Table of Contents
Advertisement
The following are trademarks registered by W.C. Bradley Co. in the U.S. Patent and Trademark Office: Caldera®; Charcoal2Go®; Char-Broil®; America's Legendary
Barbeque Company®; American Gourmet®; Bandera®; Brush Hawg®; CB 940®; Char-Diamonds®; Char-Broil Charcoal/Gas®; Everybody Grills®; Everybody
Outside®; FastStart®; Grill 2 Go®; Grill 2 Go® Express®; Grill Lovers®; Infrared Grilling That's All About U®; Keepers of the Flame®; New Braunfels Smoker
Company®; Patio Bistro®; Patio Caddie®; Patio Kitchen®; Pro-Sear®; RED®; Quantum®; Santa Fe®; Sear and Grill®; Sierra®; Signature Series®; Sure2Burn®;
The Big Easy®; Trentino®; U®; Wild West Tradition®; and the following marks:
The following are trademarks of W.C. Bradley Co.: Advantage Series™; Auto-Clean™;Chef Tested™; Commercial Series™; Designer Series™;; Diamond Flame™;
Double Chef™; Fireball™; Firenzy™; FlavorMaster™;Front Avenue™; Grill 2 Go® Advantage™; Hog and Yard Bird™; H20 Smoker™; Infrared. Grilling's Juicy Little
Secret™; Incredible Taste. Infallible Results™; Infrared Inside™; Insure™; Let's Grill Something Together™; Lev-Alert™; Longhorn™; Magneto™; Precision
Flame™; Quick2Burn™; QuickSet™; Ready When You Are™; Season, Set, And Savor™; Sizzle On The Grill™; Signature Series™; SureFire™; The Minute
Grill™;Torchfork™; Universal Grill Parts™; You Bring the Party™
Protected under one or more of the following U.S. Patents: 5,421,319; 5,458,309; 5,579,755; 5,996,573; 6,135,104; 6,279,566; 6,331,108; 6,484,900; 6,526,876; 6,595,197; 6,640,799; 6,640,803; 6,729,873; 6,739,473; 6,749,424; 6,792,935; 6,951,213; 7,047,590;
7,516,693; D364,535; D372,637; D373,701; D377,735; D383,035; D397,910; D405,643; D406,005; D406,009 ; D413,043; D413,229; D414,982; D415,388; D416,164; D416,441; D417,587; D417,588; D422,516; D423,274; D423,876; D428,303; D430,772; D435,396;
D436,004; D438,059; D438,060; D438,427; D439,110; D442,505; D443,179; D443,354; D443,464; D447,384; D447,385; D447,909; D448,610; D448,614; D448,615; D448,616; D448,975; D449,492; D450,544; D451,759; D454,028; D454,031; D455,205; D455,206;
D456,202; D456,222; D456,223; D457,789; D458,520; D458,760; D458,802; D459,088; D459,148 D459,149; D459,161; D459,163; D459,586; D459,943; D460,312; D460,313; D460,318; D461,359; D465,123; D465,693; D466,307; D466,439; D466,752; D473,414;
D474,371; D477,498; D477,501; D477,504; D477,506; D477,746; D478,471; D478,472; D480,914; D491,410; D494,009; D494,413; D498,523; D500,359; D504,048; D530,098; D535,000; Canada:D97,504;D99,355; D102,037; D104,200;D108,377; 2,315,567;
France:D010,231;D010,422;D010,590;D010,849; 1,089,646; South Korea: 384,565; United Kingdom: 2,099,402. Other Patents Pending. © 2009 W.C. Bradley Company
© 2009 Char-Broil, LLC Columbus, GA 31902
®
®
TEC™ is a trademark of Tec Infrared Grills.
Printed in China
PRODUCT GUIDE
MODEL 463230510
IMPORTANT: Fill out the product record information below.
Serial Number
See rating label on grill for serial number.
Date Purchased
For support and to register your
grill, please visit us at
www.charbroil.com
If you have questions or need
assistance during assembly,
please call 1-800-241-7548.
Estimated assembly time: 35-40 minutes
Assembly instructions © 2009
®
11/27/09 • G651-001-020801
Advertisement
Table of Contents
Troubleshooting

Related Manuals for Char-Broil 463230510


Summary of Contents for Char-Broil 463230510
- Page 1 Barbeque Company®; American Gourmet®; Bandera®; Brush Hawg®; CB 940®; Char-Diamonds®; Char-Broil Charcoal/Gas®; Everybody Grills®; Everybody Outside®; FastStart®; Grill 2 Go®; Grill 2 Go® Express®; Grill Lovers®; Infrared Grilling That’s All About U®; Keepers of the Flame®; New Braunfels Smoker Company®; Patio Bistro®; Patio Caddie®; Patio Kitchen®; Pro-Sear®; RED®; Quantum®; Santa Fe®; Sear and Grill®; Sierra®; Signature Series®; Sure2Burn®;...
-
Page 2: Table Of Contents
CAUTION For residential use only. Do not use for commercial cooking. THIS GRILL IS FOR OUTDOOR USE ONLY. CAUTION: Read and follow all safety statements, assembly instructions, and use and care directions before attempting to assemble and cook. - Page 3 Electrical Code, CSA C22.1. Keep any electrical cords and/or fuel supply hoses away from any hot surfaces. • This grill is safety certified for use in the United States and/or Canada only. Do not modify for use in any other location.
-
Page 4: Pre-Heating Grill
This typically occurs when you turn on the gas using the grill control knob before you turn on the LP tank valve. If the gas regulator safety feature activates, the grill will only reach temperatures between 250°F and 300°F even with all burners on... - Page 5 Outdoor grilling is really quite simple. You'll succeed with burgers, dogs, or steaks usually on your very first try. With experience, you will learn how to work with your grill, creating more imaginative meals all the time. This knowledge makes up the art of grilling.
- Page 6 GRILLING GUIDE – Tips & Tricks Cooking on your new grill is a hands-on experience, and it is recommended to remain outside with your grill while cooking. Grilling can be affected by many external conditions. In cold weather, you will need more heat to reach an ideal cooking temperature, and grilling may take longer.
-
Page 7: Grilling Guide
• Clean cooking grates. • Store grill in dry location. • When LP cylinder is connected to grill, store outdoors in a well ventilated space and out of reach of children. • Cover grill if stored outdoors. Choose from a variety of grill covers offered by manufacturer. -
Page 8: Use And Care
•Do not store an LP cylinder in an area where children play. LP Cylinder •The LP cylinder used with your grill must meet the following requirements: •Use LP cylinders only with these required measurements: 12" (30.5cm) (diameter) x 18" (45.7 cm) (tall) with 20 lb. (9 kg.) capacity maximum. - Page 9 •Do not smoke during leak test. •Do not use an open flame to check for gas leaks. •Grill must be leak tested outdoors in a well-ventilated area, away from ignition sources such as gas fired or electrical appliances. During leak test, keep grill away from open flames or sparks.
- Page 10 • Outdoor gas appliance is not intended to be installed in or on an RV. • Never attempt to attach this grill to the self-contained LP gas system of a camper trailer or motor home. • Do not use grill until leak-tested.
- Page 11 Safety Tips Before opening LP cylinder valve, check the coupling nut for tightness. When grill is not in use, turn off all control knobs and LP cylinder valve. Never move grill while in operation or still hot. Use long-handled barbecue utensils and oven mitts to avoid burns and splatters.
-
Page 12: Match-Lighting
Knobs lock in valves, first push in knobs and release, knobs should spring back. If knobs do not spring back, replace valve assembly before using grill. Turn knobs to LOW position then turn back to position. Valves should turn smoothly. Hose Check •... -
Page 13: Spider Alert
SPIDER ALERT! SPIDER AND WEBS INSIDE BURNER TUBE If you notice that your grill is getting hard to light or that the flame isn’t as strong as it should be, take the time to check and clean the venturi’s. VALVE... -
Page 14: Limited Warranty
LIMITED WARRANTY This warranty only applies to units purchased from an authorized retailer. Manufacturer warrants to the original consumer-purchaser only that this product shall be free from defects in workmanship and materials after correct assembly and under normal and reasonable home use for the periods indicated below beginning on the date of purchase*. -
Page 15: Parts List
PARTS LIST Key Qty Description 1 FIREBOX 5 MAIN BURNER-TUBE BURNER 1 MAIN BURNER-BAR BURNER 1 ELECTRODE, F/ TUBE BURNER 1 ELECTRODE, F/ BAR BURNER 4 CARRY OVER TUBE 1 CONTROL PANEL, MAIN 1 ELECTRONIC IGNITION MODULE 1 BUTTON, F/ IGNITION MODULE 1 SHEILD, F/ ELECTRONIC IGNITION MODULE 1 HOSE VALVE REGULATOR ASSEMBLY 7 BEZEL F/ CONTROL KNOB... -
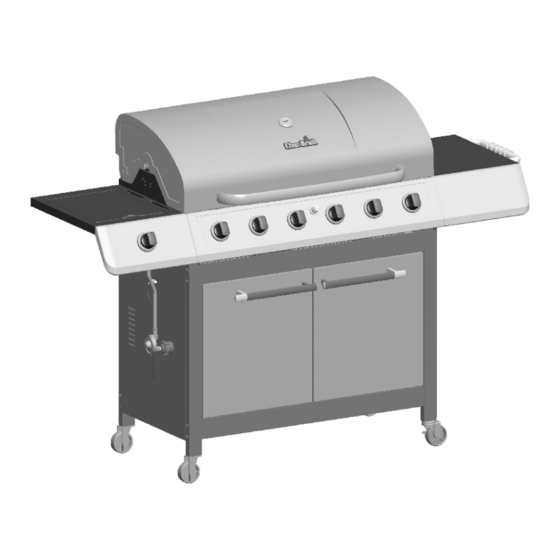
Page 16: Parts Diagram
PARTS DIAGRAM... -
Page 17: Assembly
ASSEMBLY • Place bottom shelf between side panels 1/4”-20x2-3/8” machine screws and 1/4”-20 flange nuts at front, and (2) 1/4”-20x2-3/8” machine screws and 1/4”-20 flange nuts at rear. For Front Door Brace Assembly Right Side Panel • Place lower back panel between side panels as shown. Attach to left and right side panels with (4) #8-32x3/8” sheet metal screws. - Page 18 • Hook tank exclusion wire onto the metal taps on lower back panel, attach other ends to bottom shelf with #8-32x3/8” sheet metal screws. #8-32x3/8" Sheet Metal Screws Qty. 2 • Place front door brace as shown. flange nuts. Lower Back Panel Metal Tap Attach to left and right side panels with 1/4"-20x2-3/8"...
- Page 19 • Turn assembly upside down. • Attach the two fixed casters to left leg and the two locking casters to right leg. Use the provided caster wrench to fully tighten casters. Fixed Caster Left Side Panel Caster Wrench Locking Caster Right Side Panel...
- Page 20 This step requires two people to lift and position grill head onto cart. • Carefully lower the grill head onto the cart. Make sure the regulator hose is hanging outside the cart. Attach with 1/4”-20x1/2” screws. Right side panel removed for clarity Grill Head 1/4 -20x1/2"...
- Page 21 • Attach towel bar to right side shelf with 1/4-20x1/2” Screws , 7mm lock washers and 7mm flat washers (A). • Hook side wall of shelf over support brackets on side of firebox (B). • Inside firebox attach right side shelf with (3) 7mm fire washers and 1/4-20x1/2” screws, as shown (C). At back of firebox, attach the right side shelf with (1) 7mm fire washer and 1/4-20x1/2”...
- Page 22 • Hook side wall of sideburner shelf over support brackets on side of firebox (A). • Inside firebox attach sideburner shelf with (3) 7mm fire washers and 1/4-20x1/2” screws, as shown (B). At back of firebox, attach the sideburner shelf with (1) 7mm fire washer and 1/4-20x1/2” screw, as shown (A). •...
- Page 23 • Attach sideburner bezel and valve with #8-32x3/8” SS screws. (A). • Place sideburner into shelf. Make sure valve is inside sideburner tube. Attach sideburner with #8-32 wing nut (B). Hook venturi clip to sideburner tube and around manifold. Attach sideburner ignitor wire (C). •...
- Page 24 • Attach handle to door with #10-24x1/2” machine screws, 5mm flat washers and 5mm lock washers. (A). • Insert hinge pin on bottom shelf into hole in door. Press upper hinge pin in front door brace, align hinge hole on top of door, and release hinge pin into door.
- Page 25 • Place heat tents over tube burners by inserting tabs into slots in front of firebox. Opposite ends of heat tents rest on pins in back of firebox. NOTE: There is no heat tent over bar burner. • Place cooking grates onto grate rests. •...
- Page 26 Grease Tray CAUTION Failure to install grease tray and grease pan will cause hot grease to drip from bottom of grill with risk of fire or property damage. equipped LP tank. Fill and leak-check before attaching CAUTION Failure to install tank correctly may allow gas hose to be damaged in operation, resulting in the risk of fire.
-
Page 27: Troubleshooting
Connecting Regulator to the LP Cylinder. • Turn off control knobs and LP cylinder valve. Leave lid open to allow flames to die down. After fire is out and grill is cold, remove burner and inspect for spider nests or rust. See Natural Hazard and Cleaning the Burner Assembly pages. - Page 28 • See “Match-Lighting” section of Use and Care. • Check for gas in LP cylinder. • Turn off knobs, wait 30 seconds and light grill. If flames are still low, turn off knobs and LP cylinder valve. Disconnect regulator. Reconnect regulator and leak-test. Turn on LP cylinder valve, wait 30 seconds and then light grill.
-
Page 29: Troubleshooting - Electronic Ignition
• Are output connections on • Remove and reconnect all output connections at and tight? module and electrodes. • If possible, observe grill in • If sparks are observed other than from burner(s), dark location. Operate wire insulation may be damaged. Replace wires. - Page 30 NOTES...
-
Page 31: Registration Card
Warranty Registration Department P.O. Box 1240 Columbus, GA 31902-1240...
Need help?
Do you have a question about the 463230510 and is the answer not in the manual?
Questions and answers