
Related Manuals for finder BLISS2


Summary of Contents for finder BLISS2
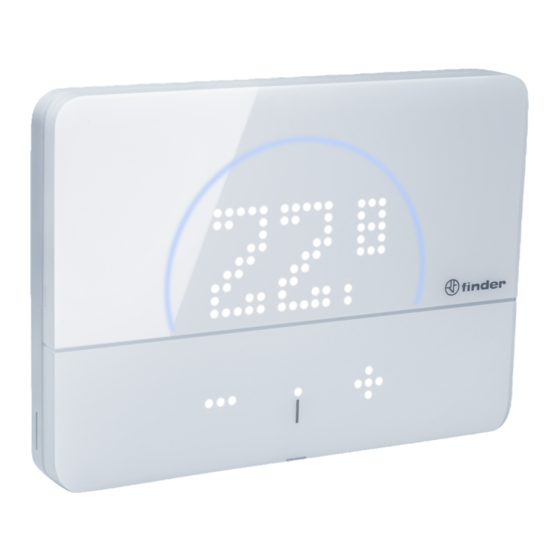
- Page 1 USER MANUAL Step-by-step guide to accessing all the functions of the Finder Bliss2 smart thermostat Type 1C.B1.9.005.0007...
-
Page 2: Table Of Contents
CONTENTS EASY INSTALLATION page 1 OVERVIEW OF SCREENS & ICONS page 3 MANUAL MODE page 4 ON/OFF MODE page 5 AUTOMATIC MODE page 6 HUMIDITY page 7 GATEWAY ASSOCIATION page 8 TRANSMISSION TEST WITH THE GATEWAY page 9 HEATING/COOLING page 10 GATEWAY SET-UP page 12... -
Page 3: Easy Installation
Smart Bliss2 thermostat. FIXING BASE Output: 5 A 250 V AC changeover volt-free contact Secure the Smart Bliss2 thermostat base to the wall using the screws Mounting: Wall included in the package. When fixing, be careful not to over-tighten the screws to avoid damaging the base. - Page 4 When done, the temperature detected by the Smart Bliss2 thermo- BATTERY INSERTION AND MOUNTING GATEWAY2 INSTALLATION stat will be displayed in the application. THE THERMOSTAT Connect the Micro USB connector to the Gateway2 (1Y.GU.005.1) and THE LUMINOUS BASE - NOTES plug the power supply into to the elecrical outlet.
-
Page 5: Overview Of Screens & Icons
OVERVIEW OF SCREENS & ICONS HUMIDITY DETECTED IN THE ROOM TEMPERATURE SETTINGS MENU Thermostat is set to AUTOMATIC ATMOSPHERE From here you can access the mode (AUTO) and will respond to device settings. In this section you can opt to programming via the App. -
Page 6: Manual Mode
MANUAL MODE With the display off, press To change the target With the target temperature To set the number of hours for which the manual mode is to apply (after which it will return to the the point to turn the temperature, press + or –... -
Page 7: On/Off Mode
ON/OFF MODE With the display off, press Press the point to The “humidity” section will be Press on the point to the point to turn the access the internal displayed as it is the first item in the confirm if you display on. -
Page 8: Automatic Mode
AUTOMATIC (AUTO) MODE With the display off, press If the thermostat is not on Press on the X to exit the current the point to turn on the AUTO, you will see the mode to return to AUTO. display. manual “hand” or the OFF symbol. -
Page 9: Humidity
HUMIDITY With the display off, press Press the point to The “humidity” section will be This screen shows the humidity (% RH). the point to turn the access the internal displayed as it is the first item Press on the X to go back. display on. -
Page 10: Gateway Association
ASSOCIATION WITH THE GATEWAY BEFORE FOLLOWING THE ASSOCIATION PROCEDURE, OPEN THE BLISS APP AND ADD A NEW DEVICE With the display off, press Press the point to The “humidity” section will be the point to turn the access the internal displayed as it is the first item display on. -
Page 11: Transmission Test With The Gateway
TRANSMISSION TEST WITH THE GATEWAY With the display off, press Press the point to The “humidity” section will be Scroll the menu to the device settings the point to turn the access the internal displayed as it is the first item icon and press the point. -
Page 12: Heating/Cooling
HEATING/COOLING ACCORDING TO THE OPERATING MODE OF THE THERMOSTAT, YOU WILL SEE DIFFERING VISUAL FEEDBACKS ON THE LUMINOUS ARC HEATING THE ARC IS RED COOLING THE ARC IS BLUE... - Page 13 INSTALLATION GUIDE 2nd GENERATION GATEWAY & BLISS2 2nd generation gateway Type 1Y.GU.005.1 & Smart Thermostat Bliss2 Type 1C.B1.005.0007 configuration steps...
-
Page 14: Gateway Set-Up
Connect the gateway to the socket using the micro USB power supply before starting the procedure. IMPORTANT The BLISS2 smart thermostat is only compatible with the second generation gateway Type 1Y.GU.005.1. The code is shown under the black silicone cover at the top of the gateway. - Page 15 After logging in to the new Bliss app, click on “Add device” to start the association Select “Bliss2” to star the association of the gateway and the thermostat.
- Page 16 Select an existing house (created with Yesly) or create a new one to define which system the gateway belongs to. Then press “Continue”. Select the time zone you are in. The default is for Italy...
- Page 17 Select “Configure a new gateway” and give it a name. Then press “Continue”. After selecting the gateway to associate, choose to connect it to the Wi-Fi network. Then press “Continue”.
- Page 18 You can choose whether to associate the gateway to the network by selecting it from those available or by scanning the QR code located behind the router. After choosing the network to associate with, the gateway will complete the association.
- Page 19 Now you need to put the Bliss2 thermostat in “connection” mode. Go to the device and make the arrows blink. Execute this procedure on the Bliss2:...
- Page 20 The gateway is now communicating with the Bliss2. Please, wait. When the procedure is over, give the Bliss2 a name.
- Page 21 Finder Bliss2 is properly paired. Now all you have to do is configure the temperature schedule and discover the rest of the functions of your new Smart Bliss2 Thermostat.
- Page 22 FINDER FRANCE Sarl FINDER P.L. Avenue d'Italie FINDER GmbH FINDER BELGIUM SRL - BV FINDER SpA ZI du Pré de la Garde Opal Way - Sto Hans-Böckler-Straße 44 Bloemendael, 5 Via Drubiaglio 14 F - 73300 ST. JEAN DE MAURIENNE...
Need help?
Do you have a question about the BLISS2 and is the answer not in the manual?
Questions and answers