Table of Contents
Advertisement
Available languages
Available languages
Quick Links
SCHLINGENTRAINER MIT UMLENKROLLE
RESISTANCE BANDS WITH PULLEY
SANGLE DE MUSCULATION AVEC POULIE
SCHLINGENTRAINER MIT
UMLENKROLLE
Gebrauchsanweisung
SANGLE DE MUSCULATION
AVEC POULIE
Mode d'emploi
CVIČEBNÍ POPRUH S KLADKOU
Návodu k použití
APARELHO DE EXERCÍCIOS COM
ROLDANA
Manual de instruções
IAN 282677
RESISTANCE BANDS WITH
PULLEY
Instructions for use
ELASTISCHE TRAINER MET
GELEIDEROL
Gebruiksaanwijzing
CINTAS DE ENTRENAMIENTO
POR SUSPENSIÓN CON POLEA
DE INVERSIÓN
Instrucciones de uso
http://qr.lidl.com/lese0jaC
1
Advertisement
Table of Contents

Related Manuals for DELTA-SPORT crivit 282677


Summary of Contents for DELTA-SPORT crivit 282677
- Page 1 http://qr.lidl.com/lese0jaC SCHLINGENTRAINER MIT UMLENKROLLE RESISTANCE BANDS WITH PULLEY SANGLE DE MUSCULATION AVEC POULIE SCHLINGENTRAINER MIT RESISTANCE BANDS WITH UMLENKROLLE PULLEY Gebrauchsanweisung Instructions for use SANGLE DE MUSCULATION ELASTISCHE TRAINER MET AVEC POULIE GELEIDEROL Mode d‘emploi Gebruiksaanwijzing CVIČEBNÍ POPRUH S KLADKOU CINTAS DE ENTRENAMIENTO POR SUSPENSIÓN CON POLEA Návodu k použití...
- Page 2 Sangle de suspension Slingtrainer Schlingentrainer Delta-Sport-Nr.: STOP Attention, entraînement en cours ! Ne pas ouvrir la porte ! Let op training! Deur niet openen! Achtung Training! Tür nicht ö nen!
-
Page 8: Table Of Contents
Inhaltsverzeichnis / Contents / Table des matieres / Inhoudsopgave Lieferumfang / Teilebezeichnung ....10 Scope of delivery / Part names ...... 18 Technische Daten ..........10 Technical data ............ 18 Bestimmungsgemäße Verwendung ....10 Correct use ............18 Sicherheitshinweise ........10 - 11 Safety notes .......... - Page 9 Obsah / Índice / Índice Rozsah dodávky / Označení dílů ....40 Contenido / Denominación de las piezas ..47 Technická data ............40 Datos técnicos ............ 47 Použití v souladu s určením ........40 Uso apropiado ..........47 Bezpečnostní pokyny ......... 40 - 41 Avisos de seguridad ........
-
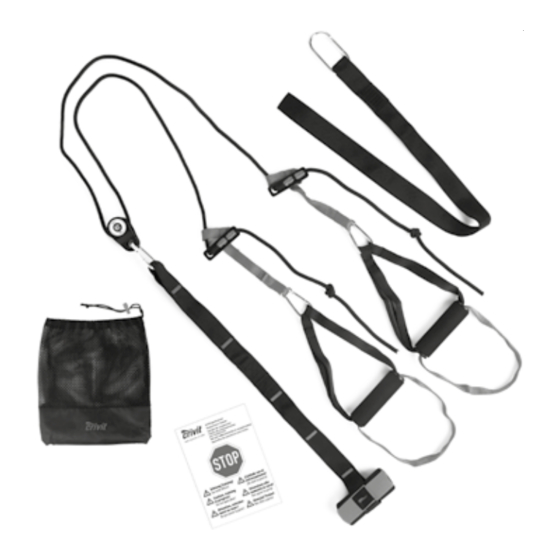
Page 10: Lieferumfang / Teilebezeichnung
Der Artikel wurde sowohl für den Gebrauch im Herzlichen Glückwunsch! Innenraum als auch im Außenbereich konzipiert Mit Ihrem Kauf haben Sie sich für einen hoch- und darf ausschließlich an Türen mit dem mit- wertigen Artikel entschieden. Machen Sie sich gelieferten Tür-Anker befestigt werden als auch vor der ersten Verwendung mit dem Artikel an Stangen, Baumästen, Haken u.ä. -
Page 11: Aufbauhinweise/Montage
Achten Sie darauf, den Artikel erst nach voll- Gefahren durch Verschleiß ständiger Montage zu verwenden. • Der Artikel darf nur in einwandfreiem Zustand • Trainieren Sie nicht, wenn Sie müde oder un- verwendet werden. Prüfen Sie den Artikel konzentriert sind. Trainieren sie nicht unmittel- vor jedem Gebrauch auf Beschädigungen bar nach Mahlzeiten. -
Page 12: Schlingentrainer Verkürzen Und Verlängern
1. Öffnen Sie dazu den Klettverschluss (2a) des • Achtung! Verletzungsgefahr! Tür-Ankers (2) und entnehmen Sie den Anker Schließen Sie die Tür immer ab! aus dem Gurtband (1) (Abb. G). • Nutzen Sie immer das mitgelieferte 2. Positionieren Sie ihn in einer der unteren Tür-Hinweisschild (10)! Schlaufen und sichern Sie den Tür-Anker an- •... -
Page 13: Umlenkrolle Anbringen
5. Fädeln Sie die Schlaufe durch die letzte Nackenmuskulatur Ankerschlaufe des Gurtbandes (1). 1. Drehen Sie Ihren Kopf langsam nach links und 6. Ziehen Sie die Schlaufe über das gesamte nach rechts. Wiederholen Sie diese Gurtband und ziehen Sie die Schlaufe fest, Bewegung vier- bis fünfmal. - Page 14 Endposition: Endposition: 3. Spannen Sie die Bauchmuskulatur an. 3. Spannen Sie den Rumpf an. 4. Ziehen Sie die Fersen zum Becken. 4. Heben Sie das Becken vom Boden an, indem 5. Gehen Sie langsam wieder in die Ausgangs- Sie die Fersen in die Fußschlaufen drücken. position zurück.
- Page 15 Endposition: Kraftzug (Abb. O) 4. Spannen Sie die Arm-, Bauch- und Länge Schlingentrainer: Mittlere Länge Gesäßmuskulatur an. Mit Umlenkrolle 5. Führen Sie kreisende Bewegungen aus, indem Ausgangsposition: Sie abwechselnd ein Bein zur Brust ziehen 1. Stellen Sie sich aufrecht hin, Sie blicken vom und das andere gerade nach hinten Befestigungspunkt weg.
-
Page 16: Qr-Code Verwenden
4. Verlagern Sie ihr Gewicht nach hinten bis Sie 2. Führen Sie den rechten Arm hinter den Kopf, sich in einem angemessenen bis die rechte Hand zwischen den Schulter- Widerstandswinkel befinden. Nur die Fersen blättern liegt. berühren den Boden, die Zehenspitzen zeigen 3. - Page 17 E-Mail: deltasport@lidl.de Service Österreich Tel.: 0820 201 222 (0,15 EUR/Min.) E-Mail: deltasport@lidl.at Service Schweiz Tel.: 0842 665566 (0,08 CHF/Min., Mobilfunk max. 0,40 CHF/Min.) E-Mail: deltasport@lidl.ch Ersatzteile zu Ihrem Artikel finden Sie auch unter: www.delta-sport.com, Rubrik Service - Ersatzteilservice Lidl DE/AT/CH...
-
Page 18: Scope Of Delivery / Part Names
Safety notes Congratulations! With your purchase you have decided on a Risk of injury! high-quality product. Get to know the product • Consult with your doctor before you begin before you start to use it. training. Make sure that you are in suitable Carefully read the following instructions health for the training. -
Page 19: Assembly Instructions
• Do not use the article for other purposes (e.g. • Inspect the article regularly for damage and as a tow or pulling rope or similar). wear. Cease use of the product if damage is • Caution! Only attach the suspension found. -
Page 20: Shortening And Lengthening The Sling Trainer
Shortening and lengthening Length of sling trainer: long Pull the bands on the sling trainer out fully so that the sling trainer the handles are approximately 7cm above the Note! Before adjustment always ensure floor. that the rope (5) is not twisted! Removing the pulley Shortening You can remove the pulley (4) from the suspen-... -
Page 21: Warming Up
Warming up End position: 3. Tense your stomach muscles. Take sufficient time before each training session 4. Pull your heels up to your pelvis. to warm up. The following includes descriptions 5. Slowly return to the starting position. of some simple exercises for this purpose. Repeat 6. - Page 22 Important: Make sure you keep your To reduce the difficulty of the exercise body tensed and retain good posture. you can support yourself on the floor Most floor exercises become more on your lower arms. This exercise difficult the further away you are from strengthens your stomach and buttock the attachment point (and vice versa).
-
Page 23: Use The Qr-Code
6. Turn your upper body to the left and move 1. Start the QR-code scanning app. your left arm past your body in order to 2. Hold your phone or tablet and use it to scan extend it out backwards. Look at your left the QR-code provided. -
Page 24: 3-Year Warranty
0871 5000 720 (£ 0.10/Min.) E-Mail: deltasport@lidl.co.uk Service Ireland Tel.: 1890 930 034 (0,08 EUR/Min., (peak)) (0,06 EUR/Min., (off peak)) E-Mail: deltasport@lidl.ie You can also find spare parts for your product at: www.delta-sport.com, category Service - Lidl Spare Parts Service GB/IE... -
Page 25: Contenu De La Livraison / Désignation Des Pièces
Consignes de sécurité Félicitations ! Vous avez acquéri un produit de haute qualité. Risque de blessure ! Apprenez à connaître le produit avant sa premi- • Veuillez consulter votre médecin avant ère utilisation. de commencer l‘entraînement. Assurez-vous Lisez pour cela attentivement le mode que votre état de santé... -
Page 26: Instructions D'installation / Montage
• Ne vous entraînez pas si vous êtes fatigué Risque causé par l‘usure ou si vous n‘êtes pas concentré. Ne vous • Cet article ne doit être utilisé que s‘il est en entraînez pas immédiatement après les repas. parfait état. Vérifiez d‘éventuels dommages Attendez environ 2 heures avant de commen- ou usures sur l‘article avant chaque utilisation. -
Page 27: Raccourcir Et Rallonger Le Système
Déplacer le point d‘ancrage • Attention ! Risque de blessure ! Si l‘élastique pour musculation est vraiment trop Fermez toujours la porte à clé ! long, vous pouvez déplacer le point d‘ancrage. • Utilisez toujours le panonceau de 1. Pour cela, ouvrez la fermeture autoagrippante porte fourni (10) ! (2a) de l‘ancre de porte (2) et sortez l‘ancre •... -
Page 28: Retirer La Poulie
Retirer la poulie Échauffement Vous pouvez retirer la poulie (4) de l‘élastique Prenez suffisamment le temps de vous échauffer pour musculation et fixer le câble (5) directe- avant chaque entraînement. Pour cela, nous vous ment à la bande (1) (fig. E). présentons ci-dessous quelques exercices simples 1. - Page 29 Indication : pour que les pieds soient plus 2. Les bras sont près du corps, les paumes à plat confortablement positionnés, poussez les sur le sol. poignées en plastique vers le haut. Position finale : 2. Les bras sont à plat près du corps. 3.
- Page 30 Position finale : Force de traction (fig. O) 4. Contractez les muscles des bras, abdominaux Longueur de l‘élastique pour musculation : et des fessiers. longueur moyenne 5. Faites des mouvements circulaires en tirant Avec poulie à tour de rôle une jambe vers le thorax et en Position de départ : tendant l‘autre droit vers l‘arrière.
-
Page 31: Utiliser Le Code Qr
4. Déplacez le poids de votre corps vers l‘arrière 3. Avec la main gauche, attrapez le coude droit jusqu‘à trouver un angle de résistance adapté. et tirez-le vers l‘arrière. Seuls les talons touchent le sol, la pointe des 4. Changez de côté et répétez cet exercice. pieds est tournée vers le haut. - Page 32 Pour être conforme au contrat, le bien doit : Veuillez trouver les pièces de rechange pour votre produit sur : www.delta-sport.com, rubrique Service - Service des pièces de 1° Etre propre à l‘usage habituellement attendu rechange Lidl d‘un bien semblable et, le cas échéant :...
-
Page 33: In Het Leveringspakket Inbegrepen / Benaming Van De Onderdelen
Veiligheidsinstructies Hartelijk gefeliciteerd! Met de aankoop hebt u gekozen voor een Gevaar voor blessures! hoogwaardig product. Maak u daarom voor • Raadpleeg uw arts voordat u met de training de eerste ingebruikname vertrouwd met het begint. Zorg ervoor dat uw gezondheid de product. -
Page 34: Opbouwinstructies/Montage
• Drink voldoende tijdens de training. • Gebruik uitsluitend originele reserveonder- • Wikkel het artikel nooit rond hoofd, hals of delen. borstkas. Wurgingsgevaar! • Bescherm het artikel tegen extreme tempera- • Gebruik het artikel niet voor andere doelein- turen, zon en vochtigheid. Een onvakkundige den (bv. -
Page 35: Slingtrainer Verkorten Of Verlengen
Aanbevolen lengte van de Montage/gebruik van de bijkomende karabijnhaak Slingtrainer Met verlengingsriem (9) kan de Sling Trainer Stel de lengte van de Slingtrainer aan stangen, boomtakken of haken gemonteerd voor elke oefening zoals hieronder worden (afb. H). Verwijder daarvoor het deuran- beschreven in: ker (2) uit de riemband (1). -
Page 36: Algemene Trainingsinstructies
2. Leg het touw over de scharnierrol (4) en 4. Draai beurtelings uw linker- en rechterarm positioneer de gaten van de scharnierrol voorwaarts en na één minuut achterwaarts. boven elkaar. Belangrijk: vergeet daarbij niet, rustig verder te ademen! 3. Steek de karabijnhaak (3) door de beide gaten van de scharnierrol en bevestig de Oefeningsvoorstellen karabijnhaak aan de riemband. - Page 37 2. Neem de plankpositie op de handen in. Eindpositie: 3. Span uw zitvlak- en buikspieren aan. Eindpositie: 4. Til het bekken in een plankpositie en neem 3. Span uw zitvlak- en buikspieren aan. deze 10 seconden lang in. 4. Trek uw knieën tot aan uw borstkas. 5.
-
Page 38: Qr-Code Gebruiken
3. Verplaats uw gewicht naar voren totdat u zich Borstkasspanning aan één zijde in een geschikte weerstandshoek bevindt. (afb. P) Uw voeten hebben alleen nog elk met de bal Lengte Sling Trainer: gemiddelde lengte van de voet contact met de grond. Met keerrol Eindpositie: Beginpositie:... -
Page 39: Verzorging En Opslag
Voer het artikel en alle bijhorende componenten via een erkend afvalverwerkend bedrijf of uw Reserve-onderdelen voor uw product vindt u ook via: www.delta-sport.com, rubriek Service - reserve-onderdelen- gemeente af. Neem de actueel geldende voor- service Lidl schriften in acht. Informeer in geval van twijfel bij uw afvalverwerkend bedrijf naar een milieuvrien- delijke afvalverwijdering. -
Page 40: Rozsah Dodávky / Označení Dílů
Bezpečnostní pokyny Srdečně blahopřejeme! Vaší koupí jste se rozhodli pro jakostní produkt. Nebezpečí úrazu! Před uvedením do provozu se nejdříve seznamte • Než začnete s tréninkem, konzultujte to se s celým produk-tem. svým lékařem. Ujistěte se, že jste pro trénink Přečtěte si pozorně... -
Page 41: Pokyny Pro Sestavení/ Montáž
• Pozor! Závěsné posilovací smyčky • Pravidelně ověřujte, zda výrobek není upevňujte výlučně na dveře! poškozen nebo opotřeben. V případě • Varování! Nebezpečí úrazu! Závěsné poškození již výrobek nesmíte používat. posilovací smyčky upevňujte výlučně Opatrně kvůli věcným škodám na dveře, které se otevírají ven •... -
Page 42: Zkracování A Prodlužování Posilovače Sling Trainer
Zkracování a prodlužování Délka posilovače: dlouhá Pásy posilovače úplně vytáhněte tak, aby posilovače Sling trainer rukojeti smyček visely cca 7 cm nad zemí. Upozornění! Před provedením úpra- Odstranění vratné kladky vy se vždy ujistěte, že lanko (5) není přetočené! Máte možnost odstranit vratnou kladku (4) ze Zkrácení... -
Page 43: Zahřátí
Zahřátí 5. Vracejte se pomalu znovu do výchozí polohy. 6. Opakujte cvik 10 krát. Před každým tréninkem si najděte dostatek času Důležité upozornění: Paty tlačte během na zahřátí. Dále pro Vás k tomu popisujeme celého průběhu pohybu pevně do několik jednoduchých cviků. Příslušné cviky byste smyček pro nohy. - Page 44 Boční plank (prkno) (obr. L) Jednostranný podpor paží (obr. N) Délka závěsného posilovače se smyčkami: Délka závěsného posilovače: Výška kolen Výška kolen S vratnou kladkou S vratnou kladkou anebo bez ní Výchozí poloha: Výchozí poloha: 1. Postavte se zpříma, hledíte směrem od 1.
-
Page 45: Používání Qr Kódu
Protahování 7. Vraťte se do výchozí polohy tím, že ohnete levou paži a povedete ji kolem těla. Po každém tréninku si udělejte čas na 8. Cvik opakujte druhou paží. protahování. Následně Vám k tomu ukážeme 9. Proveďte cvik na každou stranu 10krát. několik jednoduchých cviků. -
Page 46: Roky Záruky
Toto platí také pro náhradní a opravené díly. Opravy prováděné po vypršení záruční lhůty se platí. IAN: 282677 Servis Česko Tel.: 800143873 E-Mail: deltasport@lidl.cz Náhradní díly pro Váš výrobek najdete také na webové stránce: www.delta-sport.com, Rubrika Servis - Servis pro náhradní díly Lidl... -
Page 47: Contenido / Denominación De Las Piezas
Indicaciones de seguridad ¡Enhorabuena! Con la compra de este artículo ha adquirido un ¡Peligro de lesiones! producto de excelente calidad. • Consulte a su médico antes de empezar el Antes de utilizarlo por primera vez, fa- entrenamiento para asegurarse de que su miliarícese con él leyendo atentamente estado de salud le permite realizarlo. -
Page 48: Avisos Sobre La Construcción / Montaje
• Ventile el lugar donde entrene suficientemente La seguridad de las cintas de entrenamiento pero evite las corrientes de aire. sólo puede garantizarse si se comprueba con • Beba suficiente líquido durante el entrena- regularidad si éstas presentan daños y des- miento. -
Page 49: Acortar O Alargar Las Bandas Elásticas
• Asegúrese de que la puerta a la que fije el 2. Colóquela en una de las asas inferiores y dispositivo de anclaje de la puerta (2) posea asegure a continuación el anclaje para puer la estabilidad y resistencia necesarias para ta con el velcro del asa (fig. -
Page 50: Colocar La Polea De Inversión
6. Introduzca el lazo por toda la correa y Musculatura de la nuca apriételo firmemente de forma que se cree 1. Gire la cabeza lentamente hacia la izquierda un nudo. y hacia la derecha. Repita este movimiento Importante: Tenga cuidado de que la 4-5 veces. - Page 51 2. Los brazos permanecen a los lados del Posición de salida: cuerpo. 1. Colóquese boca arriba con los talones en las asas para los pies. Posición final: 2. Los brazos se colocan a los lados del cuerpo 3. Tense los músculos abdominales. y las palmas de las manos planas sobre el 4.
- Page 52 Bicicleta en posición de flexión 5. Acerque un brazo formando un ángulo de 90 grados hacia el cuerpo y mantenga la (fig. M) posición recta mientras lo hace. Longitud de las cintas de ejercicio: 6. Vuelva a la posición de salida volviendo a altura de las rodillas estirar el brazo flexionado.
-
Page 53: Uso Del Código Qr
Estiramiento Impulso unilateral de los pectorales (fig. P) Tómese el tiempo suficiente para estirar después Longitud de las cintas de ejercicio: mediana de cada entrenamiento. A continuación le Con polea de inversión describiremos algunos ejercicios sencillos. Posición de salida: Debería realizar cada ejercicio 3 veces por 1. -
Page 54: Garantía De 3 Años
IAN: 282677 Servicio España Tel.: 902 59 99 22 (0,08 EUR/Min. + 0,11 EUR/llamada (tarifa normal)) (0,05 EUR/Min. + 0,11 EUR/llamada (tarifa reducida)) E-Mail: deltasport@lidl.es Encontrará también recambios para su producto en: www.delta-sport.com, rúbrica Servicio - servicio de recambios Lidl... -
Page 55: Incluído Na Embalagem / Denominação Das Peças
Indicações de segurança Muitos Parabéns! Com a sua compra optou por um produto de Perigo de ferimentos! alta qualidade. Antes de o utilizar pela primeira • Consulte o seu médico antes de iniciar o vez, familiarize-se o com o produto. treino. -
Page 56: Indicações De Montagem
• Beba água suficiente durante o treino. • Proteja o artigo de temperaturas extremas, sol • Nunca enrole o artigo em redor da cabeça, e humidade. Se o artigo for usado e guarda- do pescoço ou do peito. Perigo de estrangu- do incorretamente, pode ocorrer um desgaste lamento! prematuro e eventuais ruturas na construção,... -
Page 57: Prolongar E Encurtar O Sling Trainer
Comprimento recomendado Montagem/utilização do mosquetão adicional do Sling Trainer Com o cinto de extensão (9) é possível montar Defina o comprimento do Sling Trainer as correntes de treino em barras, ramos de para cada exercício conforme descrito: árvores ou ganchos (fig. H). Para isso, remova Comprimento do Sling Trainer: curto o dispositivo de ancoragem para portas (2) do Coloque o Sling Trainer na posição mais curta... -
Page 58: Colocar A Polia
Colocar a polia Braços e ombros 1. Cruze os dedos atrás das costas e levante os Coloque a polia na sequência inversa à descrita braços com cuidado. Quando inclinar o na figura E. tronco para a frente, todos os músculos 1. - Page 59 Crunch (fig. J) Prancha lateral (fig. L) Comprimento das correntes de treino: altura dos Comprimento das correntes de treino: altura dos joelhos joelhos Com ou sem polia Com ou sem polia Posição inicial: Posição inicial: 1. Coloque os pés com os dedos virados para 1.
- Page 60 Para reduzir o grau de dificuldade Posição final: do exercício, apoie-se no solo com os 4. Contraia os músculos dos braços, abdominais antebraços. Este exercício fortalece os e glúteos. abdominais e os glúteos. 5. Puxe o braço esquerdo num ângulo de 90 graus em relação ao corpo, ao mesmo tempo Flexão unilateral (fig.
-
Page 61: Utilizar O Código Qr
2. Mova-o em círculos, primeiro num sentido e depois no outro. Também pode encontrar peças de reposição para o seu produto em: www.delta-sport.com, secção Serviço – Serviço 3. Após algum tempo, troque de pé. de peças de reposição Lidl Importante: Certifique-se de que as coxas permanecem paralelas. - Page 64 DELTA-SPORT HANDELSKONTOR GMBH Wragekamp 6 • D-22397 Hamburg Version: 02/2017 Delta-Sport-Nr.: ST-2985 IAN 282677...
Need help?
Do you have a question about the crivit 282677 and is the answer not in the manual?
Questions and answers