
Related Manuals for Abilia Progress PC


Summary of Contents for Abilia Progress PC
- Page 1 Manual English manual for Progress PC, Progress Star USB and Progress Micro USB Rev I GB...
-
Page 2: Table Of Contents
Table of Contents Introduction ....................... 4 Advantages of Progress PC ................4 Description of Progress Star USB and Progress Micro USB ......5 Install Progress PC ................... 6 Symbols ......................7 Brief Demonstration ..................7 ... - Page 3 Completed Pages ..................27 Brief Guide to Programming the Jupiter Loudspeaker Telephone with Progress PC ....................34 GewaLink channels in Progress PC ............36 Images and Symbols ..................37 BED ......................37 DVD ......................37 ...
-
Page 4: Introduction
Introduction Progress PC is a software which can be used to wirelessly control functions in the environment such as TV, video, stereo, lamps and hall telephone. Progress Star or Progress Micro that transmits the IR signals, is connected to the USB port on the computer. -
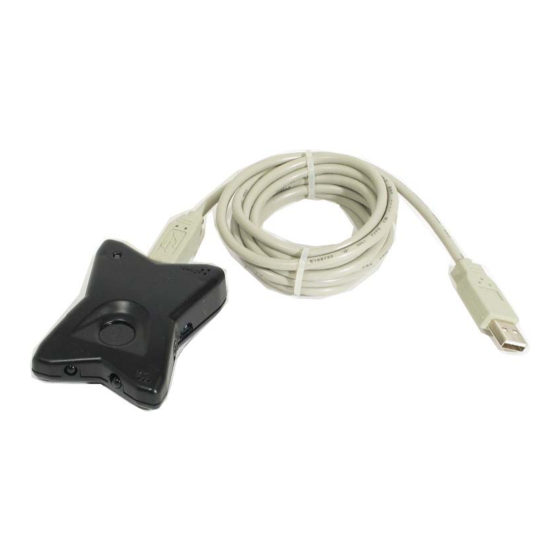
Page 5: Description Of Progress Star Usb And Progress Micro Usb
Indication LED cover If Progress PC shall be used to its full, a transmitter unit must be connected to the USB port on the computer. The transmitter unit can be either a Progress Star USB or a Progress Micro USB. When any of these transmitting units is connected all functions available in Progress PC can be used. -
Page 6: Install Progress Pc
To avoid problems when starting software and hardware it is important to follow the installation instructions. Note! Always install the software before connecting the hardware. Progress PC is compatible with Win XP, Vista, Win 7, Win 8 and Win 10. -
Page 7: Symbols
9. Start Progress PC and check that the connected transmitter unit is transmitting. Symbols The following symbols are being used in Progress PC: = Go to “Settings” = Go to “Start page” = End macro recording mode Brief Demonstration Fig 2 To get an idea of how Progress PC works look at the standard pages that are included. - Page 8 can be added, speech can be recorded, etc. Press the tools icon in order to obtain access to the Settings menu.
-
Page 9: Settings
Sometimes it is impossible for scanning users to move the window on the screen as they cannot use the mouse normally. By Progress PC it is possible to use scanning to move the window in any position. It is also possible to make the window cover the whole screen. -
Page 10: Scanning Settings
Progress PC is delivered are automatic linear scanning that is controlled by one control switch. Note! Progress PC can be adjusted such that it displays only one page at a time when scanning. In this case, each page should consist of a single button. - Page 11 Linear scanning: This can be either manual or automatic – the principle is the same in both cases. The buttons along row 1 are first stepped, and then the stepping continues along row 2, etc. Change the scanning method by the following procedure: Settings ...
-
Page 12: Control Switches
Factory default: 1 step/sec. Number of scans A scan is completed when Progress PC has stepped through a page and starts again from the beginning. The number of scans can be adjusted between 1 and Change the number of loops by the following procedure: Settings ... -
Page 13: Sound Settings
Sound Settings Sound Volume The setting of the sound volume affects all sound that Progress PC emits. This may be a tone that is heard during scanning or it may be recorded sound. The sound volume can be set between levels 0 and 5. -
Page 14: Making A Back-Up And Default Settings
Settings System Back-up Back-up Restoring a Back-up If the various settings in Progress PC have been changed but you want to enter the previous settings this is possible provided that a back-up has been made of the previous settings. See the section Making a back-up. -
Page 15: Managing Pages
If several such pages are created, Progress PC will scan through these pages. Start by creating pages with one row and one column. Then add images, sound and IR functions on these. -
Page 16: Removing A Page
Remove page Remove Adding or Removing a Row or Column It is possible to add and remove rows and columns in Progress PC. The contents of the actual buttons are removed when you remove a row or a column. -
Page 17: Changing A Page Name
“Default pages” under the name it was given when it was saved. Path: C:\Program\Gewa\Progress PC\System\Default pages. Export a page by the following procedure: Settings Pages/buttons Export page browse among the pages ... -
Page 18: Testing The Distance
Testing the Distance The distance between the remote control unit and the transmitting unit must be correct, in order to obtain good results when recording IR codes. This distance differs from one remote control unit to another, and thus you should check the distance before recording new IR codes from the remote control unit. -
Page 19: Recording Ir Codes
Recording IR Codes Progress When the best position has been determined as described above, press the Back button. Now you can choose between two different recording methods “Standard” and “Alternative”. Always start with the Right Left standard method. Press and hold down the button of the remote control unit that is to be recorded, and follow the instructions on the screen. -
Page 20: Inserting Gewalink Channels
There are 128 GewaLink channels, numbered from 0-127. These channels do not need to be recorded, they are included with Progress PC. GewaLink channels must not be confused with codes from products that are purchased in other shops, such as TVs, video machines and DVD players. -
Page 21: Creating Ir Macros
Progress PC automatically inserts text that shows which page the button leads to if the button is empty. The text can be changed or an image can be used if the text that Progress PC uses is not satisfactory. -
Page 22: Recording Sound
For example, if the function of a button is to light a lamp, Progress PC can be made to say “Lamp”. A maximum of 10 seconds can be recorded for each button. A microphone must be connected to the microphone input on the computer in order to record sound. -
Page 23: Alarm Function With A Control Switch
Alarm function on any button The alarm function can be placed on any button in Progress PC. An image and a sound signal are chosen at the same time as the function is chosen. Another image can be used if the alarm symbol is not satisfactory – see the section Adding Images on page 24. -
Page 24: Adding Images
Adding Your Own Images (Advanced) It is also possible to use your own images in Progress PC, but the procedure is slightly more complex. You should be quite used to work with a PC for this procedure. The images to be used should be approximately 100 x 100 pixels in dimension, and they should be in GIF format. -
Page 25: Clearing A Button
Writing text on a button It is possible to write text on a button and to edit it in Progress PC. The width of the input field depends on the size of the button. The number of lines of text that can be written depends on the size of the button. -
Page 26: Miscellaneous Topics
Miscellaneous Topics Checking the Version Progress PC has three different forms of version identification: 1. The software of the user interface. 2. The software, called Guix, for communication between the user interface and Windows. 3. The software for the transmitting unit. -
Page 27: Completed Pages
The following completed pages are delivered with Progress PC. Select a completed page as required and add it using the Settings page in Progress PC. Once a page has been added, it is easy to add or remove functions. Many of the pages already have IR channels set up, for example, for controlling the Gewa Jupiter loudspeaker telephone. - Page 28 BED 8 FUNC CD-CHANGER + CD-CHANGER Bed control with up to 8 CD-changer. Short-cuts CD-changer functions. Some lamps, on the upper row. etc. DVD+ CD control. Can be used DVD control. Short-cuts DVD control. Included with a HiFi-page. on the upper row. as a standard page on delivery.
- Page 29 HIFI 2 + HIFI 2 HIFI Control of HiFi with radio, Control of HiFi with Control of HiFi-unit. CD and tape player. radio, CD and tape Can link to CD, radio Short-cuts on the upper player. Included as a and tape player. row.
- Page 30 JUP DIAL GL 96-127+ JUP DIAL GL 96-127 JUP DIR KEY ALT 7+ Ring individual Ring individual Direct dialling buttons numbers with Jupiter. numbers with Jupiter. for Jupiter. Set Jupiter to Set Jupiter to use Set Jupiter to use use GewaLink 16-31, or GewaLink 96-127.
- Page 31 JUP DIR KEY GL 34- JUP DIR KEY GL 34-47 JUP DIR KEY GL 96- 127+ Direct dialling buttons Direct dialling buttons Direct dialling buttons for Jupiter. Set Jupiter for Jupiter. Set Jupiter to for Jupiter. Set Jupiter to to use GewaLink 16-47. use GewaLink 16-47.
- Page 32 TAPE TUNER TV SIMPLE+ CD control. Can be Radio control. Can be Simple TV control. The used together with a used together with a Text-TV button can be HiFi-page. HiFi-page. used for linking to Text- TV. Short-cuts on the upper row. TV SIMPLE TV TEXT + TV TEXT...
- Page 33 TV + TV+DECODER+ S imple TV-page. Short- Simple TV-page. Control of TV and cuts on the upper row. decoder. Short-cuts on the upper row. TV+DECODER VCR + DVD control. Simple page for a video Simple page for a video player. Short-cuts on player.
-
Page 34: Brief Guide To Programming The Jupiter Loudspeaker Telephone With Progress Pc
This page functions with Gewa Jupiter's factory defaults. Restore Jupiter to the factory defaults by the following procedure: 1. Add this page to Progress PC. 2. Go to this page, which allows the user to control Jupiter, in Progress PC. 3. Press on Jupiter. - Page 35 2. Go to the page entitled JUP DIAL 96-127, which allows the user to control Jupiter, in Progress PC. 3. Press on Jupiter. 4. Press and hold down on Progress PC for 5 seconds, until the indicator lamp on Jupiter flashes red. 5. Press within 3 seconds on Jupiter. 6. Press on Jupiter.
-
Page 36: Gewalink Channels In Progress Pc
GewaLink channels in Progress PC The following GewaLink channels have been used in completed pages. Bed control Equivalent GL 64-71 buttons on Gewa Prog III, IR-17SP ٭ Duocom Jupiter Lamps Jupiter Hall Telephone Window Telephone telephone GL 16-47 openers GL 96-127... -
Page 37: Images And Symbols
Images and Symbols The following images and symbols are included with Progress. All the images are grouped into various categories. -
Page 38: Hifi
HIFI... -
Page 39: Numbers
NUMBERS SYMBOLS... -
Page 40: Pictograms
PICTOGRAMS TELEPHONE... -
Page 43: Specifications For Progress Star And Progress Micro
USB port The Medical Device Directive Progress PC, Progress Star USB and Progress Micro USB are marketed as technical aids for persons with disabilities and it satisfies the requirements of the Medical Device Directive 93/42/EEC. This includes, for example, relevant... - Page 45 Abilia AB, Kung Hans väg 3, Sollentuna, Box 92, 191 22 Sollentuna, Sweden Phone +46 (0)8-594 694 00 | Fax +46 (0)8-594 694 19 | info@abilia.se | www.abilia.org.uk 808592 Manual Progress PC GB RevI Sep 2015...
Need help?
Do you have a question about the Progress PC and is the answer not in the manual?
Questions and answers