Table of Contents
Advertisement
Quick Links
Gas built-in cooking hob
Dear Buyer,
This electric built-in cooktop is manufactured for
household use.
Our appliances are packed in the environmentally
friendly materials which may be recycled,
deposited or destroyed without any hazard to the
environment. Such packaging materials are also
labeled accordingly.
Once the life cycle your appliance is over, make
sure not to pollute the environment, and deliver it
to the authorized collectors of old household
appliances
Safety precautions ......................................... 23
Technical information .................................. 23
Cleaning and maintenance ........................... 25
Troubleshooting guide .................................. 26
22
Instructions for Use, Building- in and Connecting
Instructions for use
Instructions for use have been prepared for the
user, and describe the appliance and the way it is
handled. These instructions are intended for
various types of the appliance, so you may find
some descriptions for the functions that your
particular appliance may not have.
Instructions for connecting the
appliance
The connections must be carried out in
accordance with the instructions supplied with the
appliance, and in compliance with the recognized
standards.
Connections must be performed by qualified
personnel only.
Rating plate
Rating plate with the basic information is fixed to
the bottom side of the hob.
Installation instructions ................................ 27
Caution !
GB IE MT
Advertisement
Table of Contents

Related Manuals for Gorenje GMS 66 E


Summary of Contents for Gorenje GMS 66 E
-
Page 1: Table Of Contents
Gas built-in cooking hob GB IE MT Dear Buyer, Instructions for use This electric built-in cooktop is manufactured for Instructions for use have been prepared for the household use. user, and describe the appliance and the way it is handled. These instructions are intended for Our appliances are packed in the environmentally various types of the appliance, so you may find friendly materials which may be recycled,... -
Page 2: Safety Precautions
Safety precautions • To avoid any possible hazard, the appliance may • Never use the appliance for heating of the room. • In case of any detected malfunction immediately be installed by qualified personnel only. • Operation of gas burners normally releases heat disconnect the appliance from the mains supply and humidity into the room, so that the location in and call the service. -
Page 3: Safety Cautions In Regard To The Cooking Zones
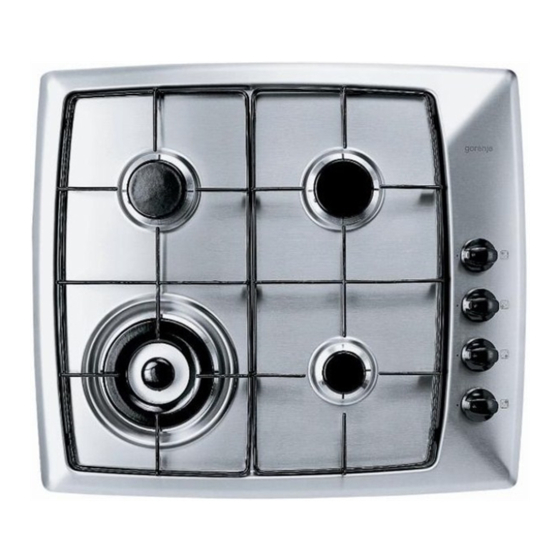
Description of the appliance Cooking burners are controlled by the relevant Ignition and operation of burners control knobs. Heating power is indicated on the knobs by the large flame symbol and the small Gas burners may be ignited by means of electric flame symbol. -
Page 4: Cookware
To facilitate positioning small dishes on the The wire grid is used for dishes with small burner grid, place the attached support extension diameter. Place the grid over the auxiliary burner over the auxiliary burner crown. Cookware Burner type Dish diameter Large (3,0kW) 220-260 mm Selection of the adequate dish size ensures... -
Page 5: Troubleshooting Guide
Troubleshooting guide Repairs may be done by qualified personnel only. Important Any unskilled attempt to repair the appliance is extremely dangerous. If the malfunction of the appliance was caused by Before attempting any repairs disconnect the the improper use, the service visit during the appliance from the mains by removing the fuse or warranty period is not free of charge. -
Page 6: Installation Instructions
Installation instructions of the element must have an opening of no less Caution ! than 6 mm. • To avoid any possible hazard, the appliance may be installed by qualified personnel only. • Panels and furniture lining of the kitchen cabinet receiving the hob must be treated with temperature resistant adhesives (100°C), otherwise they might be discoloured or... -
Page 7: Connecting The Cooktop To The Gas Supply
Connecting the cooktop to the mains power supply • Mains lead behind the cooker must be placed in Open the connector by means of screwdriver and slightly push it downwards. such manner to avoid touching the back panel Electric connection may be carried out by of the cooker because of the heat it develops during operation. -
Page 8: Conversion To Another Type Of Gas
Gas connection joint Triple-ring burner (fig.2) A R1/2 EN ISO 10226-1 / -2 or EN ISO 228-1 5 nozzles (Depending on the country-specific connection regulations.) connection B Nonmetal gasket of thickness 2 mm C Pipe extension for liquid gas (Depending on the country-specific connection regulations.) Setting elements To provide access to the setting elements:... -
Page 9: Nozzle Chart
Nozzle chart Type of gas, Auxiliary burner Normal burner Large burner Triple burner pressure Standard Fast Wobe number 0,36 0,36 1,90 0,46 0,76 1,56 Natural gas H Nominal heat input (kW) Wo=45,7÷ 95,21 34,4 95,21 34,4 180,9 43,8 285,64 72,4 333,2 148,5 54,7 MJ/ m...
Need help?
Do you have a question about the GMS 66 E and is the answer not in the manual?
Questions and answers