
Related Manuals for pro.point 200A


Summary of Contents for pro.point 200A
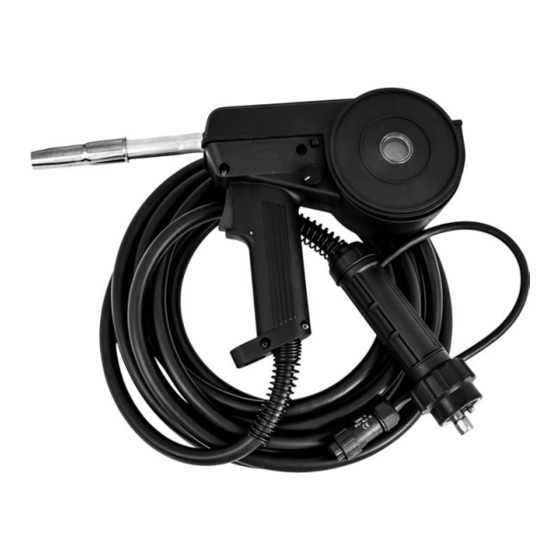
- Page 1 V1.0 8612517 200A SPOOL GUN KIT USER MANUAL Please read and understand all instructions before use. Retain this manual for future reference.
-
Page 2: Specifications
Drive Roller 0.30 and 0.35 in. INTRODUCTION The Pro.Point 200A Spool Gun Kit has an interchangeable torch neck with standard Tweco® 2 style consumables and a Euro connector for the welding machine. Fits straight on Pro.Point MIG series machines or any welding machine equipped with a Euro connector. -
Page 3: Hazard Definitions
V1.0 200A SPOOL GUN KIT 8612517 HAZARD DEFINITIONS Please familiarize yourself with the hazard notices found in this manual. A notice is an alert that there is a possibility of property damage, injury or death if certain instructions are not followed. -
Page 4: Assembly And Installation
8612517 200A SPOOL GUN KIT V1.0 Remove the parts and accessories from the packaging and inspect for damage. Make sure that all items in the parts list are included. Contents: • Spool Gun with assembled Contact Tip, Torch Nozzle, Gas Diffuser and Insulator. - Page 5 V1.0 200A SPOOL GUN KIT 8612517 Connect the spool gun to the Euro torch connection socket on the front panel, and tighten it. A loose connection can result in the connector arcing and damaging the machine and gun connector (Fig. 1-4).
- Page 6 8612517 200A SPOOL GUN KIT V1.0 12. Align the wire into the groove of the drive roller and release the tension arm. Check that the wire is in the drive roller’s groove. 13. Apply an adequate amount of pressure to the drive roller by winding in the tension adjusting knob (Fig.
-
Page 7: Care And Maintenance
V1.0 200A SPOOL GUN KIT 8612517 CARE & MAINTENANCE Maintain the tool with care. A tool in good condition is efficient, easier to control and will have fewer problems. Inspect the tool components periodically. Repair or replace damaged or worn components. Only use identical replacement parts when servicing. -
Page 8: Parts Breakdown
8612517 200A SPOOL GUN KIT V1.0 PARTS BREAKDOWN PARTS LIST DESCRIPTION Upper-Gun Case Trigger Switch Speed Adjusting Knob Potentiometer Open/Close Button Push Roll Left-Gun Case Conducting Board Hang Hook Conducting Tube Spring Support Welding Cable Motor Spring Support (Back) Motor Plate... - Page 9 V1.0 200A SPOOL GUN KIT 8612517 Visit www.princessauto.com for more information...
- Page 10 8612517 200A SPOOL GUN KIT V1.0 For technical questions call 1-800-665-8685...
- Page 11 V1,0 8612517 TROUSSE DE PISTOLET À BOBINE DE 200 A MANUEL D'UTILISATEUR Vous devez lire et comprendre toutes les instructions avant d'utiliser l'appareil. Conservez ce manuel afin de pouvoir le consulter plus tard.
-
Page 12: Spécifications
2 standard TwecoMD et un connecteur Euro pour la machine à souder. S'installe directement sur les appareils de la série MIG de Pro.Point ou sur toute machine à souder équipée d'un connecteur Euro. Il est nécessaire d'utiliser un adaptateur pour utiliser le pistolet à... -
Page 13: Consignes De Sécurité Spécifiques
V1,0 TROUSSE DE PISTOLET À BOBINE DE 200 A 8612517 Conservez ce manuel qui contient les avertissements de sécurité, les précautions, les instructions de fonctionnement ou d'inspection et d'entretien. DÉFINITIONS DE DANGER Veuillez-vous familiariser avec les avis de danger qui sont présentés dans ce manuel. -
Page 14: Assemblage Et Installation
8612517 TROUSSE DE PISTOLET À BOBINE DE 200 A V1,0 Utilisez le bon outil pour la tâche à effectuer. Cet outil a été conçu pour une utilisation spécifique. Évitez de modifier ou d'altérer cet outil ou de l'utiliser à une fin autre que celle pour laquelle il a été... - Page 15 V1,0 TROUSSE DE PISTOLET À BOBINE DE 200 A 8612517 4. Insérez la fiche du câble de mise à la terre dans la prise négative située sur la partie avant du boîtier, puis serrez (fig. 1-3). Raccordez le fil d'alimentation de soudure à la prise positive (fig.
- Page 16 8612517 TROUSSE DE PISTOLET À BOBINE DE 200 A V1,0 10. Placez la bobine de fil dans le support de bobine (fig. 3-1). L'écrou de retenue de la bobine a un filetage à gauche. Tournez dans le sens horaire pour l'enlever. Tenez et coupez le fil de la bobine en veillant à...
-
Page 17: Soin Et Entretien
V1,0 TROUSSE DE PISTOLET À BOBINE DE 200 A 8612517 14. Réglez la tension du support de bobine à l'aide du bouton (fig. 5-2). 15. Retirez la buse de gaz et l'embout de contact du col de chalumeau. Appuyez sur la détente pour entraîner le fil dans le col jusqu'à... - Page 18 8612517 TROUSSE DE PISTOLET À BOBINE DE 200 A V1,0 4. Utilisez seulement des accessoires conçus pour être utilisés avec cet outil. Gardez les poignées de l'outil propres, sèches et exemptes d'huile ou de graisse en tout temps. Veillez à ce que l'étiquette et la plaque signalétique demeurent intactes sur l'outil.
-
Page 19: Liste Des Pièces
V1,0 TROUSSE DE PISTOLET À BOBINE DE 200 A 8612517 RÉPARTITION DES PIÈCES LISTE DES PIÈCES DESCRIPTION Support de ressort PIÈCE Moteur Bouton de réglage de Plaque de moteur vitesse Vis de suspension Bouton d'ouverture/ Ensemble de rouleau fermeture de fil Étui d'arme gauche Mamelon de fil Crochet suspendu... - Page 20 8612517 TROUSSE DE PISTOLET À BOBINE DE 200 A V1,0 DESCRIPTION Tube conducteur PIÈCE Câble de soudage Étui d'arme droit Support de ressort Étui d'arme supérieur (arrière) Interrupteur à Support d'adaptateur gâchette Écrou de support Potentiomètre d'adaptateur Dispositif pousser- Adaptateur rouler Fiche à...
Need help?
Do you have a question about the 200A and is the answer not in the manual?
Questions and answers