Table of Contents
Advertisement
Quick Links
130A ARC
WELDER
53084
These instructions accompanying the product are the original instructions. This document is part of the product,
keep it for the life of the product passing it on to any subsequent holder of the product. Read all these instructions
before assembling, operating or maintaining this product.
This manual has been compiled by Draper Tools describing the purpose for which the product has been designed,
and contains all the necessary information to ensure its correct and safe use. By following all the general safety
instructions contained in this manual, it will ensure both product and operator safety, together with longer life of the
product itself.
All photographs and drawings in this manual are supplied by Draper Tools to help illustrate the operation of the
product.
Whilst every effort has been made to ensure the accuracy of information contained in this manual, the Draper
Tools policy of continuous improvement determines the right to make modifications without prior warning.
Advertisement
Table of Contents

Related Manuals for Draper stormforce 53084


Summary of Contents for Draper stormforce 53084
- Page 1 All photographs and drawings in this manual are supplied by Draper Tools to help illustrate the operation of the product.
-
Page 2: Explanation Of Symbols
INTRODUCTION Danger of ultraviolet radiation. 1.1 SCOPE AC welding machine suited to light repair and fabrication work. Danger of burning splashes. This product is intended for domestic and infrequent light trade use only. Any application other than that it was intended for, is considered misuse. This product is not a toy and must not be used by Fan cooled. -
Page 3: Specification
Make sure that the plug and power cable are in good condition. European conformity. Before plugging into the power socket, make sure that the welding machine is switched off. SPECIFICATION Switch the welding machine off and pull the plug out of the power socket as soon as you have finished working. -
Page 4: Unpacking And Checking
Fig A. If any part is damaged coming into contact with welding equipment. or missing, please contact the Draper Help Line (see This welding machine satisfies the requirements of back page). Do not attempt to use the product! -
Page 5: Assembling The Welder
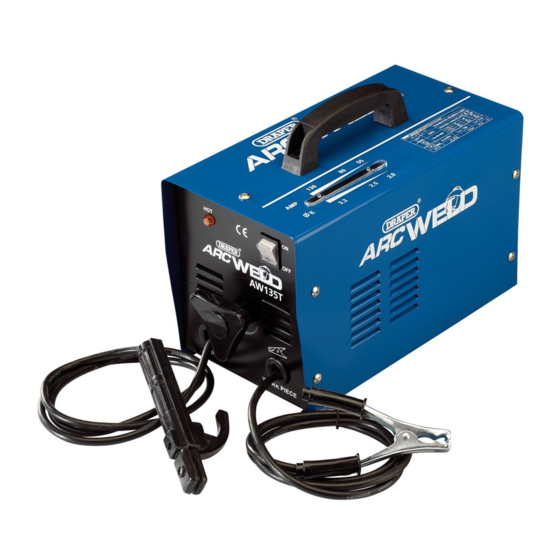
IDENTIFICATION – FIG.A (1) Carry handle (6) Electrode holder (2) Welding current indicator (7) Direct fit earth clamp (3) On/off switch (8) Face mask (4) Thermal overload indicator (9) Brush/hammer (5) Current adjustment control FIG.A ASSEMBLING THE frequency corresponding to the welding machine and that it is fitted with a delayed fuse suited to the maximum WELDER delivered rated current. - Page 6 SETTING THE WELDER Data plate on the welding machine. (A) Constructor name and machine part No. (B) Delivered alternate current frequency. (C) Serial number (D) European reference standard for the construction and safety of welding equipment. (E) WELDING CIRCUIT PERFORMANCE Minimum and maximum open circuit voltage (open welding circuit).
-
Page 7: Thermal Cutout Signal
presence of gas, vapours, conductive powders (e.g. iron SETTING THE WELDER shavings), brackish air, caustic fumes or other agents that could damage the metal parts and electrical NOTE: Once you have put the welding machine into insulation. operation, switch it on and carry out the required NOTE: The electric parts of the welder have been adjustments. -
Page 8: Maintenance And Troubleshooting
This warranty applies in lieu of any other warranty expressed or implied and variations of its terms are not authorised. Your Draper warranty is not effective unless you can produce upon request a dated receipt or invoice to verify your proof of purchase within the warranty period.
Need help?
Do you have a question about the stormforce 53084 and is the answer not in the manual?
Questions and answers