Table of Contents
Advertisement
Quick Links
Advertisement
Table of Contents
Troubleshooting

Subscribe to Our Youtube Channel
Related Manuals for LUMENIS smart532


Summary of Contents for LUMENIS smart532
- Page 1 Solid-State 532-nm Green Laser O p e r a t o r M a n u a l...
- Page 2 This manual is copyrighted with all rights reserved. Under copyright laws, this manual may not be copied in whole or in part or reproduced in any other media without the express written permission of Lumenis. Permitted copies must carry the same proprietary and copyright notices as were affixed to the original.
- Page 3 Lumenis provides web-based collection, recycling and reporting arrangements to the business end-user for equipment marked with the crossed-out wheelie bin. Please visit www.lumenis.com/Homepage/About2/Recycle...
-
Page 5: Table Of Contents
™ Smart532 Table of Contents Table of Contents CHAPTER 1 Overview Page 1.1. Introduction ............................1-1 1.2. Scope of This Manual ........................1-1 1.3. Manual Conventions .......................... 1-2 1.4. Physician Responsibility ........................1-3 1.5. Maintenance ............................1-3 1.6. Modification of the Device ........................ 1-3 1.7. - Page 6 CHAPTER 3 System Description Page 3.1. Introduction ............................3-1 3.1.1. Characteristics of the 532-nm Green Laser Beam ............... 3-1 3.1.2. Smart532 Laser System Components ..................3-2 3.1.2.1. Laser Console ........................3-3 3.1.2.2. Remote Interlock Connection Plug ................. 3-3 3.1.2.3. Footswitch ........................3-3 3.1.2.4.
- Page 7 ™ Smart532 Table of Contents 4.5.3. Connect the Main Power Cable ....................4-8 4.5.4. Connect a Delivery System ......................4-9 4.5.5. Eye Safety Filters ........................4-10 4.5.5.1. Installing the Eye Safety Filter(s) ................. 4-10 4.5.5.2. Connecting an Automatic Eye Safety Filter to the Laser ..........4-10 4.5.5.3.
- Page 8 6.2.2. Internal Power Meter Test ......................6-3 6.3. Warranty Information ........................6-4 6.4. Decontamination of Returned Equipment ..................6-4 6.5. Lumenis Customer Support ....................... 6-4 6.6. Troubleshooting Guide ........................6-5 APPENDIX A Clinical Guide Page A.1. General Information ..........................A-1 A.1.1.
- Page 9 ™ Smart532 Table of Contents A.4. Treatment Parameters in Ophthalmology ....................A-8 A.4.1. Parameters in continuous waveform (CW) ................A-9 A.4.2. Parameters in SmartPulse ..................... A-10 A.5. Posterior Segment Laser Procedures ....................A-11 A.5.1. Adverse Effects and Complications ..................A-11 A.5.2.
- Page 10 Figure 2-2: System Regulatory Labels ......................2-15 Figure 3-1: Smart532 Laser System Components ..................3-2 Figure 3-2: Smart532 Laser System – Front Panel ..................3-4 Figure 3-3: Smart532 Laser System – Rear Panel ..................3-5 Figure 3-4: Touch-Screen LCD Control Panel ....................3-6 Figure 4-1: Physical Dimensions ........................
- Page 11 List of Tables Table 6-1: Troubleshooting Guide: Error Messages with Corrective Actions ..........6-5 Table 6-2: Troubleshooting Guide: Error Messages Requiring Contact with Lumenis Service ..... 6-7 Table 6-3: Undisplayed System Malfunctions Troubleshooting Guide ............6-8 Table A-1: Typical Treatment Parameters for Ophthalmic Applications ............A-9 Table A-2: Several Examples of Repetitive Waveform Parameters ............
- Page 12 ™ Table of Contents Smart532 TOC-8 UM-1151440EN, Rev. C, May 2016...
-
Page 13: Introduction
Complete and detailed lists of the system's clinical indications appear in Appendix A of this manual – Clinical Guide. The Smart532 laser system is shipped directly from the factory to your site. A Lumenis-certified field engineer will initially uncrate, inspect, set up and install the laser to ensure that it is ready for use. -
Page 14: Manual Conventions
™ Overview Smart532 Chapter 3: System Contains a detailed overview of the Description system and its various components, controls, displays and connections. Includes detailed specifications of all facets of the system. Chapter 4: System Lists electrical, space and environmental Installation and... -
Page 15: Physician Responsibility
Changes or modifications not expressly approved by the manufacturer could void the user’s authority to operate the equipment. If any Lumenis device is resold by anyone other than an authorized sales 1.7. Resale Inspection representative, Lumenis offers a resale inspection by a Lumenis technician to assure that the device is working in accordance with manufacturer’s... -
Page 16: Abbreviations And Acronyms
™ Overview Smart532 µm Microns 1.8. Abbreviations and Acronyms °C Degrees Celsius Centimeters squared °F Degrees Fahrenheit ANSI American National Standards Institute European Directives Compliance Marking Code of Federal Regulations Centimeters Federal Communications Commission (USA) Food & Drug Administration (USA) -
Page 17: Laser Safety And Regulatory Page
Smart532 laser system. 2.2. Training and Caution Institutional No one should use the Smart532, or any other medical laser, Requirements without specific training in both medical laser use and laser safety. Both operator and safety training is available from Lumenis. Contact your Lumenis representative to inquire about seminars in your area. -
Page 18: Laser Safety Officer
™ Laser Safety and Regulatory Smart532 Large institutions are following the prescriptions of ANSI 136.3 and 2.2.1. Laser Safety EN 207 by setting up Laser Safety Committees and appointing Laser Officer Safety Officers to manage laser use. Even the smallest office should have one person to act in the capacity of Laser Safety Officer. -
Page 19: Laser Treatment/Operating Area
3. The operating area is occupied only by authorized personnel. 4. Appropriate warning signs are posted in the operating area and just outside of it. The Smart532 is a Class IV laser; the door warning sign for the Smart532 is shown in Figure 2-1. -
Page 20: Laser Safety Eyewear
For additional information, refer to ANSI Z136.1-2014, ANSI Z136.3-2011, or International Standard IEC 60825-1: 2014. The following formula was used to calculate the worst case NOHD for Lumenis Smart532 lasers and compatible delivery systems: Where: the distance of the beam waist from the laser system;... - Page 21 ™ Smart532 Laser Safety and Regulatory Using this approach we derive the following values: θ (rad) Φ (W) MPE (W/cm a (cm) Z (cm) LaserLink HS 0.020 0.00137 0.050 LaserLink Z 0.010 0.00137 0.100 LIO Keeler 0.024 0.00137 0.096 LIO Heine 0.022...
-
Page 22: Additional Ocular Protection
™ Laser Safety and Regulatory Smart532 Laser safety eyewear must also be resistant to physical damage or photo- bleaching resulting from laser exposure as per ANSI Z136.1-2007, section 4.6.2 and Appendix C. For operators who must comply with EN 207, the safety eyewear must have a protection class of LB6. -
Page 23: Additional Safety Considerations
Do not use the laser or delivery system if aiming and treatment beams are not coincident; contact your local Lumenis representative. Misalignment of aiming and treatment beams may result in laser exposure to non-target tissues and possible injury. -
Page 24: Fire Hazards
Tomography (CT), Diathermy, Radio Frequency Identification (RFID) and electromagnetic security systems (e.g., metal detectors) ● Lumenis medical lasers and laser delivery systems are intended solely for physicians trained in the use of these instruments Personnel in operating rooms, private and out-patient clinics should be 2.5. -
Page 25: Electrical Hazards
™ Smart532 Laser Safety and Regulatory Because the Smart532 contains high-voltage components, there is a danger 2.6. Electrical Hazards of severe shock if its covers are taken off by other than trained personnel. To guarantee both operator and patient safety, operator service is limited to the items described in the Maintenance chapter of this manual. -
Page 26: Grounding The System
Smart532 system. 2.7. Operating Safety Cautions & Warnings Training – do not use the Smart532 laser system in clinical, office or 2.7.1. Cautions surgical procedures unless you have been trained: ●... -
Page 27: System Safety Features
™ Smart532 Laser Safety and Regulatory The Smart532 laser system is equipped with various built-in safety 2.8. System Safety features to provide maximum protection for both clinician and patient. Features Before using the system for the first time, become familiar with these features and how they operate. -
Page 28: Laser Emergency Stop Button
™ Laser Safety and Regulatory Smart532 This red knob is designed for emergency shut-down of laser energy 2.8.6. Laser Emergency emission. When pressed it immediately disables the laser. Stop Button To disengage the emergency shut-off button, press it again. 2.8.7. Continuous The system's computer continually monitors internal system status. -
Page 29: Compliance With International Standards
Annex II of the European Medical Device Directive MDD 93/42/EEC. The Smart532 laser system is classified as Class IV lasers by the Center for Devices and Radiological Health of the Food and Drug Administration and as Class 4 by the International Standard IEC 60825. - Page 30 ™ Laser Safety and Regulatory Smart532 ● ISO 10993-1: Biological Evaluation of Medical Devices Part 1: Evaluation and Testing in the Risk Management Process. ● RoHS: Restriction of Hazardous Substances DIRECTIVE 2011/65/EU. ● REACH: Registration, Evaluation, Authorization and Restriction of Chemicals.
-
Page 31: Warning, Certification And Identification Labels
™ Smart532 Laser Safety and Regulatory Figure 2-2 displays the labels affixed to the system: 2.11. Warning, Certification and 1. Identification and Certification – the label contains the following Identification information: Labels ● System's model name and part number. ●... -
Page 32: Figure 2-2: System Regulatory Labels
™ Laser Safety and Regulatory Smart532 Figure 2-2: System Regulatory Labels 2-16 UM-1151140EN, Rev. C, May 2016... -
Page 33: Symbol Descriptions
™ Smart532 Laser Safety and Regulatory The following table provides a key to the symbols displayed on the 2.12. Symbol Smart532 laser system: Descriptions Symbol Description Danger: Laser Radiation Emergency Stop Type B Equipment Type BF Equipment Follow Instructions for Use... - Page 34 ™ Laser Safety and Regulatory Smart532 Symbol Description Electrical and Fuses Requirements Auxiliary Monitor Connection Port Service (Ethernet) Connection Port USB Connection Port Footswitch Connection Port Eye Safety Filter Connection Port LIO Connection Port Pattern Link Connection Port Remote Interlock Connection Port Water Ingress Protection Level –...
- Page 35 Guidance and Manufacturer’s Declaration – Electromagnetic Emissions The Smart532 is intended for use in the electromagnetic environment specified below. The customer or the user of the Smart532 should assure that it is used in such an environment. Emissions test Compliance Electromagnetic Environment –...
- Page 36 2.13.2 Electromagnetic Immunity Guidance and Manufacturer's Declaration - Electromagnetic Immunity The Smart532 is intended for use in the electromagnetic environment specified below. The customer or the user of the Smart532 should assure that it is used in such an environment.
- Page 37 Smart532 is used exceeds the applicable RF compliance level above, the Smart532 should be observed to verify normal operation. If abnormal performance is observed, additional measures may be necessary, such as re-orienting or relocating the Smart532. b Over the frequency range 150 kHz to 80 MHz, field strengths should be less than [V1] V/m.
- Page 38 Recommended separation distances between portable and mobile RF communications equipment and the M22 with ResurFX The Smart532 is intended for use in an electromagnetic environment in which radiated RF disturbances are controlled. The customer or the user of the Smart532 can help prevent electromagnetic interference by...
-
Page 39: System Description Page
Chapter 3 System Description The Smart532-nm green laser system is indicated for ophthalmic 3.1. Introduction applications; ear, nose and throat applications; dentistry and dermatologic applications. Complete and detailed lists of the system's clinical indications appear in Appendix A of this manual – Clinical Guide. -
Page 40: Smart532 Laser System Components
™ System Description Smart532 The Smart532 laser system is comprised of (see Figure 3-1): 3.1.2. Smart532 Laser System 1. A laser console with a touch-screen control panel. Components 2. All electrical cables necessary for proper connection. 3. Remote interlock connection plug. -
Page 41: Laser Console
3.1.2.4. Delivery Systems Delivery systems for a variety of applications may have been shipped with your Smart532 laser system laser. Refer to the operator manuals included with those delivery systems for specific descriptions and operating instructions. -
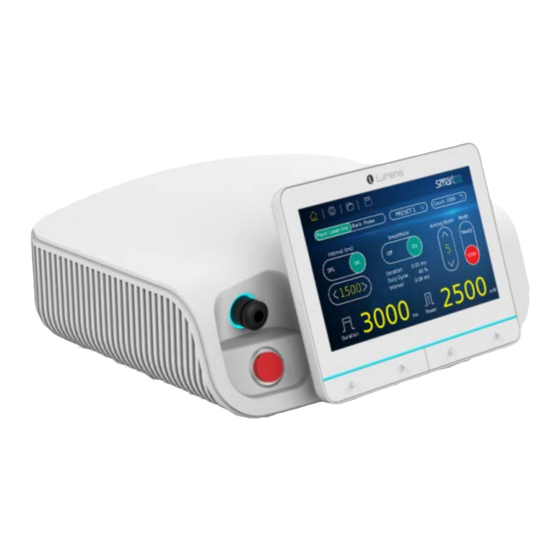
Page 42: System Description - Front Panel
™ System Description Smart532 The front panel of the Smart532 laser system is shown in Figure 3-2. 3.1.3. System Description – Front Panel Figure 3-2: Smart532 Laser System – Front Panel Description Touch-screen control panel Main on/off button Power setting ▲ and ▼ buttons Pulse duration setting ▲... -
Page 43: System Description - Rear Panel
™ Smart532 System Description The rear panel of the Smart532 laser system is shown in Figure 3-3: 3.1.5. System Description – Rear Panel Figure 3-3: Smart532 Laser System – Rear Panel Description Power cable connection port and fuse housing Array connection port to aiming beam... -
Page 44: Touch-Screen Lcd Control Panel
™ System Description Smart532 The Smart532 system is controlled by pressing the buttons on the touch- 3.1.6. Touch-Screen screen. Figure 3-4 presents a sample control screen; all aspects of the LCD Control operating system will be discussed in the Operating Instructions chapter Panel later in this manual. -
Page 45: System Specifications
™ Smart532 System Description 3.1.8. System Specifications 3.1.8.1. Outputs Treatment Laser ● Type: Frequency-doubled Nd:gdVO4, diode- pumped solid-state ● Wavelength: Green: 532 nm ±2 nm ● Nominal Laser Peak Power : 50 to 2,500 mW ● Exposure Duration: Single pulse /Continuous Waveform: 5.0 to 3,000 ms... -
Page 46: Compatible Accessories
™ System Description Smart532 ● Lumenis Slit Lamps - 1000, 980, 990, SL130, 30SL 3.1.8.3. Compatible Accessories ● Lumenis Array LaserLink (On-Axis or Off-Axis) ● Lumenis Trio ● LaserLink Z ● LaserLink HS ● ESF for all LaserLinks Listed, green 532nm ●... -
Page 47: System Classifications
™ Smart532 System Description 3.1.8.7. System Degree of Protection against Electric Shock for Applied Parts Classifications ● Type B Equipment CDRH Classification ● Class IV European MDD Laser Classification ● Class 4 Suitability for use in Presence of Flammable Mixture ●... - Page 48 ™ System Description Smart532 UM-1151140EN, Rev. C, May 2016...
-
Page 49: System Installation And Initial Setup Page
Your local Lumenis representative initially uncrates, inspects, sets up and installs the laser to ensure that it is working properly. In addition, Lumenis provides in-service training to ensure that your surgical staff is experienced with the performance and safety considerations of the laser. -
Page 50: Facility Requirements
It is strongly recommended that the system be connected to a separate power line with separate circuit breakers. Lumenis cannot guarantee adequate performance unless the system is connected to a dedicated circuit. -
Page 51: Environmental Requirements
™ Smart532 System Installation and Initial Setup 4.3.3. Environmental Air Quality: Requirements The system should operate in a non-corrosive atmosphere. Corrosive materials such as acids can damage electrical wiring, electronic components and the surfaces of optical components. Air-borne dust particles should be kept to a minimum. Dust particles absorb light and heat up. -
Page 52: Installation And Setup
The system has passed full quality assurance testing before shipment and 4.4. Installation and should be operational upon delivery. Setup The front panel of the Smart532 laser system is shown in Figure 4-2. Figure 4-2: Smart532 Laser System – Front Panel Description Touch-screen control panel Main on/off button Power setting ▲... -
Page 53: Figure 4-3: Smart532 Laser System - Rear Panel
™ Smart532 System Installation and Initial Setup The rear panel of the Smart532 laser system is shown in Figure 4-3: Figure 4-3: Smart532 Laser System – Rear Panel Description Power cable connection port and fuse housing Array connection port to aiming beam... -
Page 54: Connection Instructions
Ensure that the electrical cables are not frayed or split. Inspect all delivery devices as instructed in the appropriate delivery device operator manual. Contact your Lumenis representative if any component appears damaged. Caution Do not touch any optical lens; finger oils may damage the delicate coatings. -
Page 55: Connect The Remote Interlock
The laser will be inoperative unless the plug is inserted into the receptacle. For your convenience, the Smart532 laser system is delivered from the factory with an interlock plug pre-installed. A remote interlock is required for this system. When using a remote... -
Page 56: Connect The Main Power Cable
™ System Installation and Initial Setup Smart532 Insert the power cable plug into the Power cable connection port on the 4.5.3. Connect the Main system’s rear panel (see Figure 4-6). Power Cable Insert the other end of the power cable into the wall socket and ensure that the plug is secured. -
Page 57: Connect A Delivery System
Verify that the delivery system is properly connected to the appropriate connection ports before turning the laser system on. If the delivery system is not compatible with the Smart532 laser system, an error message will be displayed on the control panel. -
Page 58: Eye Safety Filters
If the eye safety filter is not properly connected to the Smart532 laser system, or if the eye safety filter is not compatible with the system, an error message will be displayed on the control panel. -
Page 59: Figure 4-7: Connecting A Delivery System (For Illustration Purposes Only)
™ Smart532 System Installation and Initial Setup Figure 4-7: Connecting a Delivery System (for illustration purposes only) UM-1151140EN, Rev. C, May 2016 4-11... -
Page 60: Transporting And Storage
Caution Do not ship the system without the factory packaging materials. Doing so may result in damage to the components during shipping and void the warranty. Contact Lumenis if packaging materials or repacking instructions are required. 4-12 UM-1151140EN, Rev. C, May 2016... -
Page 61: Operating Instructions Page
Chapter 5 Operating Instructions Read Chapter 2 before attempting any procedures. Be aware of the hazards 5.1. Safety when using lasers and take appropriate protective measures. Some Considerations important reminders: 1. Restrict access to the laser operating area. Post the laser warning sign before beginning any procedure. -
Page 62: Main Treatment Screen Elements
™ Operating Instructions Smart532 The elements of the Main Treatment screen are described in the following 5.3. Main Treatment illustration and following table. Each of the elements is described in detail Screen Elements in the following sections. Figure 5-2: Main Treatment Screen... -
Page 63: Delivery System Selection
Contact your Lumenis representative. 5.3.1. Delivery System Select one of two connected delivery systems by pressing the appropriate button on the screen;... -
Page 64: Exposure Time Setting
™ Operating Instructions Smart532 Set the exposure time (pulse duration) by pressing the ◄ or ► buttons on 5.3.3. Exposure Time the left side under the LCD. Setting The available exposure time settings are detailed in the Specifications section in Chapter 3 of this manual. -
Page 65: Smartpulse Mode
™ Smart532 Operating Instructions 5.3.6. SmartPulse Mode SmartPulse mode allows the operator to apply greater fine-tuning to the system's operating parameters; proceed as follows: Press the SmartPulse On button; the SmartPulse parameter selection pop-up appears (see Figure 5-3). Figure 5-3: SmartPulse Parameter Selection Pop-Up... -
Page 66: Pulse Counter
The pulse counter displays the total number of treatment pulses delivered 5.3.7. Pulse Counter since the reset button was last pressed. The range on the Smart532 laser system display is 0-10,000 pulses. It can be reset to zero by pressing the... -
Page 67: Save A New Preset
You may add your own proprietary treatment setting protocols as presets 5.3.10. Save a New Preset to the Smart532 laser system. Adjust the treatment parameters on the touch-screen – power, exposure time, interval and other parameters – in the manner that you desire, and... -
Page 68: Open Options Screen
™ Operating Instructions Smart532 To configure the Smart532 system's software and hardware preferences, 5.3.12. Open Options press the Options button on any screen; the Options screens will appear Screen (see Figure 5-5). Figure 5-5: Options Screen Pressing any of the... -
Page 69: Lio Illumination Setting Screen
™ Smart532 Operating Instructions 5.3.12.1. LIO Illumination In this screen (see Figure 5-6) you may adjust the illumination level of the connected laser indirect ophthalmoscope (LIO) by pressing the ► or ◄ Setting Screen buttons. Figure 5-6: Option Screen: Adjust LIO Illumination 5.3.12.2. -
Page 70: Language Setting Screen
™ Operating Instructions Smart532 5.3.12.3. Language Setting In this screen (see Figure 5-8) you may select the user interface language Screen by pressing the appropriate language icon on the screen. The available language selection is English, Italian, German, Japanese, Simplified Chinese, Russian, French, Spanish, Dutch and Portuguese. -
Page 71: Backlight Setting Screen
™ Smart532 Operating Instructions 5.3.12.5. Backlight Setting In this screen (see Figure 5-10) you may adjust the backlight illumination level of the user interface screen by pressing the ► or ◄ buttons. You can Screen set the backlight separately for... -
Page 72: Eye Safety Filter (Esf) Mode Selection Screen
™ Operating Instructions Smart532 5.3.12.6. Eye Safety Filter In this screen (see Figure 5-11) you may select the operational mode of the (ESF) Mode connected ESF by pressing the desired mode on the screen. Selection Screen Figure 5-11: Option Screen: Eye Safety Filter (ESF) Selection... -
Page 73: Pre-Operative Instructions
™ Smart532 Operating Instructions 1. Verify that the laser system is properly connected as instructed in this 5.4. Pre-Operative manual. Instructions 2. Verify that the delivery system is properly connected as instructed in the delivery system operator manual. If using a remote interlock, verify that it is also properly connected. -
Page 74: Aiming Beam Integrity Test
Before beginning treatment, verify the aiming beam integrity by performing the following: 1. Ensure that the delivery system is properly connected to the Smart532 laser as described in the Connection Instructions sections earlier in this chapter. -
Page 75: Intra-Operative Instructions
™ Smart532 Operating Instructions 5.5. Intra-Operative Warning Instructions Incorrect treatment settings can cause serious tissue damage. Therefore, it is recommended that you use the lowest acceptable treatment settings until you are familiar with the instrument’s capabilities. Use extreme caution until you thoroughly understand the biological interaction between the laser energy and tissue. - Page 76 ™ Operating Instructions Smart532 5-16 UM-1151140EN, Rev. C, May 2016...
-
Page 77: Maintenance And Troubleshooting Page
Preventative maintenance, safety, power and calibration tests should be performed annually by a Lumenis-certified service engineer to ensure Maintenance proper laser performance. 6.1.2. Laser System All laser system repairs should be performed by a Lumenis-certified service engineer. For detailed information contact your Lumenis Repair representative. 6.1.3. Clean the Use a cloth dampened with a hospital-grade disinfectant to wipe the external surfaces of the laser console. -
Page 78: Fuse Replacement
™ Maintenance and Troubleshooting Smart532 6.1.5. Fuse Replacement 1. Ensure that the system is turned off. 2. Unplug the main power cable from both the wall socket and the main power receptacle on the rear of the laser console. 3. Locate the fuse holder directly to the right of the main power receptacle. -
Page 79: Professional Maintenance
It is company policy not to distribute service tools outside of the Lumenis Service Organization. Possession of service instructions or tools does not authorize repair or modification of a Lumenis instrument by uncertified personnel. The Smart532 laser system incorporates an internal power meter which is 6.2.2. -
Page 80: Warranty Information
Terms and Conditions of Sale. Caution Improper use or adjustment of this system may invalidate the service warranty agreement. Please contact your Lumenis representative before attempting to troubleshoot this system in any manner other than those specified in this manual. -
Page 81: Table 6-1: Troubleshooting Guide: Error Messages With Corrective Actions
If the situation persists, shut down the system and contact Lumenis Service. Report the error number and text to them and follow their advice. - Page 82 System could not generate requested power. Restart system and try again; If error persists, shut Power Converge Error (SubP) down the system and contact Lumenis Service. Close the interlocked door or connect the interlock Door Open (Interlock) plug. Access Ready mode and continue normal operation.
-
Page 83: Table 6-2: Troubleshooting Guide: Error Messages Requiring Contact With Lumenis Service
™ Smart532 Maintenance and Troubleshooting Table 6-2: Troubleshooting Guide: Error Messages Requiring Contact with Lumenis Service Error Message Text Software Version Error Internal Communication Error (G-C) Internal Communication Error (C-F) Aiming Beam Not Calibrated Aiming Beam Error Display Press-Buttons Error... -
Page 84: Table 6-3: Undisplayed System Malfunctions Troubleshooting Guide
System will not switch to Ready mode. 2. Footswitch malfunction. 2. Contact Lumenis Service. 3. System malfunction. 3. Contact Lumenis Service. 1. System is not in Ready mode. 1. Set system to Ready mode. -
Page 85: Appendix A Clinical Guide Page
Appendix A Clinical Guide A.1. General Warning Information ● The Indications for Use and Safety and Regulatory sections of this operator manual should be carefully read and comprehended in their entirety before attempting to use the laser system. Particular attention should be given to all cautions and warnings pertaining to the safe use of the laser. -
Page 86: General Warnings And Precautions
, denaturation of proteins, photocoagulation, vaporization and ablation . For Smart532, the effect of interest is photocoagulation. Analysis of clinical and laboratory experience indicates that irradiance of ~ 100-500 W/cm , corresponding to heating the tissue by ~12-25°C above body temperature, is required for photocoagulation of tissues A.1.2. -
Page 87: Pain
™ Smart532 Clinical Guide A.1.3.1. Pain Delivery of laser energy is occasionally associated with pain or discomfort. During the procedure, pain may be reduced by topical anesthesia or retrobulbar block. The extent and duration of pain following laser therapy are usually minimal. -
Page 88: Indications For Use
Laser applications using free-beam devices, such as slit lamps or laser indirect ophthalmoscopes, are indicated by the icon shown on the left. The Smart532 is intended for use in the treatment of ocular, otolaryngological, A.2. Indications for Use dermatologic and dentistry indications as listed below. -
Page 89: Dermatologic Applications
™ Smart532 Clinical Guide The indications for use in dermatology are: A.2.3. Dermatologic Applications ● Pigmented lesion, including soar lentigines ● Vascular lesions, including cherry hemangiomas and angiokeratomas ● Extremities telangiectases, including facial and Leg telangiectases ● Cutaneous lesions ● Flat warts ●... -
Page 90: Ophthalmic Photocoagulation
CW (Continuous Wave) All Indications A.3. Ophthalmic The Smart532 system emits a laser beam with a wavelength of 532 nm (green). This type of energy can be used to treat several ocular conditions Photocoagulation in both the anterior and posterior segments of the eye. It is particularly well suited for treating the eye because it is not absorbed in aqueous media and has minimal effect on transparent tissues and materials. -
Page 91: Contraindications In Ophthalmology
™ Smart532 Clinical Guide to Age-related Macular Degeneration (AMD) Retinal Tear Barrage laser treatment Primary Open Angle Glaucoma (POAG) Trabeculoplasty Angle-Closure Glaucoma (ACG) Iridotomy/Iridoplasty A.3.2. Contraindications Laser treatment is contraindicated when an appropriate procedure cannot in Ophthalmology be performed safely. This could occur when tissue targets cannot be visualized properly. -
Page 92: Endoprobe
™ Clinical Guide Smart532 Media opacities such as a non-transparent cornea, a dense cataract or a A.3.5. Endoprobe vitreal hemorrhage can obstruct the delivery of laser energy through a slit lamp or an LIO. A solution is to circumvent these media opacities by delivering the laser energy via an endoprobe (a disposable fiber optic). -
Page 93: Ophthalmology Warnings
Ophthalmology intensity of the lesion desired, and the individual pigmentation of tissue targets. Smart532 comes with two types of waveforms: Continuous waveform (CW) and SmartPulse. UM-1151440EN, Rev. C, May 2016... - Page 94 ™ Clinical Guide Smart532 In CW, the stimulus is a single square pulse of duration 10-500 msec. The A.4.1. Parameters in appropriate power is usually found by titration: the power is initially set to continuous a low level and then increased gradually until the desired tissue effect is waveform (CW) obtained.
- Page 95 ™ Smart532 Clinical Guide A.4.2. Parameters in In SmartPulse, the stimulus is a train of brief pulses (see Table A-2). The characteristic use of SmartPulse is when a sub-visible tissue reaction is SmartPulse requested. In such a case, power is estimated by titration done at a...
- Page 96 ™ Clinical Guide Smart532 Table A-2: Recommended clinical treatment parameters in SmartPulse for intended medical conditions SmartPulse Exposure SmartPulse µ Indication Power (mW) References (links) interval duration Spot size ( duration (ms) (ms) (sec) Diabetic 1.2 X test burn Lavinsky et al 2011...
- Page 97 ™ Smart532 Clinical Guide A.5. Posterior Segment Note Laser Procedures ● Users should be aware of general laser warnings, precautions, and adverse effects listed in General Information in this chapter. ● Refer to the Ophthalmology references in this chapter for literature regarding the use of the laser in retinal laser procedures.
- Page 98 ™ Clinical Guide Smart532 A.5.2. Patient Warnings Warning ● Following photocoagulation, patients should be cautioned against any activity that could increase the venous pressure in head, neck, or eyes, such as straining, lifting, or holding their breath. Patients should be advised to sleep with the head of their bed elevated 15 to 20°.
- Page 99 ™ Smart532 Clinical Guide procedures performed on slit lamp or LIO, the pulse duration should be kept at 0.5 sec or less, to ensure that during treatment the patient does not move. ● Spot sizes are usually 200-1000 µm. In some cases, such as when treating close to the center of the macula, smaller spot size such as 50- 100 µm should be used, so as to prevent inadvertent targeting of the...
- Page 100 ™ Clinical Guide Smart532 not be permanent, depending on the severity of the accidental damage. ● Medical therapy should be continued following laser Trabeculoplasty ● Peripheral anterior synechiae may occur when the posterior portion of the trabecular meshwork or other structures posterior to the meshwork are treated.
- Page 101 ™ Smart532 Clinical Guide A.6.4. Guidelines for Use A.6.4.1. Iridotomy Iridotomy is performed for treatment of angle- closure glaucoma. The photocoagulator can be used to thin a thick iris before perforation, where perforation can be done with Nd:YAG or with a green laser with a small spot size. The desired result is a perforation of approximately 150-200 µm...
- Page 102 ™ Clinical Guide Smart532 A.6.4.2. Trabeculoplasty Trabeculoplasty is used to control open angle glaucoma. Laser burns are scattered around the trabecular meshwork. The mechanism of action is believed to be the scarring and shrinking of tissue at the laser burns, so that the trabecular meshwork between the laser burns is stretched.
- Page 103 ™ Smart532 Clinical Guide ● F. P. A. Bandello, M. Del Borrello, N. Zemella and M. Isola, "“Light” versus “classic” laser treatment for clinically significant diabetic macular oedema.," Br J Ophthalmol, vol. 89, no. 7, pp. 864-70, 2005. ● Y. Paulus and M. Blumenkranz, "Proliferative and nonproliferative diabetic retinopathy,"...
- Page 104 ™ Clinical Guide Smart532 ● W. Straub, "Complications after photocoagulation and cryotherapy", Klin Monbl Augenheilkd. 1977 Sep;171(3):317-21. ● J. Wise, "Errors in laser spot size in laser trabeculoplasty," Ophthalmology, vol. 91, no. 2, pp. 186-90, 1984. ● Spiegel, E. Wegscheider and O. Lund, "Argon laser trabeculoplasty: long-term follow-up of at least 5 years,"...
- Page 105 ™ Smart532 Clinical Guide A.8. Ear, Nose and Note Throat (ENT) Laser Users should be aware of general laser warnings, precautions, Applications and adverse effects listed in General Information in this chapter. The laser is indicated in procedures where color-specific absorption, small spot size, and high power densities are required.
- Page 106 ™ Clinical Guide Smart532 contributing factor in deciding if a procedure is done on an in- or an out-patient basis. A.8.4. Warnings Warning ● The physician should be well acquainted with standard operating procedures and the use of the operating microscope.
- Page 107 A.10. Delivery Devices and Accessories A.10.1. Filters Lumenis offers fixed and moving physician’s filters for integrated slit lamps, indirect ophthalmoscope attachments, and microscopes. These filters shield the physician's or observer's eyes from laser light and allow a normal field of view when the laser is in the Ready mode. The filters contain high quality optical elements for high visibility and easily attach to operating room microscopes.
-
Page 108: Table A-3: Irradiance And Fluence At 1 W And 0.5 Sec And 1.0 Sec Delivered
™ Clinical Guide Smart532 Fluence is the measurement of energy delivered in relation to the area of A.10.3. Fluence of laser the treatment beam or energy density. Irradiance is the measurement of energy delivered power delivered in relation to the area of the treatment beam or power by endoprobe density. -
Page 109: Figure A-1: Spot Size Versus Distance Of Fiber Tip From Tissue
™ Smart532 Clinical Guide Figure A-1 shows the spot size as a function of distance from the fiber. illustrates the relationship between irradiance and the distance Figure A-2 from the fiber tip. Figure A-1: Spot Size versus Distance of fiber tip from Tissue Figure A-2: Irradiance versus Distance of Fiber Tip from Tissue UM-1151440EN, Rev. -
Page 110: Table A-4: Spot Size And Irradiance At 1 W Delivered
™ Clinical Guide Smart532 Table A-4 lists the irradiance obtained at 1 W delivered power for 200, 300 and 600 µm diameter fiber optic accessories held from 0 to 5 mm from the tissue target. Taking into consideration the irradiance which is effective for each procedure, the user can determine the different laser power settings. - Page 111 ● The LIO should be carefully inspected before each use to be sure that it is not damaged. ● The LIO can be configured at the factory for use with a Lumenis argon A.10.7. Guidelines for laser, krypton laser, or diode-green (Smart532) laser. Only the filter material and electrical characteristics differ.
- Page 112 ™ Clinical Guide Smart532 having to pass through the gas bubble, it makes the laser treatment easier. ● A third potential advantage over conventional slit lamp delivery systems is the fact that the LIO does not employ a contact lens to direct the laser beam.
- Page 113 Several integrated slit lamp models are available from Lumenis, as are A.10.9. Description LaserLinks for adapting your existing diagnostic slit lamp to the Smart532. LaserLinks are available for Zeiss and Haag-Streit, as well as most third- party equivalent slit lamps.
Need help?
Do you have a question about the smart532 and is the answer not in the manual?
Questions and answers