Table of Contents
Advertisement
Advertisement
Table of Contents
Troubleshooting

Related Manuals for LUMENIS PULSE 120H


Summary of Contents for LUMENIS PULSE 120H
- Page 1 ® Holmium Surgical Laser Operator's Manual...
- Page 2 Lumenis, the Lumenis Logo, Lumenis Pulse 120H, SlimLine, Xpeeda and Moses are trademarks or registered trademarks of Lumenis. CAUTION: In the USA: Federal law restricts this device to sale by or on the order of a physician.
- Page 3 Lumenis (Germany) GmbH Heinrich-Hertz-Strasse 3 D-63303 Dreieich-Dreieichenhain Germany Tel: +49 (0) 6103.8335.0 Manufactured by Lumenis Ltd. Yokneam Industrial park 6 Hakidma Street P.O.B. 240 Yokneam 2069204, Israel Tel: +972.4.959.9000 Fax: +972.4.959.9050 www.Lumenis.com Lumenis Pulse 120H UM-10012510 Rev. F Page 3...
-
Page 4: Table Of Contents
Adjusting the Fiber Support Arm ..............39 Adjusting the Screen .................. 40 Connecting the Footswitch ................. 41 Inserting the External Door Interlock Connector ........42 Plugging in the Main Power Cable ............. 43 Lumenis Pulse 120H UM-10012510 Rev. F Page 4... - Page 5 Troubleshooting and Maintenance ................ 112 Handling Error Messages and Notifications ..........112 Troubleshooting ..................114 Routine Periodic Maintenance ..............117 Hospital/Clinic Staff Maintenance ............118 Professional Maintenance ................ 122 System Requirements and General Information ........... 124 Lumenis Pulse 120H UM-10012510 Rev. F Page 5...
- Page 6 Customer Service ....................133 Warranty ....................133 Returning Equipment ................133 Customer Feedback ................. 133 Appendix A: EMC Compliance ................134 Electromagnetic Emissions ..............134 Electromagnetic Immunity ................ 135 Recommended Separation Distances ............137 Lumenis Pulse 120H UM-10012510 Rev. F Page 6...
-
Page 7: Introduction
Introduction Introduction The Lumenis Pulse 120H holmium laser provides utility in urology, orthopedics, ENT, gynecology, and general surgery applications. Fiber delivery of holmium laser energy is ideal for minimally invasive surgery. WARNING: • Lasers generate a highly concentrated beam of light which may cause injury if improperly used. -
Page 8: Manual Conventions
WARNING: A Warning is a statement that alerts the operator to the possibility of injury, death, or serious adverse reactions associated with the use or mis- use of the device. Lumenis Pulse 120H UM-10012510 Rev. F Page 8... -
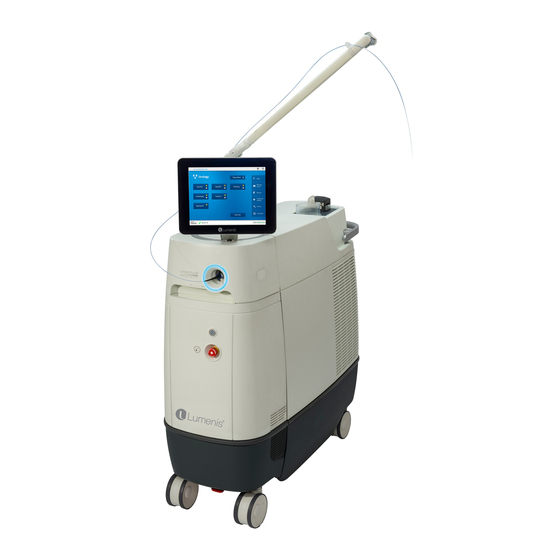
Page 9: System Description And Main Features
System Description and Main Features System Description and Main Features The Lumenis Pulse 120H laser comprises the following main components and features: • Laser console • Rotatable control screen • Dual-pedal footswitch • Integrated suction pump • Fiber support arm •... - Page 10 STANDBY/ READY foot-operated button. Figure 2: Dual-Pedal Footswitch 1. Optional purchase equipment Lumenis Pulse 120H UM-10012510 Rev. F Page 10...
-
Page 11: Component Checklist
Delivery Systems A variety of fiber optic delivery systems are available for use with Lumenis Pulse 120H laser. Refer to the appropriate delivery system instruction guide for specific operating instructions. CAUTION: Use only Lumenis-approved accessories. Third party accessories are not authorized for use. -
Page 12: Holmium Laser Theory Of Operation
The Lumenis Pulse 120H holmium laser emits a laser beam at a wavelength of 2100 nm. This wavelength is strongly absorbed by water. -
Page 13: Moses Capability
The laser efficiency is therefore much dependent on the distance between the fiber tip and the target. This is defined as the regular mode currently available for all system applications. Lumenis Pulse 120H UM-10012510 Rev. F Page 13... - Page 14 NOTE: Moses capability requires the use of dedicated Lumenis Moses fibers and it is available only for systems that incorporate Moses capability which has been activated. A complete discussion of Moses capability and fibers...
-
Page 15: Safety
(NOHD) are considered to be within the controlled area and must wear eye protection according to the following specifications: System Wavelength Minimum Optical Protection Level Used Density Lumenis Pulse 120H 2.1 μm DI LB3 Lumenis Pulse 120H UM-10012510 Rev. F Page 15... - Page 16 2. Close the treatment room door during operation of the laser. 3. Install an external door remote interlock that automatically disables the laser when the treatment room door is opened. Lumenis Pulse 120H UM-10012510 Rev. F Page 16...
-
Page 17: Electrical Hazards
• Do not operate the laser if any of the cords are faulty or frayed. The laser should undergo routine inspection and maintenance per Lumenis manufacturer’s recommendations and institutional standards. • To avoid risk of electric shock, this equipment must only be connected to a supply mains with protective earth. -
Page 18: Fire Hazards
Additional Safety Considerations CAUTION: • Smoke evacuation may be required if using the laser in open-air procedures. • Do not connect any USB flash drives or network cable to the system during operation. Lumenis Pulse 120H UM-10012510 Rev. F Page 18... -
Page 19: Protecting Non-Target Tissues
Never discharge the laser without a target to absorb it and without consideration given to what lies behind the target. Place energy- absorbing material behind the target tissue when aiming the laser at an oblique target. Lumenis Pulse 120H UM-10012510 Rev. F Page 19... -
Page 20: Safety Indicators
• A warning tone or audible voice message is emitted if the system is transitioned to READY mode while there is no fiber connected to the system. • When lasing, the lasing emission indicator appears on the screen. Lumenis Pulse 120H UM-10012510 Rev. F Page 20... -
Page 21: Warning, Certification And Identification Labels
37 A, 1 YYYY-MM-DD Rx ONLY MODEL: XXXXXXXXXX LB-20037970_A THIS DEVICE CONTAINS: FCC ID: Z97-1149466 Figure 4: Location of Warning, Identification and Certification Labels Affixed to the System (for illustration purposes only) Lumenis Pulse 120H UM-10012510 Rev. F Page 21... - Page 22 230V Electrical Requirements 50HZ 37 A, 1 Equipotential Connection Pin Type BF Equipment Caution: U.S. federal law restricts this device to sale by or on the Rx ONLY order of a physician Lumenis Pulse 120H UM-10012510 Rev. F Page 22...
- Page 23 Notice 50, Dated June 24, 2007 External Interlock Connection Footswitch Connection CSA Compliance Unique Device Identifier (UDI) Code, Type GS1 Non-Ionizing Electromagnetic Radiation Waste of Electrical and Electronic Equipment (WEEE) compliance RoHS Compliance (China) Lumenis Pulse 120H UM-10012510 Rev. F Page 23...
- Page 24 Grounding reliability can only be achieved when the EQUIPMENT achieved when the EQUiPMENT is connected to an equivalent receptacle marked “Hospital Only” is connected to an equivalent receptacle marked “Hospital or “Hospital Grade”. Only” or “Hospital Grade” 0363-076-01 Rev. B Lumenis Pulse 120H UM-10012510 Rev. F Page 24...
-
Page 25: Clinical Guide
Clinical Guide Clinical Guide Lumenis recommends that physicians learn and gather additional knowledge related to the Lumenis Pulse 120H. For details on courses and training sessions available at Lumenis, contact your Lumenis representative. Lumenis does not make recommendations regarding the practice of medicine. -
Page 26: Effects On Stones
Secondly (in Moses mode), maintaining the energy and frequency and increasing the pulse width. Laser energy can be delivered to the tissue using various delivery devices. These include straight-firing and side-firing fibers. Refer to the specific delivery devices for detailed information. Lumenis Pulse 120H UM-10012510 Rev. F Page 26... -
Page 27: Indications For Use
In China, Korea and Taiwan the Lumenis Pulse 120H system with Delivery Devices and Accessories are intended for use in surgical procedures that require incision, excision and ablation (vaporization and removal) of soft tissue and for Lithotripsy. -
Page 28: Warnings And Precautions
Warnings and Precautions NOTE: Lumenis has no clinical information concerning the safety of laser treatment on pregnant or nursing women. Warnings and Precautions This section contains warnings and precautions that are applicable to surgical procedures specifically related to the use of this system. -
Page 29: Complications
These generally resolve without treatment. Remnants of destructed tissue may become necrotic or infected. If a question of infection exists, appropriate treatment should be carried out. Lumenis Pulse 120H UM-10012510 Rev. F Page 29... -
Page 30: Detailed Indications For Use
Insufflation pressure should be set to minimum settings for effective insufflation. Detailed Indications for Use The Lumenis Pulse 120H system with delivery devices and accessories are intended for use in surgical procedures involving open, laparoscopic and endoscopic ablation, vaporization, excision, incision, and coagulation of soft tissue in medical specialties including: urology;... - Page 31 Endoscopic fragmentation of urinary (urethral, ureteral, bladder and renal) calculi, including cystine, calcium oxalate, monohydrate and calcium oxalate dihydrate stones. Treatment of distal impacted fragments of steinstrasse when guide wires cannot be passed. Lumenis Pulse 120H UM-10012510 Rev. F Page 31...
- Page 32 Capsulectomy in the knee Chondroplasty in the knee Chondrornalacia ablation • Discectomy including: Percutaneous vaporization of the L4-5 and LS-Sl lumbar discs of the vertebral spine; open and arthroscopic spine procedures; foraminotomy. Lumenis Pulse 120H UM-10012510 Rev. F Page 32...
- Page 33 Complete or partial resection of internal organs, tumors and lesions. Mastectomy Hepatectomy Pancreatectomy Splenectomy Thyroidectomy Parathyroidectomy Herniorrhaphy Tonsillectomy Lymphadenectomy Partial nephrectomy Opilonidal cystectomy Resection of lipoma Debridement of decubitus ulcer Hemorrhoids Debridement of statis ulcer Biopsy Lumenis Pulse 120H UM-10012510 Rev. F Page 33...
- Page 34 • Open and laparoscopic gynecological surgery (ablation, vaporization, incision, excision, and coagulation of soft tissue). Gynecological Surgery • Open and laparoscopic gynecological surgery (ablation, vaporization, incision, excision, and coagulation of soft tissue). Lumenis Pulse 120H UM-10012510 Rev. F Page 34...
- Page 35 Colorectal cancer Gastritis Bleeding tumors Pancreatitis Vascular malformations Telangiectasias Telangiectasias of the Osler-Weber-Renu disease Pulmonary Surgery • Open and endoscopic pulmonary surgery (cutting, ablation, vaporization, incision, excision and coagulation of soft tissue. Lumenis Pulse 120H UM-10012510 Rev. F Page 35...
- Page 36 • Corns • Papillomas • Basal cell carcinomas • Lesions of skin and subcutaneous tissue • Plantar warts • Periungual and subungual warts • Debridement of decubitus ulcer • Skin tag vaporization Lumenis Pulse 120H UM-10012510 Rev. F Page 36...
-
Page 37: Preparing The System For Use
The laser is shipped directly from the factory to your site. Your local Lumenis service representative initially uncrates, inspects, sets up, and installs the laser to ensure that it is working properly. In addition, Lumenis provides in-service training to ensure that your surgical staff is experienced with the performance and safety considerations of the laser. -
Page 38: Moving The System
2. Move they system to the desired location. Verify that the Lumenis Pulse 120H laser console is a minimum of 50 centimeters (20 inches) from walls, furniture, or other equipment. 3. Lock the laser console wheels by pushing the front or back right brake pedal down. -
Page 39: Adjusting The Fiber Support Arm
Figure 6: Adjusting the Fiber Support Arm WARNING: Ensure that the fiber support arm knob is closed properly in order to prevent unintended arm movement that may pull and cause damage to the fiber. Lumenis Pulse 120H UM-10012510 Rev. F Page 39... -
Page 40: Adjusting The Screen
Adjusting the Screen 1. Unfold the LCD panel. 2. Turn the LCD panel counter-clockwise to the position needed. 3. Adjust the angle of the LCD panel. Figure 7: Adjusting the LCD Panel Lumenis Pulse 120H UM-10012510 Rev. F Page 40... -
Page 41: Connecting The Footswitch
Connecting the Footswitch 1. Insert the footswitch connector into the footswitch receptacle on the rear of the Lumenis Pulse 120H laser console. Align the red dot of the footswitch connector with the red dot of the receptacle, then push it in. -
Page 42: Inserting The External Door Interlock Connector
5. To resume treatment, close the treatment room door or reinsert the external door interlock connector, and press the READY button. Figure 9: Reinsert the External Door Interlock Lumenis Pulse 120H UM-10012510 Rev. F Page 42... -
Page 43: Plugging In The Main Power Cable
2. Turn on the main circuit breaker. Figure 10: Main On/Off switch and Main Power Plug Lumenis Pulse 120H UM-10012510 Rev. F Page 43... -
Page 44: Connecting The Delivery System
To prevent accidental laser discharge, always turn off the laser before connecting the delivery system. NOTE: The SIS enabled Lumenis Pulse 120H system will only operate with Lumenis-qualified SIS (Secure Identification System) optical delivery fibers. Attaching any other type of fiber will generate an error message and laser emission will be disabled. - Page 45 CAUTION: Do not remove the protective cap from the laser connector in the sterile field. Removing the protective cap in the sterile field may compromise sterility. Lumenis Pulse 120H UM-10012510 Rev. F Page 45...
-
Page 46: Connecting The Suction System
Connecting the Suction System Connecting the Suction System The surgeon may use Lumenis Pulse 120H laser's built-in suction system to remove tissue, liquids, stones or other debris into the collection container. The Lumenis-supplied disposables required for this are: • Collection container kit •... - Page 47 Connecting the Suction System Suction Rate Knob Collection Suction Inlet Container Holder Pump Port Outlet Port Collection Container Kit Figure 12: Suction System Figure 13: Pulling open the Suction Pump Lumenis Pulse 120H UM-10012510 Rev. F Page 47...
- Page 48 If the suction system does not function properly, or does not operate at all, a warning to this effect will be indicated on the display. The laser system may still be used without suction. Lumenis Pulse 120H UM-10012510 Rev. F Page 48...
-
Page 49: Main System Screens
Main System Screens Main System Screens Home Screen Description Figure 15: Home Screen Lumenis Pulse 120H UM-10012510 Rev. F Page 49... - Page 50 6. Reports – Press this button to access the Reports and Treatment Logs screen. On this screen you may view the treatment logs of the procedures performed by the system. The logs can also be exported to a USB mass storage device (disk-on-key). Lumenis Pulse 120H UM-10012510 Rev. F Page 50...
- Page 51 10. Notification Bar – Notifications and error messages will appear in this bar. 11. Presets – Lumenis Presets are hard-coded into the system software and are marked with the Lumenis logo. Hospital Presets are designed and entered to the system by the hospital's surgeons. Any settings entered or re-entered on the Main Treatment screen during a procedure, may be saved and named as a Hospital Preset.
-
Page 52: Specialties Screen Description
Specialties Screen Description Specialties Screen Description Select the surgical specialty that best meets your needs. Presets are defined for each surgical specialty. Figure 17: Specialties Screen Lumenis Pulse 120H UM-10012510 Rev. F Page 52... -
Page 53: Treatment Screen Description
Treatment Screen Description Treatment Screen Description Figure 18: Treatment Screen Lumenis Pulse 120H UM-10012510 Rev. F Page 53... - Page 54 • The aiming beam is automatically set to Off when no fiber is connected to the system. • Press the indicator to open a pop-up menu (shown on the left) where you can select the desired mode: Low, Medium, High or Off. Lumenis Pulse 120H UM-10012510 Rev. F Page 54...
- Page 55 Except during actual treatment, the laser must always be in STANDBY mode. Maintaining the laser in STANDBY mode prevents accidental laser exposure if the footswitch is inadvertently pressed. 1. Optional purchase equipment; this section applies only to systems with factory-installed suction systems. Lumenis Pulse 120H UM-10012510 Rev. F Page 55...
- Page 56 Treatment Screen Description 8. Fiber Status Area - Certain Lumenis SIS fiber delivery systems for the Lumenis Pulse 120H are designed to allow several surgical treatments, while others are limited to only one treatment. When a fiber is connected, the system immediately knows: •...
- Page 57 11. Moses Operation Mode - the Moses capability can be used only in conjunction with Lumenis Moses fibers. When a Moses fiber is connected to the system it will be recognized by the system and the Moses capability will be available.
- Page 58 Lasing appears on the control screen and an audible signal sounds at all times during treatment to alert you that laser energy is being emitted. The audible signal is different for the right and left pedals. Figure 20: Lasing Indicator Lumenis Pulse 120H UM-10012510 Rev. F Page 58...
-
Page 59: Normal Operation
A damaged fiber optic cable may cause accidental laser exposure or injury to the treatment room personnel or patient, and/or fire in the treatment room. 2. If desired by the surgical team, connect the surgical accessory to the suction system. Lumenis Pulse 120H UM-10012510 Rev. F Page 59... -
Page 60: Powering On The System
Refer to “Handling Error Messages and Notifications”. Selecting the Treatment The Main Menu screen appears on the control screen after Lumenis Pulse 120H is powered On and the self-test is successfully completed. 1. Verify that the correct specialty is selected. - Page 61 WARNING: Use the lowest acceptable treatment settings until you are familiar with the instrument’s capabilities. Incorrect treatment settings can cause seri- ous tissue damage. Lumenis Pulse 120H UM-10012510 Rev. F Page 61...
- Page 62 This limitation will be reflected in the length of the highlighted bar. NOTE: Maximum energy and frequency may be limited for a specific SIS fiber delivery system. Figure 24: How to Change Treatment Settings Lumenis Pulse 120H UM-10012510 Rev. F Page 62...
-
Page 63: Starting Laser Treatment
Doing so will not affect visibility at the treatment site, since the camera compensates for the lower level of light. 3. Position the aiming beam on the target tissue. Lumenis Pulse 120H UM-10012510 Rev. F Page 63... - Page 64 8. If surgery is interrupted, set the laser to STANDBY mode to disable the footswitch. WARNING: Always set the laser to Standby mode when it is not in use to avoid unin- tended laser emission. Lumenis Pulse 120H UM-10012510 Rev. F Page 64...
-
Page 65: Shutting Down The System
3. Turn off the mains circuit breaker. 4. Remove the main power plug from the wall receptacle. 5. Remove the footswitch connector from the laser. Lumenis Pulse 120H UM-10012510 Rev. F Page 65... -
Page 66: Moving The Laser Console
Moving the Laser Console 1. Disconnect the optical fiber from the system. 2. Rotate the LCD panel clockwise and fold it down with the screen facing down. Figure 26: Folding the LCD Panel Lumenis Pulse 120H UM-10012510 Rev. F Page 66... - Page 67 Arm Knob Collar Collar Knob Figure 27: Adjusting the Fiber Support Arm 4. Unlock the laser console wheels for unidirectional movement by pushing the left brake pedal down. Figure 28: Brake Pedals Configurations Lumenis Pulse 120H UM-10012510 Rev. F Page 67...
- Page 68 For optimum safety, use a second person when moving up or down a steep incline. • Do not move the laser console rapidly over uneven surfaces; doing so may damage the equipment. Lumenis Pulse 120H UM-10012510 Rev. F Page 68...
-
Page 69: Advanced Operations
Advanced Operations Advanced Operations Moses Capability If the system incorporates Moses capability, and a Lumenis Moses fiber is connected to the system (see Figure 29), an indicator appears. Press this indicator to open a pop-up menu (shown on the left) where you may select the Moses operation mode -Contact or Distance. - Page 70 Moses mode is available for use by either the left or right pedal, independently, using Short Width pulse mode only. The default Moses mode when the Lumenis Pulse 120H system is started is Off, using Short (normal) Width pulse mode.
-
Page 71: Saving Settings As Presets
1. From the Treatment Menu screen, press the cogwheel and select Save As Preset. NOTE: Moses mode cannot be saved as part of the present settings. Figure 31: Save Settings as a Preset Lumenis Pulse 120H UM-10012510 Rev. F Page 71... - Page 72 2. Press inside the Preset Name field and type in the new name using the virtual keyboard that pops up. When you are done, press the green check mark key on the keyboard. Figure 32: Editing the Preset Name Lumenis Pulse 120H UM-10012510 Rev. F Page 72...
-
Page 73: Preset Management
Figure 33: Saving the Preset Preset Management Introduction The Lumenis Pulse 120H offers the use of predefined presets to select treatment parameters. Presets are divided into two groups: System Presets (hard-coded into Lumenis Pulse 120H). Hospital Presets (defined by the hospital staff). - Page 74 Introduction You can save any settings defined on the Main Treatment screen during a procedure as a Hospital Preset. Figure 34: Manage Presets Screen Lumenis Pulse 120H UM-10012510 Rev. F Page 74...
- Page 75 On the Main Menu screen, press the View All… button to display all of the available presets, not only those defined as Favorites. The presets are organized in two groups: System Presets and Hospital Presets. Figure 35: View All Presets - Tree Closed Lumenis Pulse 120H UM-10012510 Rev. F Page 75...
- Page 76 Figure 36: View All Presets - Tree Expanded After you press the Preset button, the system will transition to the Main Treatment screen. Lumenis Pulse 120H UM-10012510 Rev. F Page 76...
- Page 77 Creating New Presets Creating New Presets 1. From the Main Menu screen, press Manage Presets. 2. Press the Hospital Presets button. 3. Press the New button. Figure 37: Manage Presets Screen Lumenis Pulse 120H UM-10012510 Rev. F Page 77...
- Page 78 6. Click SAVE. NOTE: Moses mode cannot be saved as part of the present settings. If desired, configure Moses mode manually in the Treatment screen. Lumenis Pulse 120H UM-10012510 Rev. F Page 78...
- Page 79 1. From the Main Menu screen, press Manage Presets. 2. Press the Hospital Presets button. 3. Select anywhere on the row for the preset that you want to edit. Figure 39: Manage Presets Screen 4. Press the Edit button. Lumenis Pulse 120H UM-10012510 Rev. F Page 79...
- Page 80 5. In the Edit Preset screen, create the settings that you want. When you press inside a text field, a keyboard pops up. Figure 40: Edit Preset Screen (With Keyboard Visible) 6. Click SAVE. Lumenis Pulse 120H UM-10012510 Rev. F Page 80...
- Page 81 2. Select anywhere on the row for the preset that you want to duplicate. If you don’t see the preset, press Hospital Presets button. 3. Press the More button and select Duplicate from the dropdown menu. Figure 41: Manage Presets > More >Duplicate Lumenis Pulse 120H UM-10012510 Rev. F Page 81...
- Page 82 Duplicating Presets 4. The duplicated preset automatically appears with the Copy_ prefix under Hospital Presets. Figure 42: Preset Screen (With a Duplicated Preset) Lumenis Pulse 120H UM-10012510 Rev. F Page 82...
- Page 83 1. From the Main Menu screen, press Manage Presets. 2. Press the Hospital Presets button. 3. Select anywhere on the row for the preset that you want to delete. Figure 43: Manage Presets Screen Lumenis Pulse 120H UM-10012510 Rev. F Page 83...
- Page 84 Deleting Presets 4. Press the Delete button. 5. In the Delete Preset confirmation screen, press Yes. Figure 44: Delete Preset Confirmation Screen Lumenis Pulse 120H UM-10012510 Rev. F Page 84...
- Page 85 3. Select anywhere on the row for the preset that you want to export. If you don’t see the preset, press Hospital Presets button. 4. Press the More button and select Export Presets from the dropdown menu. Figure 45: Manage Presets > More >Export Presets Lumenis Pulse 120H UM-10012510 Rev. F Page 85...
- Page 86 Exporting Presets 5. In the Export data to USB menu, press OK. 6. Wait until the export operation is completed successfully. Figure 46: Export Operation Completed Lumenis Pulse 120H UM-10012510 Rev. F Page 86...
-
Page 87: Favorites
9 positions. 1. From the Main Menu screen, press Manage Presets. 2. From the Manage Presets screen, press Favorites and select Manage from the dropdown menu. Figure 47: Select Favorites > Manage Lumenis Pulse 120H UM-10012510 Rev. F Page 87... - Page 88 Figure 48: Select Favorites > Manage 4. Press the non-favorite preset PCNL (for example) to select it. Press the Add button to add it to the favorites. Figure 49: Add a Favorite Screen Lumenis Pulse 120H UM-10012510 Rev. F Page 88...
- Page 89 (PCNL) in the desired spot (number) in the list. Figure 50: New Preset Added to Favorites 6. Click OK to save the new Preset to the Favorites. 7. Press Cancel to exit without making any changes to the Favorites. Lumenis Pulse 120H UM-10012510 Rev. F Page 89...
- Page 90 1. From the Main Menu screen, press Manage Presets. 2. Select a preset with an empty star. 3. Press Favorites and select Add to Favorites from the dropdown menu. Figure 51: Quick Add a Favorite Lumenis Pulse 120H UM-10012510 Rev. F Page 90...
- Page 91 1. From the Main Menu screen, press Manage Presets. 2. Select a preset with a yellow star. 3. Press Favorites and select Remove Favorite from the dropdown menu. Figure 52: Quick Remove a Favorite Lumenis Pulse 120H UM-10012510 Rev. F Page 91...
-
Page 92: Reports
Reports Reports Lumenis Pulse 120H automatically generates a report of each treatment. 1. To view a summary of the reports listed in chronological order with the most recent treatment on top, press the Reports button. 2. You can export the reports as log files, for more detailed analysis, to a USB storage device. - Page 93 2. From the Home screen, press the Reports button. 3. Press the Export reports to USB button. 4. In the Export Reports confirmation screen, click OK. Figure 54: Reports Export Confirmation Screen Lumenis Pulse 120H UM-10012510 Rev. F Page 93...
- Page 94 Exporting the Reports 5. Wait until the export operation is completed successfully and press the OK button. Figure 55: Reports Export Operation Completed Lumenis Pulse 120H UM-10012510 Rev. F Page 94...
-
Page 95: Changing The Default Specialty
Changing the Default Specialty Changing the Default Specialty When you start up Lumenis Pulse 120H, the Main Menu screen automatically displays the default specialty. You can change this in the Settings & Utilities screen. 1. From the Main Menu screen, press the Settings & Utilities button. - Page 96 4. In the Change Specialty pop-up, press OK. 5. In the Settings & Utilities screen, press OK. NOTE: The specialty name highlighted in the pop-up with the symbol is the system’s default specialty. Lumenis Pulse 120H UM-10012510 Rev. F Page 96...
-
Page 97: Other Operations
If the aiming beam has been turned off a pop-up message will appear requiring that you verify knowing that the aiming beam is turned off. Press the verification button in order to proceed with the surgical procedure. Lumenis Pulse 120H UM-10012510 Rev. F Page 97... - Page 98 Figure 59: Quick Settings Pop-Up Screen NOTE: Checking the Quiet Mode check box does not affect the signal that is emitted during lasing or any other sounds that are directly related to safety. Lumenis Pulse 120H UM-10012510 Rev. F Page 98...
- Page 99 You can also edit the screen settings in the Settings & Utilities screen. Figure 60: Settings & Utilities > Display Adjustment Adjusting Volume and Sound Indications 1. Press the cogwheel in the upper-right corner and select Quick Settings. Figure 61: Select Quick Settings Lumenis Pulse 120H UM-10012510 Rev. F Page 99...
- Page 100 3. If you do not want to hear any voice indications, select the Quiet mode check box; the voice indications will be replaced with a sound indication. Figure 62: Quick Settings Pop-Up Screen Lumenis Pulse 120H UM-10012510 Rev. F Page 100...
- Page 101 Adjusting Volume and Sound Indications 4. Press OK. NOTE: You can also edit the screen settings in the Settings & Utilities screen. Figure 63: Settings & Utilities > Sound Indications Level Adjustments Lumenis Pulse 120H UM-10012510 Rev. F Page 101...
- Page 102 Changing Date and Time Changing Date and Time 1. From the Main Menu screen, press the Settings & Utilities button. 2. Press the Set button. Figure 64: Set Date & Time Button Lumenis Pulse 120H UM-10012510 Rev. F Page 102...
- Page 103 Changing Date and Time 3. In the Set screen that opens, press the up and down arrows to set the date and time. Figure 65: Settings & Utilities > Set Date & Time Lumenis Pulse 120H UM-10012510 Rev. F Page 103...
- Page 104 If you prefer a 12 hour clock, clear the 24H check box. Figure 66: Settings & Utilities > Set Date & Time With 12 Hour Clock 4. In the Set menu, press OK. 5. In the Settings & Utilities menu, press OK. Lumenis Pulse 120H UM-10012510 Rev. F Page 104...
- Page 105 2. Press the Language button. Figure 67: Language Button 3. In the Change Language screen that opens, select the language that you want to change to. Figure 68: Settings & Utilities > Change Language Lumenis Pulse 120H UM-10012510 Rev. F Page 105...
- Page 106 (local language). Figure 69: Settings & Utilities > Language Reset Flag Lumenis Pulse 120H UM-10012510 Rev. F Page 106...
- Page 107 Exporting Service Log The option to export the service log enables you to send data about the system to a Lumenis service person that can help that person understand a problem that you encountered. 1. Insert a USB storage device into the USB port at the rear of the Lumenis Pulse 120H.
- Page 108 Figure 71: Export Data to USB Button 6. In the Export data to USB pop-up menu press one of the following: • All • One Month • One Week • One Day 7. Press OK. Lumenis Pulse 120H UM-10012510 Rev. F Page 108...
- Page 109 Exporting Service Log 8. Wait until the export operation is completed successfully. Figure 72: Export Operation Completed Lumenis Pulse 120H UM-10012510 Rev. F Page 109...
- Page 110 2. The current environmental conditions are not optimal. In such cases the system will work with reduced power capability or offer the user to lower the room temperature and humidity in order to return to maximum power capability. Lumenis Pulse 120H UM-10012510 Rev. F Page 110...
-
Page 111: Help
Some topics include subtopics that you can press to open. 4. When you are done, press the Back button to return to the Main Menu screen. Figure 75: Location of the Back Button Lumenis Pulse 120H UM-10012510 Rev. F Page 111... -
Page 112: Troubleshooting And Maintenance
If the error is not corrected by a user action, the error will not fade and you will be prevented from lasing. 4. Repeat for each error message and notification. Lumenis Pulse 120H UM-10012510 Rev. F Page 112... - Page 113 Handling Error Messages and Notifications 5. Press the Close button to exit the Notification screen. Figure 76: Examples of Error Notification Area and Pop-Up Window Lumenis Pulse 120H UM-10012510 Rev. F Page 113...
-
Page 114: Troubleshooting
3. If the problem re-occurs, contact Lumenis service. 4. Turn on the system with the keyswitch in the Off position. 5. Export logs and send them to Lumenis service. System Does Not Turn On The control screen does not illuminate. No blue light in the On/Off switch and around the delivery system port. - Page 115 1. Replace the delivery system. 2. Inspect and, if necessary, replace the debris shield. 3. Contact your local Lumenis service representative. A Notification Appears on the Control Screen 1. Clear the message by pressing the Acknowledge button and follow the suggested steps intended to clear the fault.
- Page 116 1. Replace the fiber with a new one and resume normal operation. 2. If problem persists, contact Lumenis Service. Unrecognized Fiber 1. Replace the fiber with a Lumenis compatible one and resume normal operation. 2. If problem persists, contact Lumenis Service.
-
Page 117: Routine Periodic Maintenance
Check and perform Annually, or as Lumenis Must be performed only by energy detectors required if system Service Lumenis-authorized technical calibration procedure. does not perform to personnel. specifications, or occurrence of error messages. Lumenis Pulse 120H UM-10012510 Rev. F Page 117... -
Page 118: Hospital/Clinic Staff Maintenance
3. Try to select Ready mode. The system should display the following warning message in the notification bar: Verify door closed. 4. If the system does not display the warning message and remains in Ready mode, discontinue use and contact Lumenis Service. Lumenis Pulse 120H UM-10012510 Rev. F Page 118... - Page 119 2. Turn the button clockwise to release it and restart the system. 3. Press the Ready button on the LCD to enable lasing. If this is not the situation, discontinue use and contact Lumenis Service. Inspect / Replace the Debris Shield...
- Page 120 Figure 78: Inspect the Debris Shield Optic 4. Holding the debris shield handle, position the shield so that the pin is aligned with the pin receptacle and re-insert it into the debris shield receptacle. Lumenis Pulse 120H UM-10012510 Rev. F Page 120...
- Page 121 Figure 79: Reinsert the Debris Shield Spare debris shields are located in the compartment at the rear of the laser console. A notification appears in the notification bar when there is no spare in the compartment. Lumenis Pulse 120H UM-10012510 Rev. F Page 121...
-
Page 122: Professional Maintenance
Lumenis service engineer or a certified customer voids any existing manufacturer’s warranty on the instrument. A service manual for the laser may be purchased from Lumenis. It is company policy not to distribute service tools outside of the Lumenis service organization. - Page 123 Energy Detectors Calibration The Lumenis Pulse 120H system incorporates internal energy detectors which are used to control lasing energy. The energy detectors check compares the internal energy reading to the reading from an external power meter. WARNING: All personnel in the immediate area must wear eye protection rated spe- cifically for the Holmium laser.
-
Page 124: System Requirements And General Information
The laser is shipped directly from the factory to your site. Your local Lumenis service representative initially uncrates, inspects, sets up, and installs the laser to ensure that it is working properly. In addition, Lumenis provides in-service training to ensure that your surgical staff is experienced with the performance and safety considerations of the laser. -
Page 125: Accessories
• SlimLine steam sterilization tray • Safety eyewear Electrical Requirements Electrical Utilities The Lumenis Pulse 120H holmium laser is available in two electrical configurations: • Single-phase (200-240 VAC, <46A, 50 or 60 Hz) • Three-phase (380-415 VAC, <18A per phase, 50 Hz) Electrical power should be setup according to the model ordered. -
Page 126: Compliance With International Standards
WARNING: Unauthorized use of this system may expose the operator/patient to poten- tial electrical energy and laser radiation hazards. Lumenis Pulse 120H UM-10012510 Rev. F Page 126... - Page 127 If any of the electronic system monitors detect a fault condition, laser exposure cannot occur. The high voltage power supply disables, the safety shutter closes, and the footswitch disables. Safety Interlocks The laser has a safety interlock on the fiber optic laser connector. Lumenis Pulse 120H UM-10012510 Rev. F Page 127...
-
Page 128: Space Requirements
US FDA CDRH laser classification: Class IV European EN 60825 laser classification: Class 4 NOTE: When using a 32A configuration the average maximum power will be limited in order to meet the maximum current limits. Lumenis Pulse 120H UM-10012510 Rev. F Page 128... - Page 129 Continuous Type of Protection against Electric Class I Shock Degree of Protection against Electric Shock for Applied Parts Protection against Ingress of IP20 Water: System Protection against Ingress of IP68 Water: footswitch Lumenis Pulse 120H UM-10012510 Rev. F Page 129...
- Page 130 Input Power Input Power The Lumenis Pulse 120H system is delivered with one of the following electrical input configurations, correlating to the customer’s pre- determined requirements: Long-time Input Power Input Power Momentary Input power maximum Voltage Frequency current Comments phases...
- Page 131 The following laser safety eyewear complies with DIN EN 207 and ANSI Z136.1 standards as noted in the laser safety section of this manual. ANSI standard laser safety eyewear: Part Number Product Name AX-1002033 Glasses, Safety, Holmium (2100 nm) Lumenis Pulse 120H UM-10012510 Rev. F Page 131...
- Page 132 Total length of cable should not exceed five meters (16 feet). Pin assignments are as follows: Figure 80: External Door Interlock Pin Assignments (solder side of plug shown) Lumenis Pulse 120H UM-10012510 Rev. F Page 132...
-
Page 133: Customer Service
Customer Service Customer Service Warranty Lumenis warrants the Lumenis Pulse 120H system and its accessories to be free from defects in materials and workmanship, and to perform in the manner and under the conditions specified in the operator’s manual. A defective device must be returned to Lumenis or an authorized Lumenis representative. -
Page 134: Appendix A: Emc Compliance
Guidance and manufacturer’s declaration – electromagnetic emissions The Lumenis Pulse 120H is intended for use in the electromagnetic environment specified below. The customer or the user of the Lumenis Pulse 120H should assure that it is used in such an environment. Emissions test Compliance Electromagnetic environment –... -
Page 135: Electromagnetic Immunity
Guidance and manufacturer’s declaration – electromagnetic immunity The Lumenis Pulse 120H is intended for use in the electromagnetic environment specified below. The cus- tomer or the user of the Lumenis Pulse 120H should assure that it is used in such an environment. Electromagnetic environment –... - Page 136 RF transmitters, an electromagnetic site survey should be considered. If the measured field strength in the location in which the Lumenis Pulse 120H is used exceeds the applicable RF compliance level above, the Lumenis Pulse 120H should be observed to verify normal operation. If abnormal performance is observed, additional measures may be necessary, such as re-orienting or relocating the [Medical Equipment or Medical System].
-
Page 137: Recommended Separation Distances
Recommended separation distances between portable and mobile RF communications equipment and the Lumenis Pulse 120H The Lumenis Pulse 120H is intended for use in an electromagnetic environment in which radiated RF disturbances are controlled. The customer or the user of the Lumenis Pulse 120H can help prevent...
Need help?
Do you have a question about the PULSE 120H and is the answer not in the manual?
Questions and answers