Table of Contents
Advertisement
Quick Links
Advertisement
Table of Contents

Related Manuals for LUMENIS SELECTA


Summary of Contents for LUMENIS SELECTA
- Page 1 Selecta ® Ophthalmic Laser System Operator Manual ®...
- Page 2 Lumenis, the Lumenis Logo, and Novus are registered trademarks of Lumenis, Inc. InSight, SureSpot, Varia, and Spectra are trademarks of Lumenis, Inc. Manufactured in Italy by C.S.O. S.r.l. for:...
-
Page 3: Table Of Contents
Introduction......... 27 Selecta System Components ......29 Laser module . - Page 4 Inspect the Selecta components ........31...
- Page 5 Tissue effects ..........104 Selecta...
- Page 6 EMC Guidance and Manufacturer’s Declarations ... 119 Decontamination Certificate ......123 Selecta PBL200051, Rev J...
-
Page 7: Safety And
7 Safety and Regulatory Selecta PBL200051, Rev J... - Page 8 8 Safety and Regulatory Selecta PBL200051, Rev J...
-
Page 9: Introduction
Introduction 9 Introduction The Selecta ophthalmic laser systems are classified as Class IIIb lasers by the Center for Devices and Radiological Health of the Food and Drug Administration and as Class 3b by the International Standard IEC 60825. Users must take precautions to prevent exposure of laser energy to the eyes and skin from either direct or diffusely reflected laser beams, except as a therapeutic application. -
Page 10: Laser Safety Eyewear
(usually within the controlled area). For additional information, refer to ANSI Z136.1-2000, ANSI Z136.3-2005, or International Standard IEC 60825-1: 2001. The following formula was used to calculate the worst case NOHD for Lumenis Selecta lasers and compatible delivery systems: Φ Pf - a NOHD = θ... - Page 11 NOHD = Laser system Using this approach we derive the following values: Laser System Selecta Duet 1064 nm laser 0.262 0.03 J 0.0007 cm 9.3 cm 1.67 (10 ) J/cm Selecta Duet 532 nm laser 0.016 0.002 J...
- Page 12 The barrier should be made of material that can withstand the power of the treatment beam for the maximum exposure time, relative to the configuration of the controlled area and the treatment parameters for the specific medical application. Selecta PBL200051, Rev J...
-
Page 13: Additional Ocular Protection
WARNING - Never look directly into any optical lens, except for therapeutic purposes, nor any optical fiber, probe, or laser system aperture while the laser is energized. Severe eye damage could occur. Turn off the laser before inspecting any delivery system or laser components. Selecta PBL200051, Rev J... -
Page 14: Additional Safety Considerations
CAUTION - U.S. fedederal law restricts this device to sale by or on the order of a physician. CAUTION - Lumenis medical lasers and laser delivery systems are intended solely for physicians trained in the use of these instruments. Selecta... -
Page 15: Regulatory Compliance
Regulatory Compliance 15 Regulatory Compliance Lumenis lasers and delivery systems comply with 21 CFR Chapter 1, Subchapter J, as administered by the Center for Devices and Radiological Health of the US Food and Drug Administration (FDA). CE-labeled devices comply with all appropriate performance standards as specified in Annex II of the Medical Device Directive MDD 93/42/EEC. -
Page 16: Protective Housing
The laser has a protective housing that prevents unintended human access to laser radiation above Class I limits. The housing must only be opened by a Lumenis-certified technician. Safety interlocks The protective housing is not designed to be removed by the user during operation or maintenance. -
Page 17: Location Of Regulatory And Other System Labels
OD = 5+ Laser eye safety filter LASER APERTURE Laser aperture 12 V / 30 W LB-005813 REV C Joystick laser activation Illumination bulb specification Slit lamp illumination intensity Laser aiming beam intensity Location of regulatory compliance labels Selecta PBL200051, Rev J... - Page 18 18 Safety and Regulatory Slit lamp slit width selector wheel Slit lamp illumination aperture selector wheel duet Slit lamp color filter selector wheel Location of regulatory compliance labels—Illumination Tower Selecta PBL200051, Rev J...
- Page 19 Location of Regulatory and Other System Labels 19 3959 West 1820 South Salt Lake City, UT 84104 U.S.A. Lumenis (Germany) GmbH Heinrich-Hertz-Strasse 3 D-63303 Dreieich, Germany +49.6103.8335.0 CAUTION: U.S. LAW RESTRICTS THIS DEVICE TO SALE BY OR ON ORDER OF A PHYSICIAN...
- Page 20 CLASS 2 LASER PRODUCT Diode Laser: 635 nm, <1 mW Max, CW Danger Label 100-240 V~ 50/60 Hz 3.15A 100-240 V~ T-3.15A 250V Footswitch receptacle Electrical specification, fuse rating, and mains receptacle Location of regulatory compliance labels—Wheelchair-accessible table Selecta PBL200051, Rev J...
- Page 21 CLASS 2 LASER PRODUCT Diode Laser: 635 nm, <1 mW Max, CW Danger Label 100-240 V~ 50/60 Hz 3.15A 100-240 V~ Footswitch receptacle T-3.15A 250V Electrical specification, fuse rating, and mains receptacle Location of regulatory compliance labels—small office table Selecta PBL200051, Rev J...
- Page 22 22 Safety and Regulatory 3959 West 1820 South Salt Lake City, UT 84104 U.S.A. 0044 LUMENIS (Germany) GmbH (for products shipped under Heinrich-Hertz-Strasse 3 the Medical Device Directive) D-63303 Dreieich, Germany Model name, serial number, and +49.6103.8335.0 manufacturing date...
- Page 23 90% @ +55ºC (Danger. Possible explosion hazard if used 14ºF – 131ºF NON-CONDENSING in the presence of flammable anesthetics, oxygen, or nitrous oxide.) Flammable anesthetics and gases warning Nonoperating environmental specifications (on shipping box) Regulatory compliance labels Selecta PBL200051, Rev J...
- Page 24 Posterior Offset Slit lamp slit width selector wheel Posterior YAG offset adjustment Slit lamp illumination intensity control Aiming beam intensity control Slit lamp color filter Slit lamp illumination aperture selector wheel selector wheel Regulatory compliance labels Selecta PBL200051, Rev J...
-
Page 25: Operation
25 Operation Selecta PBL200051, Rev J... - Page 26 26 Operation Selecta PBL200051, Rev J...
-
Page 27: Introduction
Trio — a Selecta Duet and a LaserLink S with compatible Lumenis 532 nm photocoagulator Selecta has all of the standard controls and functions of a diagnostic slit lamp and is intended for use in eye examination of the anterior segment, from the cornea epithelium to the posterior capsule. - Page 28 The LaserLink S laser delivery adaptor is used for treatments specifically cleared for the compatible laser photocoagulator. Selecta is shipped directly from the factory to your site. Your local Lumenis representative initially unpacks, inspects, sets up, and installs the Selecta to ensure that it is working properly.
-
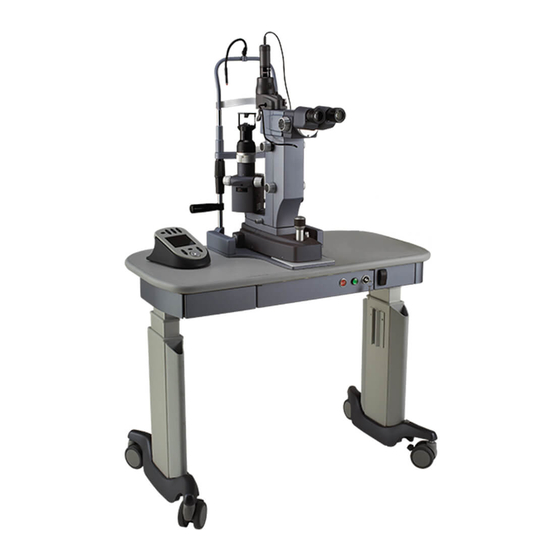
Page 29: Selecta System Components
Selecta System Components 29 Selecta System Components Selecta is comprised of the following major components: • a diagnostic slit lamp with parallel binocular optics and five- position magnification • an integrated Nd:YAG laser module that delivers 1064 nm and/or 532 nm wavelengths, depending on the laser model •... -
Page 30: Laser Module
Remote control The remote control is the control panel for the Selecta laser. The remote control allows you to select laser treatment settings, such as laser mode, energy, and aiming beam intensity. The remote control can be placed on the table so that the operator can verify the laser treatment parameters without moving back from the slit lamp binoculars. -
Page 31: Connection Instructions
CAUTION - Do not use device if slit lamp seems unstable or inadequately secured. Inspect the Selecta components Before connecting the Selecta components, inspect the individual components for dirt, debris, or damage. Check the electrical cables to ensure that they are not frayed or split. - Page 32 32 Operation Slit lamp and table Remote control receptacle (beneath slit lamp table) Connecting the remote control to the slit lamp console Selecta PBL200051, Rev J...
-
Page 33: Connect The Footswitch (Optional)
Connection Instructions 33 Connect the footswitch (optional) The Selecta provides a choice of laser activation. By default, the laser is activated by the joystick laser pushbutton. However, many physicians prefer footswitch activation, and Lumenis provides a footswitch that may be used with the system. - Page 34 34 Operation Footswitch receptacle Connecting the footswitch Selecta PBL200051, Rev J...
-
Page 35: Connect The External Door Interlock Plug
To resume treatment, close the treatment room door or reinsert the interlock plug, and press the (ready) button on the remote control. External door interlock receptacle (on back of system) External door interlock plug Connect the interlock plug Selecta PBL200051, Rev J... -
Page 36: Plug In The Main Power Cable
Insert the main power plug into the main power receptacle, as shown. Plug the other end into an electrical outlet. Power plug receptacle (on table console, near right rear wheel) Plugging in the main power cable Selecta PBL200051, Rev J... -
Page 37: Installing Optional Accessories
Installing optional accessories CAUTION - Disconnect or stabilize all accessories during transportation. A variety of optional viewing accessories is available for the Selecta, such as camera and video adaptors, and a co-observation tube. Compatible Selecta accessories are listed in the “Specifications” section of this manual. You may also contact your local Lumenis representative for additional product information. - Page 38 Seat the guide pin into the guide pin slot, and tighten the binocular screw to secure the connection. Binocular Beam assembly Magnification changer splitter screw Binocular screw Beam Beam Binocular splitter splitter dovetail dovetail dovetail mount mount receptacle Secure the beam splitter between the binocular assembly and magnification changer Selecta PBL200051, Rev J...
- Page 39 Rotate the beam splitter attachment ring clockwise to secure the connection. Front view Centering groove Beam splitter port Side view Attachment ring Attach the compatible viewing device to the beam splitter (co-observation tube shown) Selecta PBL200051, Rev J...
-
Page 40: Attaching The Laserlink S Delivery Device
Attach the LaserLink S fiber optic to the photocoagulator, as described in the LaserLink S operator manual. Disconnect the external door interlock plug from the Selecta and connect the plug to the photocoagulator when the LaserLink S is connected and in use. - Page 41 Connection Instructions 41 THIS PAGE IS INTENTIONALLY BLANK Selecta PBL200051, Rev J...
-
Page 42: System Basics
Laser settings are selected from the remote control. The laser activation mode is user-selectable: either a footswitch or joystick pushbutton may be used. Selecta PBL200051, Rev J... - Page 43 System Basics 43 Slit Lamp Joystick laser pushbutton Remote control Table top Table height control Keyswitch Emergency laser Main power receptacle Power on stop button (near right rear wheel) indicator light Laser footswitch Locking wheels Selecta PBL200051, Rev J...
-
Page 44: Turning On The System
The standby icon on the remote control illuminates, and the laser is in standby mode. The system will default to minimum settings. Turning off the system Under normal operating conditions, turn the keyswitch to the (off ) position. Selecta PBL200051, Rev J... -
Page 45: Standby, Ready, And Laser Emission Mode
Standby Ready Laser emission Standby, Ready, and Laser Emission mode (photodisruptor screen shown) Selecta PBL200051, Rev J... -
Page 46: Emergency Off
46 Operation Emergency off In an emergency, press the red emergency off button to immediately de-energize the system. Emergency off Selecta PBL200051, Rev J... -
Page 47: System Beeps
After disconnecting the system, move the slit lamp table and accessories to the desired site. Step on the wheel brake to lock the wheel, as shown. To unlock the wheel, place your foot under the brake and lift the lever up. Locking the wheels Selecta PBL200051, Rev J... -
Page 48: Slit Lamp Basics
As shown in the following illustration and described in the following section, the Selecta slit lamp has all of the standard diagnostic slit lamp controls such as illumination intensity, illumination aperture, slit width adjustment and rotation, as well as the typical diagnostic slit lamp adjustments, such as diopter eyepiece adjustments, magnification, binocular focus, and interpupillary distance adjustment. - Page 49 Illumination tower angle scale Microscope arm Joystick locking screw Arm position Illumination angle scale intensity control Instrument base Illumination aperture Aiming beam Instrument base and color filter intensity locking screw selector wheels control Slit lamp controls Selecta PBL200051, Rev J...
-
Page 50: Slit Lamp Controls
Slit lamp controls Eyepieces, diopter adjustment, and interpupillary distance The Selecta slit lamp microscope eyepieces have a 12.5x magnification, with diopter adjustments on both eyepieces of ±5. One eyepiece has crosshairs to aid focusing. The eyepiece positions can be manually adjusted to suit the operator’s interpupillary distance. -
Page 51: Laser Controls On The Slit Lamp
100 µm is the nominal setting, as indicated on the control knob. The posterior YAG offset is continuously adjustable from 0 to 350 µm posterior, with detents at 0, 100, 250, and 350 µm. Selecta PBL200051, Rev J... -
Page 52: Laser Basics
Error message display activation indicator Energy display Pulse count Burst display Total energy delivered in mJ Inactive in Burst selector Photodisruptor mode Energy control Pulse count & total energy reset Remote control (Photodisruptor-1064 nm screen shown) Selecta PBL200051, Rev J... -
Page 53: Slt Mode-Remote Control Screen
Joystick button or footswitch laser activation indicator Energy display Pulse count Total energy delivered in mJ Inactive in SLT Inactive in mode SLT mode Energy control Pulse count & total energy reset Remote control (SLT-532nm screen shown) Selecta PBL200051, Rev J... -
Page 54: Pc (External Photocoagulator) Mode-Remote Control Screen
PC (external photocoagulator) Mode—remote control screen Options toggle Contrast knob (on top side) (on top side) Laser mode selector PC Mode indicator Illumination mirror indicator Laser mode display Error message display Remote control (PC mode shown) Selecta PBL200051, Rev J... -
Page 55: Options Screen Mode-Remote Control Screen
Laser mode Software display information and messages Brightness Volume display display Joystick selection display Footswitch selection display Volume control LCD brightness Message scroll wheel Joystick/Footswitch laser activation selector Remote control (Options screen shown) Selecta PBL200051, Rev J... -
Page 56: Standby, Ready, And Laser Emission Mode
The Selecta provides a choice of laser activation. By default, the laser is activated by the laser pushbutton on the slit lamp joystick. However, many physicians prefer footswitch activation, and Lumenis provides a Selecta footswitch that may be used with the system. - Page 57 Laser Basics 57 Standby Ready Laser emission Selecting Standby or Ready mode (Photodisruptor screen shown) Selecta PBL200051, Rev J...
-
Page 58: Laser Mode
58 Operation Laser mode If you’ve purchased the Selecta Duo, the laser mode pushbutton lets you select either the YAG or SLT laser mode. The remote control screen will change to reflect all of the treatment settings available in the selected laser mode. -
Page 59: Aiming Beam
To increase the intensity, press the upper portion of the button. Increase intensity Decrease intensity Aiming beam intensity display Adjusting the aiming beam intensity (Photodisruptor screen shown) Selecta PBL200051, Rev J... -
Page 60: Remote Control System Options
Remote Control System Options Select the options screen The Selecta remote control options screen is where you can set system preferences such as the volume of system beeps, the interface language, and whether the treatment laser is activated by the joystick pushbutton or a footswitch. -
Page 61: Language
Remote Control System Options 61 Language The Selecta system interface can be displayed in either English or icon mode. The language interface button is located on the options screen. In English mode, any informational or error messages are displayed in English and with an error code, such as “E109”. -
Page 62: Lcd Screen Brightness
To decrease the brightness of the LCD screen, press the lower portion of the button. To increase the brightness, press the upper portion of the button. LCD brightness display Increase brightness Decrease brightness Adjusting the remote control screen brightness (Options screen shown) Selecta PBL200051, Rev J... -
Page 63: Laser Activation Mode-Joystick Or Footswitch
Remote Control System Options 63 Laser activation mode—Joystick or Footswitch The Selecta provides a choice of laser activation. By default, the laser is activated by the laser pushbutton on the slit lamp joystick. However, the laser can be activated either by a pushbutton on the slit lamp joystick or by a footswitch. -
Page 64: Volume
The volume control is located on the remote control options screen. To lower the beep volume, press the lower portion of the button. To increase the volume, press the upper portion of the button. Volume display Increase volume Decrease volume Adjusting the system volume (Options screen) Selecta PBL200051, Rev J... -
Page 65: Remote Control Treatment Settings
Refer to the “Specifications” section of this manual for available energy settings. The energy display shows the currently selected energy. Selected energy per burst Energy control Selecting the energy per burst (Photodisruptor mode shown) Selecta PBL200051, Rev J... -
Page 66: Total Energy And Pulse Count Displays-Photodisruptor And Slt Mode
Use the reset button to reset the total pulse count and energy displays to zero. Total pulse count Total energy delivered Reset button Total energy and total pulse count displays and reset button (Photodisruptor mode shown) Selecta PBL200051, Rev J... -
Page 67: Burst Mode-Photodisruptor Laser Mode
Set the burst mode using the burst mode selector. The currently selected burst mode is shown in the burst mode display. Burst mode display Burst selector Selecting the photodisruptor burst mode (Photodisruptor screen) Selecta PBL200051, Rev J... -
Page 68: Preoperative Setup Of The Slit Lamp And Laser
Note the index number of the slit lamp eyepieces relative to the index marks as a future starting point for this procedure. View the target through the eyepieces, and adjust the focus to obtain the smallest spot on the target. Remove the paper target from the headrest. Selecta PBL200051, Rev J... -
Page 69: Verify That The Slit Spot Is Centered
Set the slit spot to 5 mm. Set the microscope magnification to the maximum setting. Visually verify that the slit spot is centered in the field of view. If the spot is not centered, contact your Lumenis service representative. 5 mm illuminated spot Field of view... -
Page 70: Verify The Laser Aiming Beam Accuracy-Yag
Swing the illumination tower to one side, if necessary, so that it does not obstruct the aiming beam. Position the slit lamp so that the aiming beams converge to form one spot on the paper target. Selecta PBL200051, Rev J... -
Page 71: Verify The Laser Aiming Beam Accuracy-Slt
WARNING - If the aiming beams cannot be made coincident, do not use the laser on patients. Doing so may cause inadvertent damage to nontarget tissue and injury to the patient. Contact your local Lumenis representative. Lock the slit lamp in this position. - Page 72 WARNING - If the laser burn mark and the aiming beams are not coincident, do not use the laser on patients as it may cause serious injury. Contact your local Lumenis representative. Repeat the test as necessary. Selecta...
-
Page 73: Operation Instructions
Operation Instructions 73 Operation Instructions Preoperative Instructions Ensure that the Selecta system is properly connected, as described in the “Connection instructions” section of this manual. Post the “Laser in Use” warning sign outside the treatment room door. Verify that the pre-operative system set up, as described in this manual, was properly performed. -
Page 74: Postoperative Instructions
Clean the Selecta, as instructed in the “Maintenance” section of this manual. Cover the Selecta with its dust cover to protect it and ensure that the optical components remain free of dust and other contaminants. - Page 75 75 Maintenance Selecta PBL200051, Rev J...
- Page 76 76 Maintenance Selecta PBL200051, Rev J...
-
Page 77: Troubleshooting Guide
Verify that the delivery system is properly connected. External door interlock If the external door interlock is used in conjunction with a remote switch, verify that the external door interlock plug is inserted in the external door interlock receptacle. Close the interlocked door. Selecta PBL200051, Rev J... - Page 78 Slit lamp binocular eyepieces are not Refer to the Focusing the Slit Lamp sec- properly adjusted. tion of this manual for additional infor- mation for properly adjusting the Slit lamp binocular eyepieces. Selecta PBL200051, Rev J...
- Page 79 The LaserLink S is attached and the Remove the LaserLink S. Cannot select the Ready mode Selecta system is in YAG or SLT laser mode. The slit lamp table is in motion. Adjust the table to the desired height and position, and then select the Ready mode.
- Page 80 If “I109” displays on the the condition persists, contact your local remote control Lumenis representative. “Energy Low < 20%” or The detected energy level was at least Place the laser in ready mode. If the 20% lower than the level selected.
- Page 81 Place the laser in ready mode. If the condi- “Energy Low < 50%” or “C102” displays on the 50% lower than the level selected. tion continues, restart the laser. If the con- dition persists, contact your local Lumenis remote control representative. The laser temperature is too high.
-
Page 82: User Maintenance
Lumenis-certified service engineer to ensure proper laser performance. Laser repair All laser repairs should be performed by a Lumenis-certified service engineer. For training and information, contact your local Lumenis service representative. Inspecting the laser system components Before and after each use, inspect the laser system components for evidence of dirt, debris, or damage. -
Page 83: Cleaning The External Surfaces Of The Laser Console And Slit Lamp
You may damage the console and laser system electronics. Cleaning and disinfecting areas of patient contact Selecta laser treatment involves only brief skin contact with the patient, but attention should be given to the possibility of cross-contamination between patients. The areas of skin contact include the slit lamp table, chin rest, headrest and handles. -
Page 84: Clean The Gonioscopy Contact Lens
84 Maintenance Clean the gonioscopy contact lens The Lumenis Selecta contact lenses have a special low-reflectivity coating bonded to the lens, and so must, therefore, be handled carefully. As soon as a lens is removed from a patient’s eye, thoroughly rinse it in cold or warm water to remove salts, mucous and gonioprism solution. -
Page 85: External Door Interlock Pin Assignments
Total length of cable shall not exceed five meters (16 feet). Pin assignments are as follows: Signal Name Signal Description Remote Interlock Connect to switch, normally open Return Connect to switch common None No connection Remote door interlock pin assignments (mating face shown) Selecta PBL200051, Rev J... -
Page 86: Changing The Fuses
Unlock the electrical input module cover by inserting a small flathead screwdriver into the slot. Gently push against the locking tab until the lock releases. Remove the fuse cover. Installing new fuses Electrical module Changing the fuses Selecta PBL200051, Rev J... - Page 87 Replace the two 5 millimeter by 20 millimeter fuses with the appropriate replacement fuses as indicated below: Voltage Configuration Fuse Rating 100-240VAC 3.15A Fuse table Place the cover back onto the module. Gently push against the cover until the locking tab latches. Selecta PBL200051, Rev J...
-
Page 88: Changing The Slit Lamp Illumination Bulb
Be careful not to directly touch the bulb. On the right side of the illumination tower, loosen the bulb housing cover by turning the thumbscrew counter-clockwise. Housing Cover Illumination bulb housing Selecta PBL200051, Rev J... - Page 89 Holding a new bulb by its base, and being careful not to touch the glass with your fingers, insert the prongs securely into the bulb receptacle. Close the cover door and tighten the thumbscrew. Place a new illumination bulb in the receptacle Selecta PBL200051, Rev J...
-
Page 90: Energy Calibration
Calibration questions should be referred to your local Lumenis representative. Disclaimer warning Calibration is a service procedure to be done only by Lumenis-certified service engineers or customers who have taken and passed a Lumenis Service Certification Training course. Adjustment by anyone other than a trained Lumenis service engineer or a certified customer voids any existing manufacturer’s warranty on the instrument. -
Page 91: Electromagnetic Compatibility
Selecta Laser System, as this may result in increasedelectromagnetic emissions or decreased immunity to such emissions. WARNING - If the Selecta Laser System is used adjacent to or stacked with other equipment, observe and verify normal operation of the laser system in the configuration in which it will be used prior to using it in a surgical procedure. -
Page 92: Specifications
92 Maintenance Specifications The Selecta Ophthalmic laser system delivers both a 1064 nm and 532 nm treatment beam; therefore, the laser specifications outlined below for each wavelength are applicable to the Selecta Duet model. Selecta Duet 532 nm laser... -
Page 93: Electrical Requirements
Relative humidity 0 to 90% at 55°C, non-condensing Standard commercial shipping altitude Altitude Vibration Capable of surviving transport by normal commercial recognized air, sea, and land carriers Shock Lumenis shock requirements, based on size and weight Selecta PBL200051, Rev J... - Page 94 0.2, 5, 8.9, 13.3 mm and tear drop (variable 1.7 to 12.2 mm) Green, cobalt blue, Neutral Density (ND) 28% attenuation, and none Illumination filters Fixation lamp Green or red, 12 V Adjustable, vertical travel 50 mm (2 in), with fixation lamp Chin rest Selecta PBL200051, Rev J...
-
Page 95: Warranty Information
Decontamination of Returned Equipment To comply with United States postal and transportation law, equipment shipped to Lumenis US offices for repair or return must be properly decontaminated with a chemical germicide that is commercially available and cleared for use as a "Hospital Disinfectant." To ensure that all equipment has... - Page 96 96 Maintenance Selecta PBL200051, Rev J...
- Page 97 97 Professional Instructions Selecta PBL200051, Rev J...
-
Page 98: 98 Professional Use Instructions
98 Professional Use Instructions Selecta PBL200051, Rev J... - Page 99 Refer to the laser operator manual, Indications for Use section. • Selecta Trio: same indications for use as a Selecta Duet and LaserLink S slit lamp delivery device with a currently cleared Lumenis 532nm photocoagulator...
-
Page 100: General Intended Use
SLT treatment laser provides a low energy, short pulse of laser light that produces a thermal effect in pigmented cells in the trabecular meshwork. If an optional LaserLink S delivery device is attached to the Selecta system and a compatible Lumenis 532 nm photocoagulator laser, such as the Novus Spectra, the Selecta works strictly as a standard diagnostic slit lamp—... - Page 101 The physician is advised to consult medical journals for information on laser treatment in a particular specialty. The use of a laser is at the physician’s discretion except in cases where the application is contraindicated. Selecta PBL200051, Rev J...
-
Page 102: Selective Laser Trabeculoplasty (Slt)-532Nm Nd:yag
The mechanism of action of the Lumenis Selecta 532nm frequency-doubled, Q-Switched Nd:YAG ophthalmic laser is the selective targeting of pigmented trabecular meshwork cells. The Selecta achieves its intended effect through the use of single laser pulses of short duration and low fluence (energy/area). The... -
Page 103: Slt Contraindications For Use
SLT Precautions The following precautions are suggested when using the Selecta for SLT: • To reduce the risk of damage to non-targeted tissues, the treatment energy setting should be the minimum energy necessary to perform the treatment. -
Page 104: Photodisruptor Clinical Procedure And Parameters
Selecta 1064 nm wavelength acts principally on water in tissue and produces a cutting or disrupting tissue effect. Therefore, the Selecta 1064 nm laser will damage any tissue or structure on which the beam is focused. -
Page 105: Posterior Capsulotomy-1064 Nm Nd:yag
Posterior Capsulotomy—1064 nm Nd:YAG 105 Posterior Capsulotomy—1064 nm Nd:YAG The Selecta 1064 nm laser is indicated for disruption of the posterior capsule of the eye (posterior capsulotomy). Contraindications The following represent contraindications for posterior capsulotomy or pupillary membranectomy: • pre-existing ocular pathologies including: –... - Page 106 Patients who exhibit a pressure rise generally return to pretreatment levels within 24 hours but should be carefully followed throughout this period. Persistent IOP elevation occurs in some patients. Clinical estimates are that 2-3% of patients may be treated for secondary glaucoma. Selecta PBL200051, Rev J...
- Page 107 Physicians who experience problems with continued pitting should consider ending the treatment. The Selecta aiming beam is offset longitudinally up to 0.1 mm in front of the Nd:YAG beam. Physicians who experience continued focusing problems, which can lead to IOL pitting, should first check the ocular setting of each eye on the slit lamp.
- Page 108 • patients with IOLs, particularly posterior chamber lenses close to the posterior capsule, are at risk of IOL pitting or cracking • patients with pre-existing ocular conditions have a greater chance of experiencing postoperative complications Selecta PBL200051, Rev J...
-
Page 109: Precautions
Targeting Focus the unit in accordance with the description provided in the Operation section of this manual. In dual aiming beam systems such as Selecta, the Nd:YAG beam extends beyond the diode beams, so there is an increased probability of Nd:YAG beam impingement of the iris. The diode aiming beam focus spot is longitudinally offset up to a maximum of 350 microns in front of the Nd:YAG beam. -
Page 110: Patient Considerations
• intraocular lens damage (including pits, fractures, or dislocations) • intraocular bleeding • vitreal chamber injury (including loose cortex or capsular fragments) • generalized endophthalmitis with vitreous involvement • corneal edema • neovascularization of the iris • iris damage • vitreous hemorrhage Selecta PBL200051, Rev J... -
Page 111: Iridotomy-1064 Nm Nd:yag
Iridotomy—1064 nm Nd:YAG 111 Iridotomy—1064 nm Nd:YAG The Selecta 1064 nm wavelength is indicated for performing an iridotomy (hole in the iris). Contraindications The following represent contraindications for iridotomy. Pre-existing ocular pathologies including: • eyes with opacities of the media such that the iris cannot be adequately visualized •... -
Page 112: Poor Candidates For Nd:yag Laser Iridotomy
The risk of lens damage during Nd:YAG laser iridotomy will increase if: • laser focusing is inaccurate • laser energy is applied through an already patent iridotomy • laser energy is applied through the pupil directly to the lens Selecta PBL200051, Rev J... -
Page 113: Inadvertent Patient Movement
All eyes should be observed with a biomicroscope for bleeding. If bleeding occurs, additional Nd:YAG laser treatment may aggravate it. Further, if bleeding does not stop spontaneously or after applying digital pressure, argon laser photocoagulation of the bleeding site may be necessary. Selecta PBL200051, Rev J... -
Page 114: Corneal Damage
Nd:YAG laser iridotomy: • patients with chronic uveitis have an increased tendency towards both early and late iridotomy closure • patients with vascularization of the iris or engorgement of iris vessels are at increased risk of bleeding Selecta PBL200051, Rev J... -
Page 115: Precautions
350 microns in front of the Nd:YAG beam. This offset is adjusted on the laser using the posterior offset control. With the offset control set at 100 microns, Selecta delivers a preset offset equal to 100 microns in air. Energy Minimal effective energy and minimal pulses per burst should be used to reduce risk of damage to nontarget areas. - Page 116 116 Professional Use Instructions Selecta PBL200051, Rev J...
- Page 117 117 Appendix 1 Selecta PBL200051, Rev J...
- Page 118 118 Appendix 1 Selecta PBL200051, Rev J...
-
Page 119: Emc Guidance And Manufacturer's Declarations
Guidance and Manufacturer's Declaration Electromagnetic Emissions Selecta ophthalmic laser family is intended for use in the electromagnetic environment specified below. The customer or the user of Selecta ophthalmic laser family should ensure that it is used in such an environment. - Page 120 Guidance and Manufacturer's Declaration: Electromagnetic Immunity Selecta ophthalmic laser family is intended for use in the electromagnetic environment specified below. The customer or the user of Selecta ophthalmic laser family should ensure that it is used in such an environment.
- Page 121 RF transmitters, an electromagnetic site survey should be considered. If the measured field strength in the location in which the Selecta ophthalmic laser family system is used exceeds the applicable RF compliance level above, the Selecta ophthalmic laser family system should be observed to verify normal operation. If abnormal performance is observed, additional measures may be necessary, such as reorienting or relocating the Selecta ophthalmic laser family unit.
- Page 122 Equipment and the Selecta ophthalmic laser family System The Selecta ophthalmic laser family system is intended for use in an electromagnetic environment in which radiated RF distur- bances are controlled. The user of the Selecta ophthalmic laser family system can help prevent electromagnetic interference by...
-
Page 123: Decontamination Certificate
The undersigned also agrees to reimburse Lumenis for any costs incurred in cleaning the enclosed equipment, in the event said item(s) is/are received by Lumenis in a contaminated condition. - Page 124 124 Appendix 1 Selecta PBL200051, Rev J...
Need help?
Do you have a question about the SELECTA and is the answer not in the manual?
Questions and answers
WHAT IS SAVER MODE ON MY LASER
Saver Mode, referred to as CaseSaver™ Mode, is a feature on the LUMENIS SELECTA laser that allows continued operation if one of the laser wavelengths becomes inoperable. If the unit has more than one wavelength, the remaining operational wavelengths continue to function, enabling treatment to proceed until the unit is serviced.
This answer is automatically generated