Crestron AirMedia Series 3 Quick Start Manual
Hide thumbs
Also See for AirMedia Series 3:
- Product manual (174 pages) ,
- Quick start manual (6 pages) ,
- Getting started (2 pages)
Advertisement
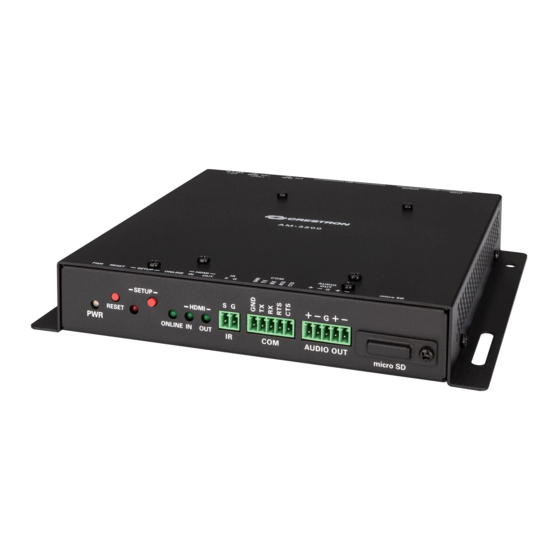
AM-3200, AM-3200-WF, and AM-3200-WF-I
AirMedia® Series 3 Receiver 200
The AirMedia® Series 3 Receiver 200 (AM-3200, AM-3200-WF, and
AM-3200-WF-I) enables secure wireless collaboration in the modern
digital workspace. Easy to deploy and manage, install the Receiver in
conference rooms, huddle rooms, lounges, lobbies, or almost any space
to establish a productive meeting environment.
In the Box
1
AirMedia Series 3 Receiver (AM-3200, 6511482;
AM-3200-WF, 6511483; or AM-3200-WF-I, 6511484)
Additional Items
4
Anchor, Wall, Plastic (2057414)
4
Screw, Metal, 0.98 in. (25 mm) (2057419)
1
Connector, 2-Pin (2057409)
2
Connector, 5-Pin (2057410)
2
Antenna with cable, SMA, Female (2057413)*
*This item is only included with the AM-3200-WF and AM-3200-WF-I models.
Install the Device
The device can be mounted onto a rack rail or flat surface.
Mounting onto a Rack Rail
The device can be mounted onto a front or rear rack rail. To mount the
device:
1. Position either the left or right mounting flange so that the holes
align with the holes in the rack rail.
2. Secure the device to the rack rail using two rack mount screws
(not included).
Quick Start
1
Advertisement
Table of Contents

Related Manuals for Crestron AirMedia Series 3


Summary of Contents for Crestron AirMedia Series 3
- Page 1 2. Secure the device to the rack rail using two rack mount screws (not included). In the Box AirMedia Series 3 Receiver (AM-3200, 6511482; AM-3200-WF, 6511483; or AM-3200-WF-I, 6511484) Additional Items Anchor, Wall, Plastic (2057414) Screw, Metal, 0.98 in. (25 mm) (2057419)
- Page 2 Quick Start AM-3200, AM-3200-WF, and AM-3200-WF-I AirMedia® Series 3 Receiver 200 Mounting onto a Flat Surface Using the included mounting screws and anchors, mount the device onto a flat surface such as a wall or the underside of a table. Use the mounting template on the following page to determine the mounting hole locations.
- Page 3 Quick Start AM-3200, AM-3200-WF, and AM-3200-WF-I AirMedia® Series 3 Receiver 200 AM-3200, AM-3200-WF and AM-3200-WF-I Mounting Template...
-
Page 4: Make Connections
Quick Start AM-3200, AM-3200-WF, and AM-3200-WF-I AirMedia® Series 3 Receiver 200 Make Connections Make connections to the Receiver as shown in the following diagrams. NOTES: The device receives power from a Power over Ethernet (PoE+, IEEE 802.3at) connection. It can also receive power from the PW-2412WU power pack (sold separately). - Page 5 Quick Start AM-3200, AM-3200-WF, and AM-3200-WF-I AirMedia® Series 3 Receiver 200 Bottom Panel Connections - AM-3200...
- Page 6 Quick Start AM-3200, AM-3200-WF, and AM-3200-WF-I AirMedia® Series 3 Receiver 200 Bottom Panel Connections - AM-3200-WF, AM-3200-WF-I...
-
Page 7: Configure The Device
Power is being applied to the device. The device is booting. AM-3200-WF Setup White The setup button was pressed. Online Green The device is connected to a Crestron Control System. HDMI In Green A video signal is detected at the HDMI input. www.crestron.com/model/6511483 HDMI Out Green A video signal is being transmitted to the HDMI output. -
Page 8: Important Safety Instructions
Quick Start AM-3200, AM-3200-WF, and AM-3200-WF-I AirMedia® Series 3 Receiver 200 Important Safety Instructions Instructions importantes Important Safety Instructions Instructions de sécurité importantes WARNING: When using this product, basic precautions should always be Les avertissements: concernant l’utilisation de ce produit doivent followed, including the following: toujours être fondés sur les précautions fondamentales, notamment: 1. - Page 9 Crestron disclaims any proprietary interest in the marks and names of others. Crestron is not responsible for errors in typography or photography.
Need help?
Do you have a question about the AirMedia Series 3 and is the answer not in the manual?
Questions and answers