Carmanah F Series Install Manual
Hide thumbs
Also See for F Series:
- User manual (75 pages) ,
- Manual (31 pages) ,
- Quick start manual (20 pages)
Table of Contents
Advertisement
Quick Links
Advertisement
Table of Contents

Subscribe to Our Youtube Channel
Related Manuals for Carmanah F Series


Summary of Contents for Carmanah F Series
- Page 1 F Series APPLIED INFORMATION (AI) INTEGRATION INSTALL GUIDE 89104_InstallGuide_TRA_F-Series_AI_Integration_Kit_RevA Carmanah Technologies Corp. | 250 Bay St, Victoria, BC V9A 3K5, Canada | 1.250.380.0052 | customerservice@carmanah.com | carmanah.com Page 1...
-
Page 2: Warnings And Precautions
Warranty Disclaimer This manual will familiarize you with the features, operation standards, and installation of Carmanah’s F Series Applied Information (AI) system. Failure to comply with the use, storage, maintenance, installation or placement instructions detailed in this manual could void the warranty. -
Page 3: Safety And Usage Precautions
Changes or modifications to Carmanah equipment not expressly approved by Carmanah could void both the user's authority to operate the equipment and the warranty. Carmanah Technologies Corp. | 250 Bay St, Victoria, BC V9A 3K5, Canada | 1.250.380.0052 | customerservice@carmanah.com | carmanah.com Page 3... -
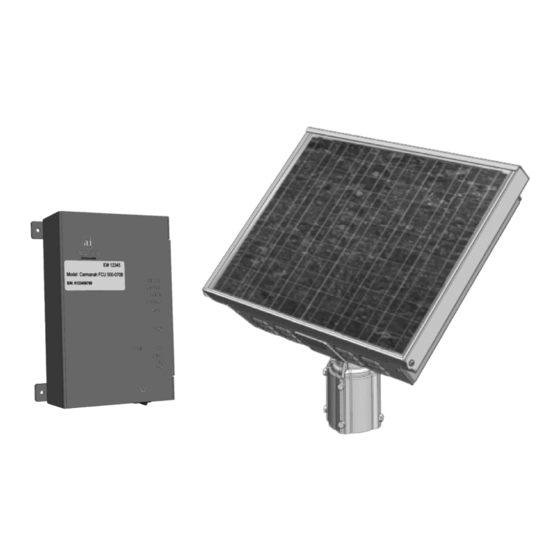
Page 4: System Components
Applications For Carmanah R829-F and R247-F systems, the F Series AI Integration Kit allows for remote system monitoring, scheduling and control. With Carmanah R820-F and R920-F Rectangular Rapid Flashing Beacon (RRFB) systems, the F Series AI Integration Kit allows remote system monitoring. -
Page 5: Tools And Materials Required
APPLIED INFORMATION (AI) INTEGRATION INSTALL GUIDE Tools and Materials Required The following tools and materials may be required to install the AI Integration Kit into your F Series system: • Drill and ½” drill bit • Deburring tool or similar •... - Page 6 Ensure that no burrs are present that would interfere with the antenna seal. Carmanah Technologies Corp. | 250 Bay St, Victoria, BC V9A 3K5, Canada | 1.250.380.0052 | customerservice@carmanah.com | carmanah.com Page 6...
- Page 7 • Use heat gun to affix the heat shrink tubing. • Strip insulation of the five wires 0.35”. Carmanah Technologies Corp. | 250 Bay St, Victoria, BC V9A 3K5, Canada | 1.250.380.0052 | customerservice@carmanah.com | carmanah.com Page 7...
- Page 8 • Swing the EMS down to access the internal wiring. If radio is present, ensure radio pins are not bent and antenna cable is not damaged. Carmanah Technologies Corp. | 250 Bay St, Victoria, BC V9A 3K5, Canada | 1.250.380.0052 | customerservice@carmanah.com | carmanah.com Page 8...
- Page 9 • Remove battery harness wires from battery circuit board terminal by pushing down on each terminal button with small flat bladed screwdriver and pulling out each wire. Carmanah Technologies Corp. | 250 Bay St, Victoria, BC V9A 3K5, Canada | 1.250.380.0052 | customerservice@carmanah.com | carmanah.com Page 9...
- Page 10 BAT−. wires wires Make sure all wire strands go into the terminal hole. Carmanah Technologies Corp. | 250 Bay St, Victoria, BC V9A 3K5, Canada | 1.250.380.0052 | customerservice@carmanah.com | carmanah.com Page 10...
- Page 11 • Align ends of heatshrink on both harnesses near end of sheet metal tab. • Cable tie around both harnesses and sheet metal tab. Carmanah Technologies Corp. | 250 Bay St, Victoria, BC V9A 3K5, Canada | 1.250.380.0052 | customerservice@carmanah.com | carmanah.com Page 11...
- Page 12 • Insert other end of 3” yellow wire into 3-position splice terminal. • Insert yellow wire from AI harness into third splice terminal position. Carmanah Technologies Corp. | 250 Bay St, Victoria, BC V9A 3K5, Canada | 1.250.380.0052 | customerservice@carmanah.com | carmanah.com Page 12...
- Page 13 Route Wires • Tuck 3-position splice terminal under PV and battery harnesses as shown. • Route wires as neatly as possible. Carmanah Technologies Corp. | 250 Bay St, Victoria, BC V9A 3K5, Canada | 1.250.380.0052 | customerservice@carmanah.com | carmanah.com Page 13...
- Page 14 • Turn EMS over and replace four screws. • Install ring terminal from green ground wire under bottom right EMS screw. Carmanah Technologies Corp. | 250 Bay St, Victoria, BC V9A 3K5, Canada | 1.250.380.0052 | customerservice@carmanah.com | carmanah.com Page 14...
-
Page 15: Install Antenna
• Match GPS & GSM labels on antenna harness & AI unit (Cell closer to front, GPS closer to back). Carmanah Technologies Corp. | 250 Bay St, Victoria, BC V9A 3K5, Canada | 1.250.380.0052 | customerservice@carmanah.com | carmanah.com Page 15... - Page 16 • Route coax cables between AI unit and antenna neatly and cable tie as needed. Avoid sharp bends in the coax cable. Carmanah Technologies Corp. | 250 Bay St, Victoria, BC V9A 3K5, Canada | 1.250.380.0052 | customerservice@carmanah.com | carmanah.com Page 16...
- Page 17 • On the upper left side of the browser, select the device name that matches the Device ID (the ID number labelled on the AI unit). Carmanah Technologies Corp. | 250 Bay St, Victoria, BC V9A 3K5, Canada | 1.250.380.0052 | customerservice@carmanah.com | carmanah.com Page 17...
- Page 18 If testing indoors where there is no GPS signal, this may result in a device status of “No GPS Lock.” R829 school zone application shown. Carmanah Technologies Corp. | 250 Bay St, Victoria, BC V9A 3K5, Canada | 1.250.380.0052 | customerservice@carmanah.com | carmanah.com Page 18...
-
Page 19: Technical Support
© 2020 Carmanah Technologies Corporation Technical Support: Email: customerservice@carmanah.com Toll Free: 1.877.722.8877 (US & Canada) Worldwide: 1.250.380.0052 Fax: 1.250.380.0062 Web: carmanah.com Carmanah Technologies Corp. | 250 Bay St, Victoria, BC V9A 3K5, Canada | 1.250.380.0052 | customerservice@carmanah.com | carmanah.com Page 19...
Need help?
Do you have a question about the F Series and is the answer not in the manual?
Questions and answers