
Subscribe to Our Youtube Channel
Related Manuals for Contec CMS 50IW


Summary of Contents for Contec CMS 50IW
- Page 1 Telefoon: 074-2911110 (klantenservice) Bestel in onze webshop Webshop: www.medipreventiecentrum.nl E-mail: info@medipreventiecentrum.nl Pols saturatiemeter...
- Page 2 Instructions to User Dear users, thank you very much for purchasing the Pulse Oximeter. This Manual is written and compiled in accordance with the council directive MDD93/42/EEC for medical devices and harmonized standards. In case of modifications and software upgrades, the information contained in this document is subject to change without notice.
- Page 3 than 2 hours. For the special patients, there should be a more prudent inspecting in the placing process. The device can not be clipped on the edema and tender tissue. The light (the infrared is invisible) emitted from the device is harmful to the eyes, so the user and the maintenance man should not look at the light source.
-
Page 4: Table Of Contents
1.1 Instructions for safe operations ............1 1.2 Warning ..................1 1.3 Attention ..................2 2 Overview ....................4 2.1 Features ..................4 2.2 Major applications and scope of application ........4 2.3 Environment requirements ............. 5 3 Principle ....................6 4 Technical specifications .............. -
Page 6: Instructions For Safe Operations
1 Safety 1.1 Instructions for safe operations Check the main unit and all accessories periodically to make sure that there is no visible damage that may affect patient’s safety and monitoring performance. It is recommended that the device should be inspected weekly at least. -
Page 7: Attention
Please don't measure this device with functional tester for the device's related information. 1.3 Attention ֠ Keep the oximeter away from dust, vibration, corrosive substances, tinder, high temperature and moisture. ֠ If the oximeter gets wet, please stop operation. ֠ When it is carried from cold environment to warm or humid environment, please do not use it immediately. - Page 8 ֠ If some abnormal conditions appear on the screen during test process, pull the finger out and reinsert to restore normal use. ֠ The device has normal life for three years since the first electrified use. ֠ The device has alarm function, this function can either be paused, or closed (default setting) for good.Please check the chapter 6.1 as reference.
-
Page 9: Overview
2 Overview The pulse oxygen saturation is the percentage of HbO in the total Hb in the blood, so-called the O concentration in the blood. It is an important bio-parameter for the respiration. A number of diseases relating to respiratory system may cause the decrease of SpO in the blood, furthermore, some other causes such as the malfunction of human body's self-adjustment, damages during surgery, and the injuries caused by some... -
Page 10: Environment Requirements
The Pulse Oximeter can be used in measuring the pulse oxygen saturation, pulse rate and perfusion index through finger.The product is fit for family, hospital, oxygen bar, community healthcare, physical care in sports (It can be used before or after doing sports and it is not recommended to use the device during the process of having sport) and etc. -
Page 11: Principle
3 Principle Principle of the Oximeter is as follows: An experience formula of data process is established taking use of Lambert Beer Law according to Spectrum Absorption Characteristics of Reductive Hemoglobin (Hb) and Oxyhemoglobin (HbO ) in glow & near-infrared zones. Operation principle of the device is: Photoelectric Oxyhemoglobin Inspection Technology is adopted in accordance with Capacity Pulse Scanning &... -
Page 12: Technical Specifications
4 Technical specifications 4.1 Main performance value display Pulse rate value display, bar graph display Pulse waveform display Perfusion Index value display Charge function: Lithium battery is the power supply and can be charged up time and again. Low-power indication: low-power indication symbol appears before working abnormally which is due to low-power. -
Page 13: Installation
C Perfusion Index Range: 0%~20% D Resolution : 1%, Pulse rate: 1bpm; Perfusion Index:0.1% E Measurement Performance in Weak Filling Condition: and pulse rate can be shown correctly when pulse-filling ratio is 0.4%. SpO error is ±4%; pulse rate error is ±2 bpm or ±2% (select larger). F Resistance to Surrounding Light: The deviation between the value measured in the condition of man-made light or indoor natural light and that of darkroom is less than ±1%. -
Page 14: Probe Installation
Figure 2 Front View 5.2 Probe installation A. Open the USB cover,inserting the probe into the USB port of the pulse oximeter,and the red-light of probe will flicker. B. Insert the finger into the probe (the side with finger sign and the nail should be in the same side ).The connected probe could work normally when the luminescent tube in the device emit red light sostenuto. - Page 15 Figure 3 Fingernails and the luminescent tube should be in the same side. 6.1.3 Pause Alarm Alarm includes the alarm of measure data's going beyond the limits(SpO and pulse rate value), alarm of low-power, and the alarm of finger out. In the measuring interface, if the alarm function is on, during the period of alarming, alarm can be suspended by short pressing menu button,and the screen will appear pause-alarm symbol, but the function...
- Page 16 A Brightness Adjustment In the main menu interface,short press menu button to move the choice bar to the "Brightness" item,then long press menu button to adjust the brightness of screen (4 levels adjustable). Figure 4 Main Menu Interface B Alarm Setting In the main menu interface,short press menu button to move the choice bar to "Alarm”...
- Page 17 Figure 5 Alarm Setting Menu a The high/low limit of alarm setting In alarm setting menu,short press menu button to move the choice bar to "Dir" item,long press menu button to choose Up or Down.Short press menu button to adjust alarm item:SpO high limit (SpO ALM HI), SpO low limit (SpO...
- Page 18 setting menu as Figure 6. Figure 6 Record setting Menu a Record segments Display the number of the data segments which have been recorded. b Record setting In the "Record Menu" interface,short press menu button to move the choice bar to the "Record off" item,then long press menu button to begin to record data;here enter the "Record"...
- Page 19 In the main menu interface,short press menu button to move the choice bar to the "System" item,then long press menu button to enter the system setting menu as Figure 7. Figure 7 System Menu a Hard. Ver. The version number of hardware for the device. b Soft.
- Page 20 transmission.If the user can't set "Wireless" after cutting connecting,please try again after waiting 30 seconds. Recommended adapter: 2.4GHZ adapters which use CSR as main chip. d. Sound Volume In the "System Menu" interface,short press menu button to move the choice bar to "Sound Volume” item,then long press button to change sound volume step by step (3 levels adjustable).
- Page 21 to "Exit” item, then long press button to exit main Menu and return to the measure interface. H. Clock Setting In the measure interface, Short press power button to enter to the clock interface,and long press button to set time."up" means to adjust time upwards,"down"...
-
Page 22: Attention For Operation
When charging in power-off state, short press power button and the device will display green dynamic state bar.It means that the device is charging.When the state bar is full,the charging is finished. When charging in power-on state,dynamic Power indication symbol displays. -
Page 23: Clinical Restrictions
B.The finger should be in a proper position (see the attached illustration as Figure 3 for reference), or else it may result in inaccurate measure. C.The ray between luminescent tube and photoelectric receiving tube must get across subject’s arteriole. D.The oximeter should not be used at a location or limb tied with arterial canal or blood pressure cuff or receiving intravenous injection. -
Page 24: Maintain, Transportation And Storage
may also be a major factor resulted in serious error of SpO measure. D. The SpO value serves as a reference value for judgment of anemic anoxia and toxic anoxia, for some patients with serious anemia may also report good SpO measurement. -
Page 25: Troubleshooting
8 Troubleshooting Trouble Possible Reason Solution The finger is not properly Place finger Pulse positioned. properly Rate again. The patient’s SpO is too Try again; Go to a displayed low to be detected. hospital normally. diagnosis if you are sure the device works all right. - Page 26 The device The battery is not full Please recharge the can not be charged. battery used for full The battery is broken Please contact time after local service center. charge The battery The battery is broken Please contact can not be local service center.
-
Page 27: Key Of Symbols
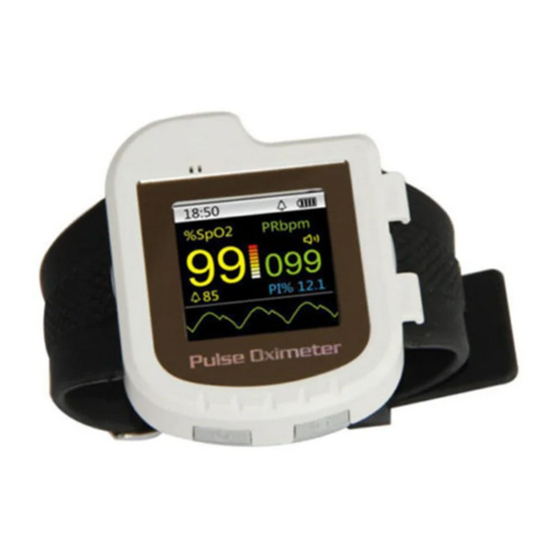
9 Key of symbols Signal Description Warning – See User Manual %SpO The pulse oxygen saturation (%) PRbpm Pulse rate (bpm) Perfusion Index (%) The battery power is full Low-power Close the alarm sound indication Pause the alarm sound indication Open the alarm sound indication Close the pulse sound indication Open the pulse sound indication... - Page 28 Menu button power button IP22 International Protection WEEE (2002/96/EC)
-
Page 29: Function Specification
10 Function specification Information Display Mode Pulse Oxygen 2-digit digital OLED display Saturation(SpO Pulse Rate(PR) 3-digit digital OLED display Perfusion Index (PI) 3-digit digital OLED display Pulse Intensity (bar-graph) bar-graph OLED display Parameter Specification Measuring range 0%~100%, (the resolution is 1%). 70%~100%:±2% ,Below Accuracy... - Page 30 Battery Requirement Voltage 3.7 rechargeable lithium battery × 1 (The red wire on the battery denotes anode,the black wire on the battery denotes cathode.) Battery working life Charge and discharge no less than 500 times. Power Adapter(selected) Output voltage DC 5V Output current 1000mA Wireless Module...
- Page 31 Low voltage alarm alarm Pulse rate alarm Probe error alarm 16ms...
Need help?
Do you have a question about the CMS 50IW and is the answer not in the manual?
Questions and answers