Advertisement
Available languages
Available languages
Quick Links
Advertisement

Related Manuals for Pro's Kit GE-634


Summary of Contents for Pro's Kit GE-634
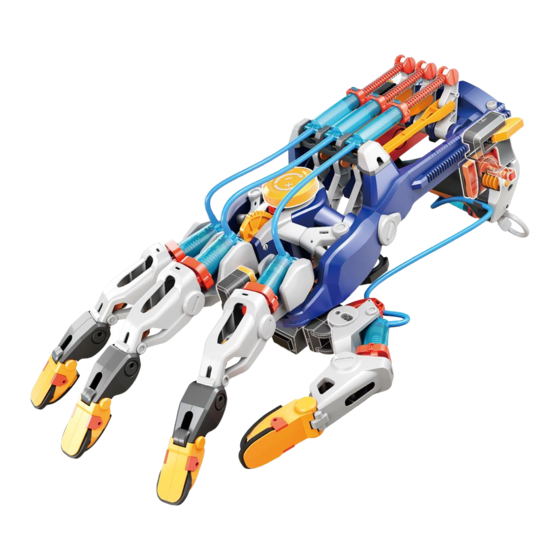
- Page 1 GE-634 液壓 機械手套 Assembly Instruction & Manual 組裝說明手冊...
- Page 3 目錄 Contents ....................... 產品介紹 Product Introduction ....................... 自備工具 Tools You May Need ....................... 零件清單 Mechanical Parts List ........................塑膠模型零件 Plastic Parts ...................... 小技巧提醒 Read It Before Assembly 握把 組 裝 手掌 組裝 Operation-Bar Assembly Palm Assembly ................手 指 組 裝 液壓...
- Page 4 液 壓 機 械 手 套 HYDRAULIC CYBORG HAND 產品 介 紹 Product Introduction 體 驗機械人 生 ,就 從打 造液 壓 機 械 手 套 開 始 ! G E - 6 3 4 液 壓 機 械 手 套 不 需 要 電 池 , 透 過 液 壓 原 理 轉 換 成 動 力 , 配 合 可 調 角 度 手 指 關 節 , 取 物 、 握 持 更 有 趣 , 大 、 小 物 品 皆 能拿取自如;不僅手指角度可調整,手掌大小、寬鬆也可以依需求調節,好玩不分大、小手! 可變換的拇指位置,不論左、右...
- Page 5 塑 膠 模 型 零 件 Plastic Parts 此產品為模型組件拆封修剪或包裝不完整,恕不退換 Goods cut are not returnable. 請依照組裝步驟將所需的零件剪下。 事先全數剪下會在組裝時造成混淆 Cut the plastic parts when they are required. Do not cut them in advance. MADE IN TAIWAN...
- Page 6 小技巧提醒 Read It Before Assembly 在開始組裝前,請仔細閱讀以下說明 Please read through and follow the tips below before assembly. 剪切毛邊 Remove burrs 毛邊 毛 邊 Unnecessary burrs Unnecessary burrs 正 確 Correct 毛 邊 Unnecessary burrs 錯誤 Incorrect 請勿過度剪切非毛邊的塑膠零件, 以免組裝不確實,導致運作不良 Trim off the burrs ONLY. Do not trim off the protrusion belonged to 零件剪下時請將毛邊剪切乾淨,以免產生間隙導致運作不良...
- Page 7 握 把 組 裝 Operation-Bar Assembly 正確 錯誤 Incorrect Correct 請將C8 推 至 底 俯 視圖 Top View Push C8 to the end 正確 錯誤 Incorrect Correct 注意方向 Ensure the right dirction of C11 P2x2 P2x2 正確 錯誤 Incorrect Correct P2x2 正視圖...
- Page 8 手 掌 組裝 Palm Assembly 錯 誤 Incorrect 泡棉貼 Sponge P7- 5 錯 誤 Incorrect 正 確 Correct 請做3組 P7- 1 請做3次 手 掌 PALM...
- Page 9 手指組裝 Fingers Assembly 轉向 正確 錯 誤 Correct Incorrect 正 確 Correct 錯 誤 Incorrect 正確 錯 誤 Correct Incorrect 錯 誤 Incorrect 正 確 Correct...
- Page 10 請 注 意 組 裝 順 序 :先 組 C 2 , 再 組 C 1 Assemble C2 first; and then C1 正 確 Correct 錯 誤 Incorrect 正確 錯 誤 Correct Incorrect 泡 棉貼 Sponge P7- 3 正 確 錯...
- Page 11 請注意A14方向要正確 Ensure the right dirction of A14 請 注 意 組裝順序:先組C2,再組C1 Assemble C2 first; and then C1 正確 Correct 錯誤 Incorrect 正確 錯 誤 Correct Incorrect 泡棉 貼 Sponge P7- 3 正 確 錯誤 Correct Incorrect 指頭 02 Finger 02 P7- 6 正...
- Page 12 請 注 意 組裝順序: 先組C2,再組C1 請注意A11方向要正確 Ensure the right dirction of A11. Assemble C2 first; and then C1 正確 Correct 錯誤 Incorrect 正 確 錯 誤 Correct Incorrect 泡棉 貼 Sponge P7- 3 正確 錯誤 Correct Incorrect P7- 6 正確 錯...
- Page 13 指 頭 01 Finger 01 指頭 01 Finger 01 指頭 03 指頭 03 Finger 03 Finger 03 指頭 02 Finger 02 P7 泡棉 貼 Sponge P1x2 P7- 4 P7- 4 Fi ng ers 指頭組裝完成 FINGERS...
- Page 14 液壓 系 統模 組 組裝 Hydraulic System Assembly 模組 B 模組 A Hydraulic Hydraulic System System 需做1組 需做3組 液 壓 筒 液壓 筒 Cylinder Cylinder 軟管 液 壓筒 液壓 筒 Tube Cylinder 軟 管 Cylinder 12cm Tube 34cm 軟 管 裁切 How To Cut The Tube 量...
- Page 15 G3液壓筒 組 裝 G3 Cylinder Assembly 組裝F13時,請注意F7&F8的方向務必正確 Before assembling F13, ensure F7 & F8 正確 錯誤 錯誤 was built correctly Correct Incorrect Incorrect 組裝前請將毛邊剪除乾淨 Cut off the burrs before assembly 正確 錯誤 錯誤 Correct Incorrect Incorrect 毛邊 毛邊 burr burr 毛邊...
- Page 16 錯誤 液壓筒 Incorrect Cylinder 錯誤 Incorrect 正確 Correct G1 液 壓筒組 裝 G1 Cylinder Assembly 此 處 上 油 Oil the part 組裝前請將毛邊剪 除乾淨 Cut off the burrs before assembly. 毛邊 burr 錯誤 Incorrect 毛邊 毛邊 burr burr 側視 圖Side View 錯誤...
- Page 17 連接G 1 和G3 Connect G1 with G3 將 活塞 推壓 至底 將 活 塞 拉 到上 方 (如 圖示 ) 重 複 步驟 Pull up the piston to the Press down the piston Re-do to fill up the top (as shown below). to the bottom.
- Page 18 連 接 G 2和G3 Connect G2 with G3 將 活 塞 拉 到上 方 ( 如 圖 示 ) 將 活 塞 推 壓 至 底 重 複 步 驟 Pull up the piston to the Press down the piston Re-do to fill up the top (as shown below).
- Page 19 模 組A測試 Hydraulic System A Testing 比 例 1:1 Scale 1:1 推 壓 至底 Push to the end 正確 錯誤 檢查 Correct Incorrect Check 液壓筒 Cylinder 軟管 Tube 液壓筒 12 cm Cylinder 若模組A出現以上異常狀況,請確認液壓筒是否注滿水(參考14頁,步驟1-3) If hydraulic system A experiences above failures, back to page 14, step 1-3 and fill up the cylinder with water 模...
- Page 20 拇指組裝 Thumb Assembly 泡棉貼 Sponge P7- 4 正 確 錯誤 Correct Incorrect...
- Page 21 泡棉貼 Sponge P7- 7 正 確 錯誤 Correct Incorrect 正 確 錯誤 P7- 6 Correct Incorrect 拇指 THUMB 正 確 錯誤 Correct Incorrect 拇 指 THUMB 液壓筒 Cylinder 組 模 Hydraulic System...
- Page 22 總組合 Module Assembly 正確 錯誤 Correct Incorrect 支 撐 墊( 保 護墊 ) 組裝Supporting Pads Assembly 注 意: F 20 上下切勿顛倒 N ot ice : Do no t t u rn F20 upside down 長 墊 錯誤 Long-Pad Incorrect 注 意: F 20 上下切勿顛倒 N ot ice : Do no t t u rn F20 upside down 泡棉貼...
- Page 23 各 部 位 合 體 組 裝Complete-unit Assembly 指頭 FINGERS 手掌 PALM P2x2...
- Page 24 模 組 Hydraulic System 液壓筒 Cylinder 壓 Push 液壓筒 Cylinder 正確 Correct 壓 Push 錯誤 Incorrect F1 will break 請勿做此動作 會被壓斷!
- Page 25 模 組 Hydraulic System 液壓筒 Cylinder 液壓筒 Cylinder 壓 Push 正確 Correct 壓 Push 錯誤 Incorrect F1 will break 請勿做此動作 會被壓 斷! 模 組 Hydraulic System 液壓筒 Cylinder...
- Page 26 液壓筒 Cylinder 壓 Push 正確 Correct 壓 Push 錯誤 Incorrect F1 will break 請勿做此動作 會被壓斷! 正確 Correct 握 把 OPERATION-BAR 錯誤 Incorrect...
- Page 27 右手控制環安裝Installation ( for Right-hand Users) 左手使用者,請參照P.36-37安裝方式 Optional left-hand users,go to page 36-37 for installation 將長墊鎖緊至底 Fasten Long-Pad to the end 長墊 旋轉 Long-Pad ROTATE 旋轉 ROTATE 旋轉ROTATE 將短墊鎖緊至底 Fasten Short-Pad to the end 旋轉 ROTATE ROTATE 旋轉 ROTATE 短墊 Short-Pad...
- Page 28 拇指 THUMB 液壓筒 Cylinder 小技巧提醒:視實際需求依以下方法將拇指卸除 Tips- thumb disassembly in case of necessary. 壓下 PRESS PRESS 拉開 PULL PULL...
- Page 29 操作方式 How To Operate 鬆開D8和D9 Unlock D8 & D9. 將右手戴上手套,並將拇指放於指示的鉤環上 Put your right hand through the device, fix the thumb to the hook. 正確 Correct 錯誤 Incorrect 上下 滑 動 握 把 以 符合 手 指 長 度 將手指扣在扣環上,並試著以指頭推拉,取得能夠順暢動作的位置 Slide up or down the operation-bar to fit your fingers’ lengths. Have your fingers clasp the hooks, try a push/pull by your fingertips for smooth operation.
- Page 30 旋 緊左 右 兩 側 的 保 護 墊 至 適 合 寬 度 , 以 利 手 掌 居 中 Adjust and fasten both supporting pads to fit your palm at a comfortable middle position. 中央 Middle 正確 Correct 中央...
- Page 31 特 點 說 明 Product Features 調整旋鈕 Rotary Knob 液壓系統 Hydraulic System 手指可向上張開 Extension 。 拇指角度可調整Adjustable Thumb 拇指可卸除/變更位置 Detachable Thumb 指頭關節角度可調整 Adjustable Finger Joints C la w a n d R ig h t H 左手 Left Hand 爪型 Claw 右手...
- Page 32 注 意事項 Warning 1.輕拿輕放,請勿以如下錯誤方式拿取液壓手套 Handle the Cyborg hand with care and do not mistreat as shown below. 正確 錯誤 錯誤 Correct Incorrect Incorrect 2.請勿拿 取 過重 的物品 Do not grip or lift objects that exceed the maximum weight limits shown below. 抓取Gripping 最大...
- Page 33 3. 小 心 調整 指手 指角度Gently adjust finger joints. 3種水平角度可調整(開-合) Horizontal Mode (close-open) with 3-phase adjustments. 切勿過度延伸、張開關節角度,以免造成損壞 Do not bend the joints over the limited phasing/angle, it might cause the fingers broken. 錯誤 錯誤 Incorrect Incorrect 2種垂直角度可調整(上-下) Vertical Mode ( up-down) with 2-phase adjustments. 錯誤...
- Page 34 操作技 巧 Exercises/and Tips ( for Right-hand users) 範例 1 Example 1 拿取小 東西 Grip the tiny items (A) 拇指調整 : (1) 將拇指放入” R ”位 (2) 如下所示調整拇指位置 (A) Thumb adjustment : (1) Insert “ Thumb ” at the “ R ” position. (2) Adjust ” Thumb ” angle as shown below. (B) 指關節調整...
- Page 35 範例 2 Example 2 拿取 體積較大物 品 Grip the big objects (A) 拇指調整 : (1) 將拇指放入” M ”位 (2) 如下所示調整拇指位置 (A) Thumb adjustment : Insert “ Thumb ” at the “ M ” position. (2) Adjust thumb position as below illustrated. (C) 逆時針旋轉旋鈕將手指抬到最高的位置...
- Page 36 簡易 故 障 排除Trouble Shooting 如果手指頭操作不順暢,請跟著以下步驟進行確認 If the fingers do not work properly, check the following steps. 1 . 請 確 認 G 1 液 壓筒 裡 是 否 有 多 餘 的 空 氣 。 如 有 ,請依照 3 4 頁的 步驟 確 認安 裝 Check if there is excess air inside the Cylinder G1.
- Page 37 如為手指頭(非拇指)的軟管脫落或漏水,請卸除G1液壓筒並重新注水 Water leakage or slipped tubes on fingers – disassemble G1 and refill with water. Disassemble Tips 拆 除 技巧 液壓筒 Cylinder 正確 Correct 壓 Push 錯誤 Incorrect F1 will break 請勿 做 此動 作 會被 壓 斷! Side View Rear View 側...
- Page 38 如為拇指的軟管脫落或漏水,請卸除G2液壓筒並重新注水 Water leakage or slipped tubes on thumb – disassemble G2 and refill with water. 液壓筒 Cylinder 注滿水 重複步驟 將活塞壓到底部 Press down the Fill up with water 直到液壓筒注滿水 Re-do piston to the fill up the cylinder bottom. with water. 拉開 套入...
- Page 39 左手控制環安裝Installation (for Left Hand Users) 將長墊鎖緊至底 Fasten Long-Pad to the end 長墊 Long-Pad 旋轉 ROTATE 旋轉 ROTATE 旋轉 ROTATE 將短墊鎖緊至底 Fasten Short-Pad to the end ROTATE 旋轉 ROTATE 旋轉 ROTATE 短墊 Short-Pad...
- Page 40 拇指 THUMB 液壓筒 Cylinder 小技巧提醒:視實際需求依以下方法將拇指卸除 Tips- thumb disassembly in case of necessary. 壓下 PRESS PRESS 拉開 PULL PULL...
- Page 41 Name, address (no P.O. Box), telephone number, and email address. 2. 請註明產品名稱、產品型號、零件名稱、零件型號以及數量 Model name and model number.Part number, part name, and quantity. 3. 如有任何需求,請洽您的經銷商 Please contact local distributor if any query. 液壓機械手套 Cyborg Hand 零件表 GE-634 Parts List 零件型號 零件名稱 數量 Part Name Part Number 華司螺絲...
Need help?
Do you have a question about the GE-634 and is the answer not in the manual?
Questions and answers