
Related Manuals for Pro's Kit GE-537


Summary of Contents for Pro's Kit GE-537
- Page 1 GE-537 八方全能遊戲搖桿 Assembly Assembly Instruction Instruction & & Manual Manual 組裝說明手冊 組裝說明手冊...
-
Page 3: Table Of Contents
目錄 Contents 產品介紹 Product Introduction 自備工具 Tools You May Need 零件清單 Mechanical Parts List 塑膠模型零件 Plastic Parts 小技巧提醒 Read It Before Assembly 去除毛邊 Remove Burrs 緊固螺絲 Fasten Tapping Screws 模型形狀、組裝方向與位置注意事項 Shape, Assembly Direction, and Position of Parts 抹油方式 How to Oil the Parts 組裝說明... -
Page 4: 產品介紹 Product Introduction
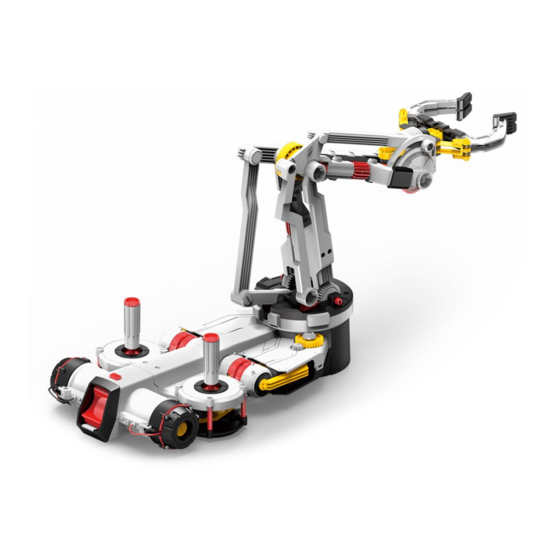
八方全能遊戲搖桿 Joysticks Robotic Arm 產品介紹 Product Introduction 玩膩一般的機械手臂了嗎? 那就來試試新款的八方全能遊戲搖桿吧! 經由孩子們最熟悉的遊戲搖桿操控手臂,4軸控制作動8個方向,操作直覺 、輕輕鬆鬆就能上手。可以兩爪握持,也可以變化成四爪夾持,在家也能體驗夾娃娃機的樂趣。親手為自己打造專屬的八方全能遊戲搖桿吧! Looking for a unique robotic arm with exclusive features? This innovative arm is easily operated by two joysticks to control the 4 axes in 8 different directions, simultaneously. The Robotic Arm has interchangeable 2-claw and 4-claw grippers so you can grab a whole range of different objects. -
Page 5: 塑膠模型零件 Plastic Parts
六角軸(長) Hex Shaft (Long) 電池彈片端子組 Battery Terminal with Wire 107mm 2 pcs 泡棉(黑) Sponge (Black) 油包 Oil Bag 1 pc 1 pc 1 pc 塑膠模型零件 Plastic Parts 此產品為模型組件拆封修剪或包裝不完整,恕不退換 Cut goods cut are not returnable. 請依照組裝步驟將所需的零件剪下,以免組裝時造成零件混淆 Cut off the plastic parts when they are required. Do not cut them in advance. -
Page 6: 小技巧提醒 Read It Before Assembly
小技巧提醒 Read It Before Assembly 在開始組裝前,請仔細閱讀以下說明 Please read through and follow the tips below before assembly. 去除毛邊Remove burrs 毛 邊 Unnecessary 毛 邊 正確 burrs Unnecessary burrs Correct 毛 邊 Unnecessary 錯誤 burrs Incorrect 請勿過度剪切非毛邊的塑膠零件, 以免組裝不確實,導致運作不良 Trim off the burrs ONLY. Do not 零件剪下時請將毛邊剪切乾淨,以免產生間隙導致運作不良... -
Page 7: 抹油方式 How To Oil The Parts
抹油方式 How to Oil The Parts 衛生紙 Tissue Paper 抹油 注 意 : 出 現此 圖 代 表 零件 需 抹 油 Apply Oil Note : Oil the parts when appears. 請勿將液壓油抹到非指示抹油處 紙杯子 Do not oil outside the shadow as shown below. 抹油示意: Example: 棉花棒... - Page 8 先將D9插入至底後,再鎖緊螺絲 Push D9 to the end first, then fasten the screws P1x4 請確認D8缺口需朝向箭頭方向 Ensure the right direction of D8 將 與 壓緊後翻面並鎖上螺絲 Holding D8 tight with G1 and turn 180. P1x3...
- Page 9 P20 2 P20 2 P20 2 P20 2 請將鐵片凸起處向後折 Fold back the lobe 請將鐵片凸起處向後折 Fold back the lobe 紅色 黑色 Black 注意: 凸點需面向電池 IMPORTANT! Protrusion must face battery. P1x4 P1x4 正確 錯誤 Correct Incorrect...
- Page 10 黑色 Black 正確 Correct 錯誤 Incorrect 紅色 Red 請將電線如圖示水平卡入溝槽 Please arrange the wires as shown below. Please arrange the wires as shown below. 黑色 Black 俯視圖 Top View 紅色 Red 紅色 Red 正確 Correct 錯誤 Incorrect 黑色 Black...
- Page 11 正確 錯誤 正確 Correct 錯誤 Incorrect Correct Incorrect 正確 錯誤 Correct Incorrect 將C3蓋上G1前,請先將D5鎖至C3 Ensure to fasten D5 to C3 first 咔噠 Click 咔噠 Click 咔噠 Click 咔噠 Click...
- Page 12 P1x4 推 PUSH PUSH 請如圖示預先按下開關以切斷電源 Please power off the device in advance as illustrated. Please power off the device in advance as illustrated. Please power off the device in advance 請務必使用鹼性一號電池,以免安全裝置 一號電池(D)x2 as illustrated. 無法正常操作 Battery(D)x2 Please do not use super heavy duty batteries. They may cause the abnormal operation ofthe safety switch.
-
Page 14: 底座齒輪箱組裝 Base Gearbox Assembly
底座 齒輪 箱組 裝 Base Gearbox Assembly P10x4 請勿向外扳開 Do not pull outward ! A8x2... - Page 15 P4(白色 White) 20mm 正確 Correct 錯誤 Incorrect 正確 Correct 錯誤 Incorrect 請做2組 29mm...
- Page 16 正確 Correct 錯誤 Incorrect 請做2組 29mm 推 PUSH 29mm...
- Page 17 65.5mm 21.5mm P18x2 P12x2 推 PUSH 正確 Correct 錯誤 Incorrect 請做 3 組 16mm 執行此步驟前,務必將D7先上油 Please ensure D7 is fully applied with oil. Do not leave D7 dry before moving to next step. 切勿將D33與D32混淆 Do not mix D33 and D32 請做2組...
- Page 18 請注意D33、D32組裝方向務必正確 Ensure the direction of D33 and D32 俯視圖 Top View...
- Page 19 請確認D8缺口需朝向箭頭方向 請確認D8缺口需朝向箭頭方向 Ensure the right direction of D8 Ensure the right direction of D8 正確 Correct 錯誤 Incorrect...
- Page 20 正確 Correct 錯誤 Incorrect 20mm 正確 錯誤 Correct Incorrect 20mm (白色) (White) (藍色) (Blue)
- Page 21 正確 錯誤 Correct Incorrect...
- Page 22 安裝B3時請注意方向是否正確 Pay attention to the direction Pay attention to the direction when installing B3. when installing B3.
- Page 23 P1x3...
- Page 24 P1x8...
- Page 25 D28x2 P1x6 翻面時請注意勿觸碰並開啟安全裝置 Please do not falsely trigger the safety lock when flipping the base over.
- Page 26 請做2組 安裝B3時,請注意方向是否正確 Pay attention to the direction Pay attention to the direction when installing B3. when installing B3.
-
Page 27: 組裝測試 Assembly Testing
組 裝測 試 Assembly Testing 向上 PUSH 壓 PUSH Power on 開啟電源 Power on PUSH 壓 PUSH 向下 down down 向右 right right right 向上 向下 down down 向右 向左 right right left left 向左 left left left right left 底座旋轉... -
Page 28: 圓盤齒輪箱組裝 Disc Gearbox Assembly
圓盤 齒輪 箱組 裝 Disc Gearbox Assembly 29mm 上拉移除 向下壓 PULL PUSH 16mm 29mm... - Page 29 16mm 上拉移除 向下壓 PULL PUSH 29mm 16mm 16mm (黑色) (黑色) (Black) (Black) (藍色) (Blue) (藍色) 16mm (Blue)
- Page 30 16mm 請將毛邊剪切乾淨 Cut off the burrs before assembly. 毛邊 毛邊 burr burr 正確 錯誤 Correct Incorrect...
- Page 31 P1x3...
-
Page 32: 夾爪組裝 Gripper Assembly
夾爪組 裝 Gripper Assembly 向下壓 PUSH 向下壓 PUSH 21.5mm 上拉移除 PULL 上拉移除 PULL 16mm 正確 錯誤 Correct Incorrect (白色) (White) (橘色)(Orange) 16mm 正確 Correct 16mm 錯誤 Incorrect P1x4... -
Page 34: 手臂組裝 Arm Assembly
手臂組 裝 Arm Assembly 107mm 正確 錯誤 Correct Incorrect 請做2組 正確 Correct 錯誤 Incorrect 正確 Correct 錯誤 Incorrect... - Page 35 正確 錯誤 Correct Incorrect 側視圖 Side View...
-
Page 36: 各部件組合 Final Combination
各 部件 組合 Final Combination 前推搖桿讓手臂與底座呈垂直方向 Push the joystick forward and make the arm a vertical position on the base. 開啟電源 Power on 壓 PUSH PUSH 壓 PUSH PUSH D3x2 使用鑷子協助, 將較容易組裝 Use tweezers as aid tool 關機 Power off 壓... - Page 37 A4x4...
- Page 38 上 Upper Side 下 Lower Side...
-
Page 40: 操作方式 How To Play
操作方式 How to Play 按下安全裝置 Push the Push the safety lock 按下開關 PUSH PUSH Push the power switch 上 up 下 down 向後 backward 向前 forward 腕關節擺動 Shoulder Motion 肘關節擺動 Elbow Motion 向前 向下 down forward 緊閉夾爪 張開夾爪 向左 向右 gripper gripper left... - Page 41 夾爪變換 Claw Modes 腕關節擺動 Rotatable Wrist 4爪 垂直 4 -Claws Vertical 。 水平 Horizontal 爪 2 -Claws...
-
Page 42: 簡易故障排除 Trouble Shooting
簡易故障排除 Trouble shooting 1.請確認電池安裝位置是否正確(見第9頁,步驟 1.Be sure to install batteries with correct polarity. Please refer to page 9 , step 2.開啟電源後,如機器未發出運轉聲,請確認以下線路是否安裝正確. a.見第7頁,步驟 b.見第10頁,步驟 2.After pressing the power switch, if the device doesn’t make an operational sound, please check a.page 7 , step . - Page 43 遊...
- Page 44 ˙電池移除或更換應由成人或在成人監督下進行。 Removal and replacement of batteries should be carried out by adult or under adult supervision. ˙請避免電池或電池連接器端子短路。 Avoid short circuiting the contacts in the battery compartment or the battery terminals. ˙電池長期不用或電力耗盡時請取出以避免電池漏液。 Remove exhausted batteries from the product to avoid leakage. ˙請勿混用新舊電池及不同廠牌、種類的電池,以免造成危險或電器損耗。...
Need help?
Do you have a question about the GE-537 and is the answer not in the manual?
Questions and answers