Table of Contents
Advertisement
Quick Links
Advertisement
Table of Contents

Related Manuals for Pro's Kit GE-897


Summary of Contents for Pro's Kit GE-897
- Page 1 GE-897 三合一按鍵編程機器人 Assembly Instruction & Manual 組裝說明手冊...
-
Page 2: Table Of Contents
目 錄 Contents ....................產品介紹 Product Introduction ....................自備工具 Tools You May Need ....................零件清單 Mechanical Parts List ........................ 塑膠模型零件 Plastic Parts .................... 小技巧提醒 Read it Before Assembly ................... 馬達組裝 Motor Module Assembly ................左齒輪箱組裝 Gear Box Module (Left) Assembly 右齒輪箱組裝... -
Page 3: 產品介紹 Product Introduction
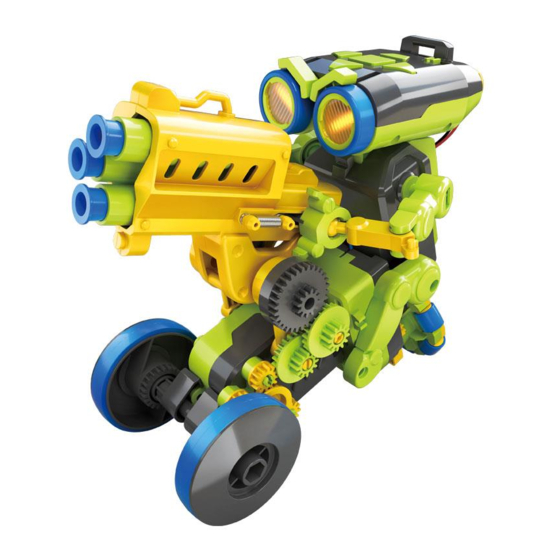
3合1按鍵編程機器人 3 IN 1 TRIBO 產品介紹 Product Introduction 對於機器人只能走來走去感到無趣嗎?編程一定要用電腦嗎?編程是不是都很難?3合1按鍵編程機器人以簡單、直覺的方式解決以上煩惱!藉由頭部的 五個按鍵,大、小朋友們就能輕易地設計出機器人的動作 –前進、後退、向左、向右、旋轉等,即便是初學者也能輕易上手! 模型組裝結構,讓您 搭接出不同的機器人造型做出豐富的動作,善用您的創造力、觀察力、邏輯能力,做出你的狙擊神射手、創意小畫家和掃地機器人吧! TRIBO is a one-of-a-kind DIY Keypad Coding Robot. This mission-based adorable coding buddy is designed to inspire every user with a beginner- friendly coding method that doesn’t require a digital device (computer/tablet/phone). You can build and rebuild the parts into 3 different designs: Shooter, Doodler and Sweeper. -
Page 4: 塑膠模型零件 Plastic Parts
塑膠模型零件 Plastic Parts 此產品為模型組裝,經拆封修剪或包裝不完整,恕不退換 Goods cut are not returnable 請依照組裝步驟將所需的零件剪下,以免組裝時造成零件混淆 Cut the plastic parts when they are required. Do not cut them in advance. Spare part 11 12 21 22 MADE IN TAIWAN 小技巧提醒 Read it Before Assembly 開始組裝前請仔細閱讀以下說明 Please read through and follow the tips below before assembly. 去除毛邊... - Page 5 拆卸工具:使用B14卸下B9或C23(變形時才會用到) Disassembly Tool : B14 to use on B9 & C23 拉開 PULL 拉開以利鬆脫 Pull and release the parts. 拉開 PULL 拉開以利鬆脫 Pull and release the parts. 拆卸技巧 Disassembly Tips 使用一字起子 Use a 邊扭轉邊拉開 Twist and pull simultaneously. screwdriver. 拔開端子 Loose the Plug 請如圖示拔開連接電池盒的端子以利拆裝機器人...
-
Page 6: 馬達組裝 Motor Module Assembly
馬達組裝 Motor Module Assembly 安裝C3、C4時,請注意方向是否正確 Pay attention to the direction when assembling C3 & C4 正 確 錯 誤 Correct Incorrect 馬達模組 MOTOR MODULE P1 (白色 White) 藍色 黑色 Blue Black 請做 正 確 錯誤 Correct Incorrect 2 組 左齒輪箱組裝 Gear Box Module (Left) Assembly P2 (白色White) 馬達模組... - Page 7 彎折處(圖示2)請預留 黑色 Black 藍色 Blue 約0.5cm Remain apprx. 0.5cm Remain apprx. 0.5cm in the bending in the bending position position 0.5cm 0.5cm P4 (黃色Yellow) P4 (黃色Yellow) P3 (灰色 Gray) P5 (橘色Orange) P6 (灰色Gray) P6 (灰色Gray) P5 (橘色Orange) (黃色) (Yellow) P4 (黃色Yellow) 正確...
-
Page 8: 右齒輪箱組裝 Gear Box Module (Right) Assembly
齒輪箱模組 左 GEAR BOX MODULE 右齒輪箱組裝 Gear Box Module (Right) Assembly 藍色 Blue P2 (白色 White) 彎折處(圖示2) 請預留約0.5cm 黑色 Black 馬達模組 Remain apprx. Remain apprx. MOTOR 0.5cm in the 0.5cm in the MODULE bending bending position position 0.5cm 0.5cm... - Page 9 P4 (黃色Yellow) P3 (灰色Gray) P4 (黃色Yellow) P6 (灰色Gray) P4 (黃色Yellow) (灰色) (Gray) P5 (橘色Orange) (橘色) (Orange) (黃色) (Yellow) 正 確 錯 誤 (白色) Correct Incorrect (White) P3 (灰色 Gray) P10x3 齒輪箱模組 右 GEAR BOX MODULE...
-
Page 10: 按鍵組裝 Keypad Module Assembly
按鍵組裝 Keypad Module Assembly 注意B18方向是否安裝正確 Pay attention to the right direction of B18 B18x4 正 確 Correct 錯 誤 請做2組 Incorrect P10x4 P10x2 按鍵模組 D4x2 KEYPAD MODULE... -
Page 11: 電池盒組裝 Battery Module Assembly
電池盒組裝 Battery Module Assembly AAA(x4) ˙電池移除或更換應由成人或在成人監督下進行。 Installation, removal and replacement of batteries should be carried out by adults or under adults supervision. ˙請避免電池或電池連接器端子短路。 Avoid short circuiting the contacts in the battery compartment or the battery terminals. ˙請勿混用新舊電池及不同廠牌、種類的電池,以免造成危險或電器損耗。 Do not mix used batteries and new batteries or batteries of different types. ˙請勿混合鹼性、碳鋅電池或充電電池使用。... -
Page 12: 狙擊槍組裝 Shooting Module Assembly
狙擊槍組裝 Shooting Module Assembly 正確 Correct 錯誤 Incorrect 狙 擊槍模組 SHOOTING M O D U L E 錯誤 正確 Incorrect Correct... -
Page 13: 全向輪組裝 Omni Wheel Module Assembly
全向輪組裝 Omni Wheel Module Assembly 請將毛邊剪切乾淨 Cut off the burrs before assembly. 毛邊 burr 毛邊 burr 請做 6 組 全向輪模組 OMNI WHEEL MODULE 掃帚組裝 Broom Module (Left & Right) Assembly 壓 PUSH 正 確 錯 誤 Correct Incorrect 左 掃 帚... -
Page 14: 後輪組裝 Rear Wheel Module Assembly
後輪組裝 Rear Wheel Module Assembly 後輪模組 R E A R WHEEL MODULE 輪胎組裝 Wheels Module (A & B) Assembly 請將毛邊剪切乾淨 Cut off the burrs before assembly 輪胎模組 WHEEL M O D U L E 請將毛邊剪切乾淨 Cut off the burrs before assembly 輪胎模組... -
Page 15: 創意小畫家組裝 Doodler Assembly
創意小畫家組裝 Doodler Assembly 支 架 模 組 BRACKET Bracket MODULE 後輪模組 R E A R WHEEL MODULE 齒輪箱模組 右 GEAR BOX MODULE 齒輪箱模組 左 GEAR BOX MODULE 電池盒模組 BATTERY MODULE... - Page 16 按鍵模組 KEYPAD MODULE 輪胎模組 WHEEL M O D U L E 輪胎模組 WHEEL M O D U L E...
- Page 17 切換到模式”0” Switch to Mode “ 0 ” as shown. 齒輪箱模組 右 GEAR BOX MODULE 齒輪箱模組 左 GEAR BOX MODULE 麥克筆 Marker Pen 14.5~15mm 40~42 mm 或 麥克筆 Marker Pen 8~9mm 40~42 amm...
- Page 18 請依照實際狀況編程,以下範例僅供參考 範 例 Please revise the codes according to the actual performance of the robot. Example Below examples are just for references. 範例 01 Example 01 切 換 至 模 式 1 Switch to Mode 1 出發 完 成 FINISH 前...
-
Page 19: 掃地機器人組裝 Sweeper Assembly
掃地機器人組裝 Sweeper Assembly 齒輪箱模組 左 GEAR BOX MODULE 正 確 錯 誤 Correct Incorrect 齒輪模組 GEAR MODULE 正 確 錯 誤 Correct Incorrect 注意B7組裝方向 Pay attention to the right direction of B7... - Page 20 正確 錯誤 Correct Incorrect 推 PUSH 齒輪箱模組 右 GEAR BOX MODULE 齒輪模組 GEAR MODULE 正確 Correct 錯誤 Incorrect 支 架 模 組 BRACKET MODULE 後輪模組 R E A R WHEEL MODULE...
- Page 21 切換到模式”0” Switch to Mode “ 0 ” as shown. 按鍵模組 KEYPAD 電池盒模組 MODULE BATTERY MODULE 請確認步驟6和7的零件皆組裝確實,以免掃地機器人運作不順暢 Please note all the parts stated in step 6 & 7 need to be assembled firmly, or the sweeper may not perform normally.
- Page 22 注意A2組裝方向 Pay attention to the right direction of A2 左 掃 帚 BROOM M O D U L E...
- Page 23 掃 帚 右 BROOM M O D U L E 輪胎模組 WHEEL M O D U L E 輪胎模組 WHEEL M O D U L E...
- Page 24 齒輪箱模組 右 GEAR BOX MODULE 齒輪箱模組 左 GEAR BOX MODULE 轉 動 機 器 人 眉 毛 以 做 出 不 同 的 表 情 You could rotate the eyebrows to create different looks. 請依照實際狀況編程,以下範例僅供參考 範 例 Please revise the codes according to the actual performance of the robot. Example Below examples are just for references.
-
Page 25: 狙擊神射手組裝 Shooter Assembly
狙擊神射手組裝 Shooter Assembly 齒輪箱模組 左 GEAR BOX MODULE 正確 錯誤 Correct Incorrect 推 PUSH 齒輪模組 GEAR MODULE 狙擊槍模組 正確 SHOOTING Correct M O D U L E 錯誤 Incorrect 錯誤 Incorrect... - Page 26 輪胎模組 WHEEL M O D U L E 輪胎模組 WHEEL M O D U L E...
- Page 27 齒輪箱模組 右 齒輪模組 GEAR BOX GEAR MODULE MODULE 正確 錯誤 Correct Incorrect 推 PUSH 電池盒模組 BATTERY MODULE...
- Page 28 切換到模式”0” Switch to Mode “ 0 ” as shown. 齒輪箱模組 右 GEAR BOX 全向輪 MODULE 模組 OMNI WHEEL MODULE 將步驟10與步驟6的模組組合在一起 將步驟10與步驟6的模組組合在一起 Combine the modules of step10 and step 6 together Combine the modules of step10 and step 6 together 正 確 錯...
- Page 29 齒輪箱模組 左 GEAR BOX MODULE...
- Page 30 正 確 錯 誤 Correct Incorrect 推 飛 鏢 PUSH DART MODULE 轉 動 機 器 人 眉 毛 以 做 出 不 同 的 表 情 You could rotate the eyebrows to create different looks. 請依照實際狀況編程,以下範例僅供參考 範 例 Please revise the codes according to the actual performance of the robot. Example Below examples are just for references.
-
Page 31: 操作方式 How To Program Your Robot
操作方式 How to Program Your Robot 操作指引 Operation Guide 每次最多可輸入64個指令,當輸入第65個指令時,機器人會發出 按鍵介紹 ”嗶--------嗶嗶”(一長音兩短音)警示聲拒絕接收指令 You can input up to 64 commands with the keypad buttons. This Keypad Instructions is the maximim number of inputs. Tribo will make a “Beeeee- bee- bee” sound and stop taking the following orders when the input is made. - Page 32 步驟 完成編程指 令 後 , 按 下中 央 鍵 確 認 STEP Press the central button to confirm the sequence of commands. 完成 Finish 中央鍵 步驟 Central Button 再按一次中央鍵,機器人開始執行指令動作 STEP Press the central button again to execute. 出發 Go 中央鍵 Central Button 重複執行...
-
Page 33: 更換電池方式 How To Replace The Batteries
步驟 再按一次中央鍵,機器人開始執行指令動作 STEP Press the central button again to execute. 出發 Go 中央鍵 重複執行 Replay Central Button 當機器人完成動作後,玩家可以按中間鍵令機器人重複執行前次動作 When the robot finishes a program, users could press the central button to replay. 重複執行 Replay 重置 Reset 中央鍵 Central Button 經由以下兩種方式可執行新的編程指令 To code a new program, users could do either the options of below. -
Page 34: 簡易故障排除 Trouble Shooting
簡易故障排除 Trouble Shooting 1. 請確認電池安裝位置是否正確,參見第9頁,步驟 1. Be sure to install batteries with correct polarity, refer to page 9, step 2. 如創意小畫家/掃地機器人/狙擊神射手未正確地依循編碼動作,請確認左、右齒輪箱和按鍵模組是否組裝正確. 2. If Doodler/Sweeper/Shooter doesn’t execute the program correctly, please check if the left and right gear box terminals and keypad module are assembled in the correct way. 按鍵模組... - Page 35 Name, address (no P.O. Box), telephone number, and email address. 2. 請註明產品名稱、產品型號、零件名稱、零件型號以及數量 Model name and model number.Part number, part name, and quantity. 3. 如有任何需求,請洽您的經銷商 Please contact local distributor if any query. 三合一按鍵編程機器人 零件表 GE-897 Parts List Tribo 3 in 1 Keypad Coding Robot 數量 零件型號 零件名稱 Part Name Part Number 小齒輪(白色)
- Page 36 DOODLER SWEEPER SHOOTER KEYPAD CODING ROBOT ˙電池移除或更換應由成人或在成人監督下進行。 Installation, removal and replacement of batteries should be carried out by adults or under adults supervision. ˙請避免電池或電池連接器端子短路。 Avoid short circuiting the contacts in the battery compartment or the battery terminals. ˙請勿混用新舊電池及不同廠牌、種類的電池,以免造成危險或電器損耗。 Do not mix used batteries and new batteries or batteries of different types. ˙請勿混合鹼性、碳鋅電池或充電電池使用。...
Need help?
Do you have a question about the GE-897 and is the answer not in the manual?
Questions and answers