Table of Contents
Advertisement
Quick Links
Advertisement
Table of Contents

Related Manuals for BLUM M35.7200


Summary of Contents for BLUM M35.7200
- Page 1 M35.7200...
-
Page 2: Table Of Contents
M35.7200 Table of contents Safety Reference diagram Set-up and start-up Set-up Clamping and milling Maintenance Troubleshooting Spare parts Scope of delivery Conformity BA-161... -
Page 3: Safety
■ Other risks are identified by warning signs and safety information. It is therefore necessary to observe the safety information. Intended use The base notching device is only intended to process drawer bases for the Blum LEGRABOX. The base notching device may only be used under the following conditions: ■... - Page 4 ➢ Always apply a protective cover when operating the base notching device. ➢ For your own safety, use only those accessories which are recommended or specified in the instruction leaflet or Blum sales catalogue. ➢ Check the electrical cable for damage.
- Page 5 Keep non-authorised persons away from thebase notching device . No more than one person may use the base notching device at a time. Always wear eye protection when operating this machine. Wear proper ear protection when operating this machine. Caution: danger of crushing!
- Page 6 M35.7200 Position of warning signs 2013 Ser.No.: MA 00001 22 kg / 48,5 lbs Boden-Falzgerät Ref.No.: M35.7200 Julius Blum GmbH - A - 6973 Industriestrasse 1 BA-161...
-
Page 7: Reference Diagram
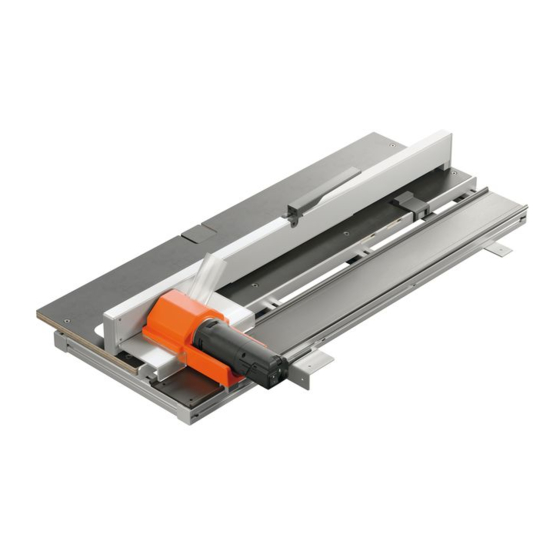
Reference diagram Fixing bracket (used to secure the device during delivery) Fixing board Shaft holder Runner Work top Support Depth stop Clamping lever Extraction socket Clamping plate Danger zone Carriage... - Page 8 M35.7200 Reference diagram for carriage Rear protective cover Front protective cover Rocker switch Flange surface Sliding film Pre-cutter Cutting insert Notch cutter BA-161...
- Page 9 Operating elements Clamping lever Press down the clamping lever [8] to secure the workpiece. Rocker switch The rocker switch [14] is used to switch the base notching device off and on. NOTE ■ The rocker switch [14] does not have an inching mode. ■...
-
Page 10: Set-Up And Start-Up
M35.7200 Set-up and start-up Dimensions 22 kg 22 kg Height (H): _________________________________________________________ 264 mm Width (W): __________________________________________________________ 584 mm Depth (D): __________________________________________________________ 1108 mm Weight: _______________________________________________________________ 22 kg ➢ Should only be used in dry, enclosed rooms. Required table space WARNING The base notching device weighs 22 kg. - Page 11 Remove the transport locking device The carriage on the base notching device is secured by the fixing bracket [1]. ➢ Loosen the screws. ➢ Remove the fixing bracket [1]. Applying the fixing bracket ➢ Pull the base notching device forwards on the table. ➢...
- Page 12 M35.7200 Fixing to the work top WARNING The base notching device must be securely connected to the workbench. ➢ Screw the base notching device at the fixing bracket [1] and fixing board [2] to the work table. ➢ Alternatively, the base notching device can be clamped using screw clamps on the fixing bracket [1] and the fixing board [2].
-
Page 13: Set-Up
Set-up Processable drawer bases Nominal length of drawer base for cabinet width Drawer base min. 270 mm min. 275 mm Thickness 16 mm max. 650 mm max. 1200 mm Support ➢ Swing out the support [6] from the drawer base – width 500 mm. ➢... -
Page 14: Clamping And Milling
M35.7200 Clamping and milling Clamping NOTE ■ There should be no wood chips on the work top [6] since they can affect the accuracy of the notch or damage the surface of the workpiece. ➢ Lay the workpiece on the base notching device, as shown. - Page 15 NOTE ■ By working with a depth stop [7] you can increase the accuracy and quality of the notch. ➢ Push the workpiece against the depth stop [7], as shown. CAUTION ■ Keep your hands away from the clamp (K). ➢...
- Page 16 M35.7200 Milling WARNING Cutting tools can cause serious injury. ➢ No more than one person may use the base notching device at a time. ➢ Nobody should be in the machine's danger zone [G]. ➢ Wear eye protection. ➢ Wear ear protection.
- Page 17 NOTE ■ Never turn off the motor during the milling process. That could damage the motor or the notch cutter [19]. ➢ Press the rocker switch [14]. Switch off the motor. NOTE ■ After finishing the work, do not push the carriage back over the workpiece, no matter whether or not the motor is running.
-
Page 18: Maintenance
M35.7200 Maintenance WARNING Serious cuts. Everyday cleaning Failure to heed this warning may result in personal injury. ➢ The base notching device must be disconnected from the power supply before cleaning and maintenance. CAUTION ■ Wear eye protection during cleaning work. - Page 19 Removing the motor If the motor needs to be removed for maintenance, cleaning or replacement purposes, proceed as follows: WARNING Serious cuts. Failure to heed this warning may result in personal injury. ➢ The base notching device must be disconnected from the power supply before cleaning and maintenance.
- Page 20 M35.7200 ➢ Secure the motor in the shaft holder [3]. Install the motor ➢ All the fixing and clamping surfaces on the carriage and motor must be free of dust and wood chips. NOTE ■ Cutters and cutting inserts may not touch the housing under any circumstances since they could damage the cutting inserts.
- Page 21 Cleaning the housing Proceed as follows if the carriage housing [S] is filled with wood chips or if the cutter is blocked: Removing and installing the motor ➢ Remove the wood chips from the housing. Remove the cutter Removing and installing the motor ➢...
- Page 22 M35.7200 Change the cutting inserts Removing and installing the motor WARNING Serious cuts. Failure to heed this warning may result in personal injury. ➢ The base notching device must be disconnected from the power supply before cleaning and maintenance. ➢ Wear gloves.
- Page 23 ➢ Clean the pre-cutter [17] using a dry cloth. ➢ Turn the pre-cutter [17] 90 degrees. ➢ Tighten the screw in the pre-cutter [17] by turning it clockwise. NOTE ■ Only the TORX® key provided may be used.
- Page 24 M35.7200 Changing the cutting insert [18]. ➢ Loosen the screw for the cutting insert [18] by turning it anticlockwise. ➢ Clean the base of the cutting inserts [18] using a dry cloth. ➢ Turn the insert cutter [18] 180 degrees.
- Page 25 ➢ Place the cutting insert [18] in the middle. ➢ Tighten the screw for the cutting insert [18] by turning it clockwise. NOTE ■ Only the TORX® key provided may be used NOTE ■ In order to ensure equal wear on the pre-cutters and the cutting inserts, always change the complete set when replacing the pre-cutters [17] or insert cutters [18].
-
Page 26: Troubleshooting
M35.7200 Troubleshooting Fault Possible cause Remedy Incorrect notch dimensions Workpiece not clamped correctly ➢ see page 14 Dirty stops ➢ see page 18 Dirty work top ➢ see page 18 Workpiece is not flat against the stop ➢ see page 13 Cutter worn out ➢... -
Page 27: Spare Parts
Spare parts M35.003-05 TIEF-AN M35.001-04 ABSAUG M35.021M11 MOTOR M35.003-03 FUEHRUNG GR M35.001-02 SCHUTZ L GLEITFOLIE JUM-11-10 M35.ZF0-60.03 FRAE-KO M35.ZW40 WENDE PL+SR M35.001-02 SCHUTZ R... -
Page 28: Scope Of Delivery
M35.7200 Scope of delivery Base notching device M35.7200 Cutter M35.ZF0-60.03 FRAE-KO Hopper M51N0603 TRI+ZUT Open-ended wrench 19 hex-wrench 6 BA-161... - Page 29 EC Declaration of Conformity We, Julius Blum GmbH, Industriestrasse 1, A-6973 Höchst, Austria take full responsibility in declaring that product M35.7200, to which this declaration refers, complies with the following EU directives: EC Machine Directive 2006/42/EC EC EMC Directive 2004/108/EG...
- Page 30 M35.7200 Notes BA-161...
- Page 31 Notes...
- Page 32 Julius Blum GmbH Beschlägefabrik 6973 Höchst, Austria Tel.: +43 5578 705-0 Fax: +43 5578 705-44 E-Mail: info@blum.com www.blum.com...
Need help?
Do you have a question about the M35.7200 and is the answer not in the manual?
Questions and answers