Table of Contents
Advertisement
Quick Links
Table of Contents
1
INTRODUCTION......................................................................... 3
2
ABOVE ALL... SAFETY! ............................................................. 4
2.1
Symbols used.................................................................... 4
2.2
Warnings............................................................................ 4
2.2.a General .................................................................... 4
2.2.b Batteries .................................................................. 5
2.3
Assistance ......................................................................... 5
3
DESCRIPTION OF PARTS ......................................................... 6
3.1
Description of parts and commands ................................. 6
3.2
Display symbols ................................................................ 8
4
PREPARATION ........................................................................... 9
4.1
Connecting/removing the antenna .................................... 9
4.1.a Connecting the antenna: ......................................... 9
4.1.b Removing the antenna: ........................................... 9
4.2
Fastening/removing the belt clip ....................................... 9
4.3
Installing/removing the batteries ....................................... 9
4.3.a To install the batteries:........................................... 10
4.3.b To remove the batteries:........................................ 10
4.4
Recharging the batteries ................................................. 10
4.4.a Standard MW904 wall battery charger.................. 11
4.4.b CA445 Intelligent, table-top battery charger ......... 11
4.5
Proper use of rechargeable batteries .............................. 11
4.5.a Memory effect ....................................................... 12
5
STANDARD FUNCTIONS ......................................................... 13
5.1
Turning Ocean on/off ....................................................... 13
5.2
Volume regulation ............................................................ 13
5.3
Selecting a channel ......................................................... 13
5.4
Transmission and reception............................................. 13
5.4.a Reception .............................................................. 13
5.4.b Transmission.......................................................... 13
5.5
Monitor function .............................................................. 14
5.6
Selecting transmission power ......................................... 14
5.7
Instant recall of channel 16 ............................................. 14
5.8
Display lighting ................................................................ 14
5.9
Keypad lock..................................................................... 15
5.10 Use of CALL button......................................................... 15
5.11 Clock mode ..................................................................... 15
5.11.a Setting the time .................................................... 15
5.12 Chronometer mode ......................................................... 15
6
ADVANCED FUNCTIONS (F BUTTON) ................................... 17
6.1
Activating/deactivating keypad tones ............................. 17
6.2
VOX mode ....................................................................... 17
6.2.a Activation/deactivation of VOX mode........... 17
6.2.b Setting VOX sensitivity .......................................... 18
6.2.c Setting VOX delay ................................................. 18
6.3
Scanning functions.......................................................... 18
6.3.a Scanning on all channels....................................... 18
6.3.b Activating Dual Watch ........................................... 19
6.4
International, U.S.A., and Canada Bands........................ 19
6.5
Memory channels ............................................................ 19
6.5.a Programming of memory channels ....................... 19
6.5.b Memory recall........................................................ 20
1
Advertisement
Table of Contents

Related Manuals for Midland Ocean


Summary of Contents for Midland Ocean
-
Page 1: Table Of Contents
Table of Contents STANDARD FUNCTIONS ............13 Turning Ocean on/off ............13 Volume regulation ............13 Selecting a channel ............13 INTRODUCTION................. 3 Transmission and reception..........13 5.4.a Reception .............. 13 ABOVE ALL… SAFETY! ............. 4 5.4.b Transmission............13 Symbols used..............4 Monitor function .............. - Page 2 6.5.c Memory scanning ..........20 Weather channel (only with the USA band) ..... 20 Automatic weather information warning (detection of NOAA tone) ..........20 PROGRAMMING AND SELECTION OF PRIVATE CHANNELS ..22 CLEANING AND MAINTENANCE OF YOUR RADIO....22 Cleaning the radio ............22 Connectors ..............
-
Page 3: Introduction
2, CE/99/05 regulations, and is water resistant (splashproof), ensuring cing the risk of interference. clear, reliable communication for many years. Ocean is equipped with • Multifunctional bar indicator– in reception mode, this function in- a microprocessor, which controls not only the marine band tuning, but dicates the incoming signal strength using a series of bars. -
Page 4: Above All
Your physician will be able to suggest ways of obtaining sonal injury. this information. Notes such as this one indicate practical advice that Midland Keep a tight grip your radio (a fall may damage it) and ensure the suggests be followed for the optimal performance of Ocean. -
Page 5: Batteries
Insert the prongs into a soc- Do not open the radio for any reason! Ocean’s precision mecha- ket that has been grounded. nics and electronics require experience and specialized equi- Avoid shocks and excessive vibrations. -
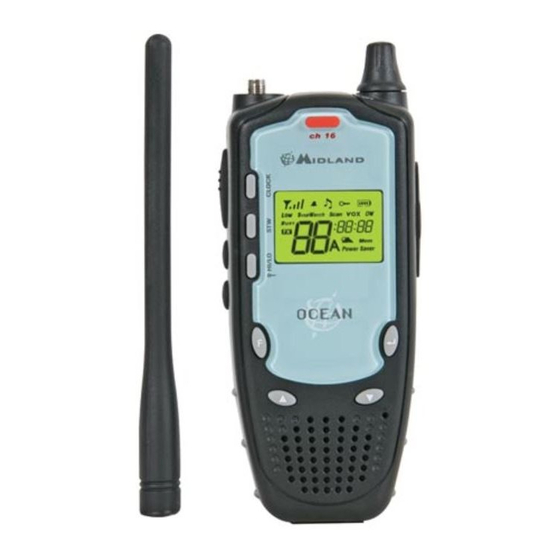
Page 6: Description Of Parts
3 DESCRIPTION OF PARTS 3.1 Description of parts and commands Refer to the following pictures to lo- cate and get familiar with the various parts of Ocean:... - Page 7 LCD display – the LCD (liquid crystal) display constantly displays HI/LO button – selects high or low transmission power, and the operating status of Ocean and functions currently in use. activates/deactivates the keypad lock. SPK, MIC CHG, and DATA sockets (on the radio’s side, under a 14) CALL button –...
-
Page 8: Display Symbols
3.2 Display symbols D) Keypad tones – indicates the activation of tones to confirm when buttons are pressed. Your marine transceiver is fitted with an LCD (liquid crystal) display to E) Scan - appears when the transceiver is performing channel scan- keep you up to date on its operating status. -
Page 9: Preparation
4 PREPARATION 4.1.b Removing the antenna: 1) Follow step 1 of paragraph 4.1.a. Before using your transceiver, ensure that your package contains: 2) Unscrew the flexible, rubber ducky antenna, turning it counter- • The transceiver clockwise and removing it. • The flexible, rubber ducky antenna with SMA connector Avoid transmitting without the antenna connected or with a •... -
Page 10: To Install The Batteries
Ensure you have properly closed the battery compartment co- For installing/removing the batteries, it is not necessary to remove ver. the belt clip (procedure outlined in par. 4.2), however, this does make it easier to access the batteries. 4.3.b To remove the batteries: Do not install a combination of rechargeable and alkaline bat- 1) Follow steps 1 and 2 of paragraph 4.3.a. -
Page 11: Standard Mw904 Wall Battery Charger
4.4.a Standard MW904 wall battery charger For successive charging, longer duty, and battery life, refer to par. 4.5. 1) Ensure the radio is turned off (it must remain off for the entire period of charging). Do not forget to replace the rubber flap after charging. 2) Carefully lift the rubber flap on the right side of the transceiver, slipping a fingernail into the center left 4.4.b CA445 Intelligent, table-top battery charger... -
Page 12: Memory Effect
MW904 standard charger, otherwise you risk overcharging the batte- batteries have reached the end of their life; at this point, you will ries. need to substitute the battery set. If you use the batteries properly, you will obtain at least 400 cycles of charge/discharge at maximum duty. -
Page 13: Standard Functions
(duplex channels) or it is the same (simplex channels). Normally, 5.4.b Transmission communication between vessels can only take place on simplex The PTT (push to talk) button is located on the top left of your Ocean. channels. To transmit:... -
Page 14: Monitor Function
1) Ensure the channel you’ve selected is not a reception-only channel the button. The squelch will remain open until you briefly press the (if it is, the transmission will be disabled) and that no one else is button again. talking (this will appear on your display as the BUSY icon). 2) Hold down the PTT button: will appear on the display, and the icon will indicate your relative transmission power (the number... -
Page 15: Keypad Lock
5.12 Chronometer mode Two-tone calling is a special function of Ocean. As such, your party This function activates the use of your transceiver’s built-in chronome- may not recognize it. We suggest that you ensure your party is ter (values to the hundredths of a second). - Page 16 :00:00 3) To exit the chronometer function, press the STW button again. When the chronometer function is active, Ocean is still able to receive calls, but the display will continue to show the chronometer’s progress. When this happens, you can transmit normally using the CALL or PTT buttons, or using VOX mode.
-
Page 17: Advanced Functions (F Button)
6 ADVANCED FUNCTIONS (F BUTTON) Off = tones deactivated). 2) Press the buttons to change the keypad tone to On or Off. The F button enables the user to access the transceiver’s advanced 3) Press the button to confirm the setting change and return to functions and to change settings as required: selecting the band (INT, Stand-by, or press the F key to access the following menu setting. -
Page 18: Setting Vox Sensitivity
(for a maximum of five seconds), giving should be adjusted to the minimum level necessary to activate tran- the user a chance to respond to a call, if necessary, before Ocean smission by voice. automatically begins scanning again. To begin scanning, follow the... -
Page 19: Activating Dual Watch
It is your responsibility to select the proper band (using the 2) Repeatedly press the F key until the DW icon flashes on the di- optional PRG-OCEAN programmer); otherwise you may cause splay. interference with other services or not be able to communicate... -
Page 20: Memory Recall
(NOAA tone at 1050 Hz) emitted at the same channel for about 5 seconds. During this period, you have a few time as weather information. When Ocean detects a NOAA signal, it options: will interrupt normal operations and move automatically to the weather •... - Page 21 4) Press the to confirm the changed setting. Ocean will return to Stand-by mode and will monitor the pre-selected weather channel at regular intervals. To deactivate the automatic weather warning, follow the steps outlined above, selecting the Off setting.
-
Page 22: Programming And Selection Of Private Channels
To pro- Carefully rub the radio using a soft, clean cloth that does not have gram private channels, you will require the optional “PRG-OCEAN” loose fibers. If the radio is very dirty, slightly dampen the cloth with a programmer, or you will need to contact your supplier. -
Page 23: Troubleshooting
If your transceiver experiences a logical malfunction (improper sym- bols on the display, blocking of functions, etc.), it may not be expe- Your Ocean is designed to provide you with years of optimal perfor- riencing a true failure, but rather a problem caused by external factors. -
Page 24: Solution Table
Check the radio traffic on the selected channel and chan- 5.4.a ge channels if necessary Ocean is positioned too close to other interference devi- Move Ocean away from the interference devices ces (televisions, computers, transmitters, etc.) Battery life is short... -
Page 25: Technical Specifications
10 TECHNICAL SPECIFICATIONS GENERAL Channels All international, USA, and Canada channels Frequency generation PLL synthesizer from 156.025 to 157.425 MHz Frequency range from 156.300 to 162.000 MHz Antenna Impedance Power Supply from 4.8 to 6 (4 AA rechargeable NiMH or alkaline batteries) Operating Temperature Range °C from -15°... -
Page 26: Frequency Table
11 FREQUENCY TABLE Frequency (MHz) Frequency (MHz) Frequency (MHz) Mode Note Mode Note Mode Note 156.050 160.650 157.050 161.650 156.575 156.575 156.100 160.700 157.100 161.700 156.625 156.625 156.150 160.750 157.150 161.750 156.675 156.675 156.200 160.800 157.200 161.800 156.725 156.725 156.250 160.850 157.250 161.850...
Need help?
Do you have a question about the Ocean and is the answer not in the manual?
Questions and answers