
Subscribe to Our Youtube Channel
Related Manuals for pro.point 8712135


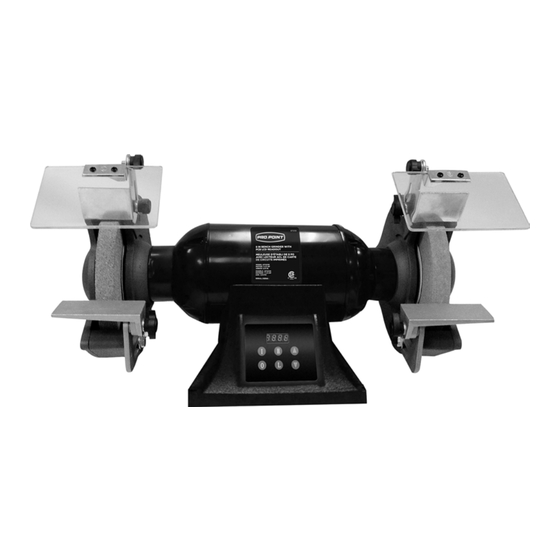
Summary of Contents for pro.point 8712135
- Page 1 V1.0 8712135 8 in. BENCH GRINDER WITH PCB LCD READOUT USER MANUAL Please read and understand all instructions before use. Retain this manual for future reference.
-
Page 2: Specifications
8712135 8 in. BENCH GRINDER WITH PCB LCD READOUT V1.0 8 in. BENCH GRINDER WITH PCB LCD READOUT SPECIFICATIONS Horsepower 1-1/2 HP Grinding Wheel Dimensions 8 in. Diameter by 1 in. Thick Arbor Size 5/8 in. Grit 36 and 60... -
Page 3: Work Area
V1.0 8 in. BENCH GRINDER WITH PCB LCD READOUT 8712135 DANGER! This notice indicates an immediate and specific hazard that will result in severe personal injury or death if the proper precautions are not taken. WARNING! This notice indicates a specific hazard or unsafe practice that could result in severe personal injury or death if the proper precautions are not taken. -
Page 4: Personal Precautions
8712135 8 in. BENCH GRINDER WITH PCB LCD READOUT V1.0 Wear the appropriate type of full-face shield in addition to safety googles, as the work can create chips, abrasive or particulate matter. Wear gloves that provide protection based on the work materials or to reduce the effects of tool vibration. - Page 5 V1.0 8 in. BENCH GRINDER WITH PCB LCD READOUT 8712135 Keep hands and fingers away from the grinding area. Any part of body coming in contact with moving parts could cause injury. Never use a tool with a cracked or worn grinding wheel.
- Page 6 8712135 8 in. BENCH GRINDER WITH PCB LCD READOUT V1.0 13. Make sure the bench grinder is on a firm, level surface and properly secured to avoid injury from unexpected movement. Firmly clamp or bolt the bench grinder to a support surface to prevent slipping or sliding during the operation.
- Page 7 V1.0 8 in. BENCH GRINDER WITH PCB LCD READOUT 8712135 Maintain a firm grip on the workpiece and position your body and arms to allow you to resist a kickback. Kickback can propel the material in the direction of the grinding wheel’s rotation.
-
Page 8: Electrical Safety
8712135 8 in. BENCH GRINDER WITH PCB LCD READOUT V1.0 10. Only use an accessory that exceeds the No Load Speed rating (see Specifications). ELECTRICAL SAFETY WARNING! To reduce risk of electric shock, be certain that the plug is connected to a properly grounded receptacle. -
Page 9: Power Cord
V1.0 8 in. BENCH GRINDER WITH PCB LCD READOUT 8712135 This device is only for use on 120 V (single phase) and is equipped with a 3-prong grounded power supply cord and plug. 8.1 DO NOT remove the ground prong from the plug. This will render the tool unsafe. - Page 10 8712135 8 in. BENCH GRINDER WITH PCB LCD READOUT V1.0 2.3 Have the power cord replaced by a qualified service technician. Keep all connections dry and off the ground to reduce the risk of electric shock. Do not touch plug with wet hands.
-
Page 11: Assembly And Installation
V1.0 8 in. BENCH GRINDER WITH PCB LCD READOUT 8712135 ASSEMBLY & INSTALLATION Numbered references in parenthesis (#1) refer to the included Parts List. Letter references in parenthesis (A) refer to the included Identification Key. Dashed numbers in parenthesis (Fig. 1-1) refer to a specific point in an illustration or image. - Page 12 8712135 8 in. BENCH GRINDER WITH PCB LCD READOUT V1.0 Position tool rest so that distance between tool rest and grinding wheel is less than 1/16 in. Reposition angle of tool rest if necessary. Secure all knobs and bolts. 4. Mount right tool rest in a similar manner.
-
Page 13: Operation
V1.0 8 in. BENCH GRINDER WITH PCB LCD READOUT 8712135 Align the tool’s mounting holes with the corresponding pedestal holes. Slide a flat washer over a 1/4-20 x 1 in. hex head bolt and insert through the grinder base and pedestal holes. -
Page 14: Grinding Wheels
8712135 8 in. BENCH GRINDER WITH PCB LCD READOUT V1.0 GRINDING WHEELS For best grinding results and maintaining good balance, always keep the wheel(s) properly dressed. Never force a workpiece against a cold wheel. Use light pressure until the wheel becomes warm. - Page 15 V1.0 8 in. BENCH GRINDER WITH PCB LCD READOUT 8712135 BASIC GRINDER OPERATIONS WARNING! Never start the tool with the operator or bystander in line with the grinding wheel. A damaged grinding wheel could shatter and the debris may cause an injury.
-
Page 16: Sharpening Scissors
8712135 8 in. BENCH GRINDER WITH PCB LCD READOUT V1.0 LAWN MOWER BLADES Ensure there is adequate working space to maneuver the blade. Sharpen the blade’s beveled side first, then dress the other side with the grinder or a file. - Page 17 V1.0 8 in. BENCH GRINDER WITH PCB LCD READOUT 8712135 Sharpening twist bits freehand will require considerable practice and dry runs with the grinder OFF to acquire the skill of rotating the bit while maintaining the original cutting edge angle.
-
Page 18: Care And Maintenance
8712135 8 in. BENCH GRINDER WITH PCB LCD READOUT V1.0 Remove only the material necessary to achieve the desired bevel angle with a sharp and square cutting edge. This process produces a sharp hollow ground bevel with a small amount of ‘wire’ burr. Remove this with a final honing on a whetstone. -
Page 19: Wheel Dressing
V1.0 8 in. BENCH GRINDER WITH PCB LCD READOUT 8712135 Wheels should be dressed periodically to maintain grinding efficiency, especially if they become clogged from grinding soft metals. Use a grinding wheel dresser to restore the wheel’s original shape. 6.1 Dress the grinding wheel face only. Dressing the wheel sides can cause it to become too thin for safe use. -
Page 20: Changing The Grinding Wheels
8712135 8 in. BENCH GRINDER WITH PCB LCD READOUT V1.0 CHANGING THE GRINDING WHEELS WARNING! Use only grinding wheels rated for 3,450 RPM or higher with a 5/8 in. arbor hole and the appropriate sized bushing. Never use a grinding wheel rated lower than 3,450 RPM or attempt to machine an undersized wheel to fit the arbor. -
Page 21: Troubleshooting
V1.0 8 in. BENCH GRINDER WITH PCB LCD READOUT 8712135 CLEANING CAUTION! Do not use brake fluids, gasoline, petroleum-based products, penetrating oils, etc., on the tool’s plastic parts. Chemicals can damage, weaken or destroy plastic, which may result in a serious personal injury when the tool is in use. - Page 22 8712135 8 in. BENCH GRINDER WITH PCB LCD READOUT V1.0 PROBLEM(S) POSSIBLE CAUSE(S) SUGGESTED SOLUTION(S) Grinder 1. Blown line fuse or 1. Replace with fuse of tripped circuit proper size, if fuse is won’t start. blown. Reset tripped breaker. breaker.
-
Page 23: Parts Breakdown
V1.0 8 in. BENCH GRINDER WITH PCB LCD READOUT 8712135 PARTS BREAKDOWN Visit www.princessauto.com for more information... -
Page 24: Parts List
8712135 8 in. BENCH GRINDER WITH PCB LCD READOUT V1.0 PARTS LIST DESCRIPTION 25 End Shield 26 Wavy Washer #10-24 x 1/4 in. Flange Screw 27 6203ZZ Ball Bearing WheeI Guard Cover 28 Motor Fan 1/2 in.-12 Hex Nut, (LH... - Page 25 V1.0 8 in. BENCH GRINDER WITH PCB LCD READOUT 8712135 DESCRIPTION 56 Base Cover 50 Base 57 4-1.4 x 8 mm Thread Forming Screw 51 Control Panel 58 Rubber foot 52 3-0.5 x 10 mm Flat Head Screw 59 Circuit Board Assembly 1 53 Panel Label 60 5/16-18 x 1/2 in.
- Page 26 8712135 8 in. BENCH GRINDER WITH PCB LCD READOUT V1.0 For technical questions call 1-800-665-8685...
- Page 27 V 1,0 8712135 MEULEUSE D’ÉTABLI DE 8 PO AVEC LECTEUR ACL DE CARTE DE CIRCUITS IMPRIMÉS MANUEL D'UTILISATEUR Vous devez lire et comprendre toutes les instructions avant d'utiliser l'appareil. Conservez ce manuel afin de pouvoir le consulter plus tard.
-
Page 28: Spécifications
8712135 MEULEUSE D’ÉTABLI DE 8 PO AVEC LECTEUR V 1,0 AVEC LECTEUR ACL DE CARTE DE CIRCUITS MEULEUSE D’ÉTABLI DE 8 PO AVEC LECTEUR ACL DE CARTE DE CIRCUITS IMPRIMÉS SPÉCIFICATIONS Puissance 1 1/2 CV Dimensions de la meule Diamètre de 8 po sur une épaisseur de 1 po... -
Page 29: Aire De Travail
V 1,0 MEULEUSE D’ÉTABLI DE 8 PO AVEC LECTEUR 8712135 AVEC LECTEUR ACL DE CARTE DE CIRCUITS Conservez ce manuel qui contient les avertissements de sécurité, les précautions, les instructions de fonctionnement ou d'inspection et d'entretien. DÉFINITIONS DE DANGER Veuillez-vous familiariser avec les avis de danger qui sont présentés dans ce manuel. -
Page 30: Sécurité Personnelle
8712135 MEULEUSE D’ÉTABLI DE 8 PO AVEC LECTEUR V 1,0 AVEC LECTEUR ACL DE CARTE DE CIRCUITS 4. N'installez pas et n'utilisez pas d'outils électriques en présence de gaz, de poussière ou de liquides inflammables. SÉCURITÉ PERSONNELLE AVERTISSEMENT ! Portez de l'équipement de protection personnelle homologué... -
Page 31: Consignes De Sécurité Spécifiques
V 1,0 MEULEUSE D’ÉTABLI DE 8 PO AVEC LECTEUR 8712135 AVEC LECTEUR ACL DE CARTE DE CIRCUITS N'utilisez pas l'outil si vous êtes fatigué ou sous l'effet de drogues, d'alcool ou de médicaments. Évitez de porter des vêtements ou des bijoux pouvant se prendre dans les pièces mobiles d'un outil. - Page 32 8712135 MEULEUSE D’ÉTABLI DE 8 PO AVEC LECTEUR V 1,0 AVEC LECTEUR ACL DE CARTE DE CIRCUITS Ne mettez jamais l’outil en marche si une meule est en contact avec la pièce de travail. Ne forcez jamais l’outil. Une pression excessive pourrait briser l’outil, entraînant ainsi des dommages au niveau de la...
- Page 33 V 1,0 MEULEUSE D’ÉTABLI DE 8 PO AVEC LECTEUR 8712135 AVEC LECTEUR ACL DE CARTE DE CIRCUITS vibrations, remplacez-la. Vérifiez également si l'appareil présente d'autres causes de vibration, comme des roulements usés ou un arbre courbé. Réparez ou remplacez les composants brisés immédiatement avant d'utiliser l'appareil.
- Page 34 8712135 MEULEUSE D’ÉTABLI DE 8 PO AVEC LECTEUR V 1,0 AVEC LECTEUR ACL DE CARTE DE CIRCUITS Maintenez fermement la pièce à travailler et placez le corps et les bras de façon à vous permettre de résister à l'effet de rebond.
- Page 35 V 1,0 MEULEUSE D’ÉTABLI DE 8 PO AVEC LECTEUR 8712135 AVEC LECTEUR ACL DE CARTE DE CIRCUITS Ne forcez jamais l'outil. Une pression excessive pourrait briser l'outil, entraînant ainsi des dommages au niveau de la pièce à travailler ou causant des blessures graves. Si votre outil fonctionne correctement lorsqu'il n'y a aucune charge, mais non lorsqu'elle est soumise à...
-
Page 36: Cordon D'alimentation
8712135 MEULEUSE D’ÉTABLI DE 8 PO AVEC LECTEUR V 1,0 AVEC LECTEUR ACL DE CARTE DE CIRCUITS 4.1 Advenant une panne de courant, fermez l'appareil dès que le courant est interrompu. Il pourrait y avoir un risque de blessure accidentelle advenant le retour du courant alors qu'on n'a pas fermé... - Page 37 V 1,0 MEULEUSE D’ÉTABLI DE 8 PO AVEC LECTEUR 8712135 AVEC LECTEUR ACL DE CARTE DE CIRCUITS lorsque le cordon d'alimentation de l'outil est trop court pour atteindre la source d'énergie depuis l'aire de travail. Lorsque vous vous servez d'un outil électrique à l'extérieur, employez un cordon prolongateur portant la mention W-A ou W.
- Page 38 8712135 MEULEUSE D’ÉTABLI DE 8 PO AVEC LECTEUR V 1,0 AVEC LECTEUR ACL DE CARTE DE CIRCUITS 4.3 Tenez le cordon à l'écart de la chaleur, de l'huile, des rebords coupants ou des pièces mobiles. Veillez à ce que personne, ni aucun matériel mobile ni des véhicules n'écrasent les cordons d'alimentation non protégés.
-
Page 39: Assemblage Et Installation
V 1,0 MEULEUSE D’ÉTABLI DE 8 PO AVEC LECTEUR 8712135 AVEC LECTEUR ACL DE CARTE DE CIRCUITS ASSEMBLAGE ET INSTALLATION Les numéros de référence entre parenthèses (n 1) se rapportent à la liste de pièces comprise. Les lettres de référence entre parenthèses (A) se rapportent à... - Page 40 8712135 MEULEUSE D’ÉTABLI DE 8 PO AVEC LECTEUR V 1,0 AVEC LECTEUR ACL DE CARTE DE CIRCUITS ASSEMBLAGE DU SUPPORT D’OUTIL Placez le support d’outil (D) sur la patte de fixation de support d’outil et fixez-le en position au moyen d’une rondelle plate de 5/16 po (E) et d’un bouton de...
- Page 41 V 1,0 MEULEUSE D’ÉTABLI DE 8 PO AVEC LECTEUR 8712135 AVEC LECTEUR ACL DE CARTE DE CIRCUITS yeux (I) au moyen de deux vis à tête cylindrique n 10-24 x 1/2 po (G) et du support inférieur de dispositif de protection des yeux.
- Page 42 8712135 MEULEUSE D’ÉTABLI DE 8 PO AVEC LECTEUR V 1,0 AVEC LECTEUR ACL DE CARTE DE CIRCUITS Glissez une rondelle plate de 1/4 po sur l’extrémité du boulon et vissez un écrou hexagonal de 1/4-20 sur l’extrémité du boulon. Serrez les vis jusqu’à ce que le jeu entre la base de l’outil et le socle soit de 1/8 po.
-
Page 43: Panneau De Commandes
V 1,0 MEULEUSE D’ÉTABLI DE 8 PO AVEC LECTEUR 8712135 AVEC LECTEUR ACL DE CARTE DE CIRCUITS MEULES Pour un meulage plus efficace et pour préserver un bon équilibre, assurez-vous que les meules sont toujours décrassées correctement. N'appuyez jamais une pièce à travailler avec force contre une meule froide. - Page 44 8712135 MEULEUSE D’ÉTABLI DE 8 PO AVEC LECTEUR V 1,0 AVEC LECTEUR ACL DE CARTE DE CIRCUITS OPÉRATIONS DE BASE DE LA MEULEUSE AVERTISSEMENT ! Ne démarrez jamais l'outil alors que l'opérateur ou une personne est sur la trajectoire de la meule.
- Page 45 V 1,0 MEULEUSE D’ÉTABLI DE 8 PO AVEC LECTEUR 8712135 AVEC LECTEUR ACL DE CARTE DE CIRCUITS Utilisez toujours la face de la meule alors que celle-ci se déplace vers le bas contre l'objet travaillé. L'ébavurage du bord s'effectue de préférence en utilisant la meuleuse pour retirer les bavures du bord sur l'angle biseauté.
- Page 46 8712135 MEULEUSE D’ÉTABLI DE 8 PO AVEC LECTEUR V 1,0 AVEC LECTEUR ACL DE CARTE DE CIRCUITS AVERTISSEMENT ! Une lame de tondeuse à gazon en déséquilibre peut provoquer des vibrations excessives, endommageant ainsi la tondeuse à gazon et l'arbre du moteur.
- Page 47 V 1,0 MEULEUSE D’ÉTABLI DE 8 PO AVEC LECTEUR 8712135 AVEC LECTEUR ACL DE CARTE DE CIRCUITS AFFÛTAGE DES CISEAUX À BOIS ET DES FERS DE RABOT L'affûtage des ciseaux et des fers sur la meuleuse d'établi produira des biseaux creux tranchants comme une lame de rasoir, alors qu'on devra ensuite procéder à...
-
Page 48: Soin Et Entretien
8712135 MEULEUSE D’ÉTABLI DE 8 PO AVEC LECTEUR V 1,0 AVEC LECTEUR ACL DE CARTE DE CIRCUITS Meulez l'embout du tournevis bien droit et éliminez tout jeu, entaille ou torsion sur la lame du tournevis. N'exercez qu'une légère pression sur la lame tout en la déplaçant de l'avant vers l'arrière sur la face de la meule. - Page 49 V 1,0 MEULEUSE D’ÉTABLI DE 8 PO AVEC LECTEUR 8712135 AVEC LECTEUR ACL DE CARTE DE CIRCUITS Conservez toutes les pièces en état de marche. Vérifiez si le protecteur ou les autres pièces fonctionnent correctement et s’ils réalisent la fonction pour laquelle ils ont été conçus.
-
Page 50: Remplacement Des Meules
8712135 MEULEUSE D’ÉTABLI DE 8 PO AVEC LECTEUR V 1,0 AVEC LECTEUR ACL DE CARTE DE CIRCUITS REMPLACEMENT DES MEULES AVERTISSEMENT ! Utilisez uniquement des meules qui présentent un régime nominal de 3 450 tr/min ou plus et un trou d'axe de 5/8 po ou une bague de format approprié. - Page 51 V 1,0 MEULEUSE D’ÉTABLI DE 8 PO AVEC LECTEUR 8712135 AVEC LECTEUR ACL DE CARTE DE CIRCUITS Ajustez la distance du support d'outil (n 14) et du dispositif de protection contre les étincelles (n 5) par rapport à la meule. Maintenez un jeu de 1/16 po ou moins lorsque que le diamètre de la meule diminue en raison de l'usure...
-
Page 52: Mise Au Rebut
8712135 MEULEUSE D’ÉTABLI DE 8 PO AVEC LECTEUR V 1,0 AVEC LECTEUR ACL DE CARTE DE CIRCUITS LUBRIFICATION L'outil est lubrifié en permanence en usine et ne demande aucune lubrification additionnelle. MISE AU REBUT Recyclez votre outil endommagé dans une installation prévue à... - Page 53 V 1,0 MEULEUSE D’ÉTABLI DE 8 PO AVEC LECTEUR 8712135 AVEC LECTEUR ACL DE CARTE DE CIRCUITS PROBLÈME(S) CAUSE(S) POSSIBLE(S) SOLUTION(S) PROPOSÉE(S) Vibrations 1. Montage incorrect 1. Réinstallez la meuleuse excessives. de la meuleuse ou d'établi. des accessoires. 2. Dressez les meules ou 2.
- Page 54 8712135 MEULEUSE D’ÉTABLI DE 8 PO AVEC LECTEUR V 1,0 AVEC LECTEUR ACL DE CARTE DE CIRCUITS RÉPARTITION DES PIÈCES En cas de questions techniques, appelez le 1-800-665-8685...
-
Page 55: Liste Des Pièces
V 1,0 MEULEUSE D’ÉTABLI DE 8 PO AVEC LECTEUR 8712135 AVEC LECTEUR ACL DE CARTE DE CIRCUITS LISTE DES PIÈCES DESCRIPTION QTÉ Supports inférieurs de protection des yeux Vis à bride Protection des yeux 10-24 x 1/4 po 20 Rondelle plate, 1/4 po 2 Couvercle de protège-meule... - Page 56 8712135 MEULEUSE D’ÉTABLI DE 8 PO AVEC LECTEUR V 1,0 AVEC LECTEUR ACL DE CARTE DE CIRCUITS DESCRIPTION QTÉ 49 Plaque de détente des contraintes 39 Support d’outil (droite) 50 Base 40 Patte de fixation Panneau de (droite) commandes Meule 52 Vis à...
Need help?
Do you have a question about the 8712135 and is the answer not in the manual?
Questions and answers