Table of Contents
Advertisement
Quick Links
POVS-1 Series
PIR Occupancy/Vacancy Sensor
Introduction
POVS-1 is a Passive Infrared Motion Sensor that can function as either a security sensor which activates alarm when triggered, or
an occupancy/vacancy sensor which controls home automation or lighting functions via the Control Panel.
Optional models with extra temperature sensor, humidity, and/or ambient light sensor, can provide temperature, humidity/lux
readings and transmit to the Control Panel at regular intervals.
The PIR includes following models, with optional ambient light sensor, temperature sensor, and humidity sensor functions.
Model No.
PIR Sensor
POVS-1-LT
O
POVS-1-L
O
POVS-1-T
O
POVS-1RhL
O
POVS-1
O
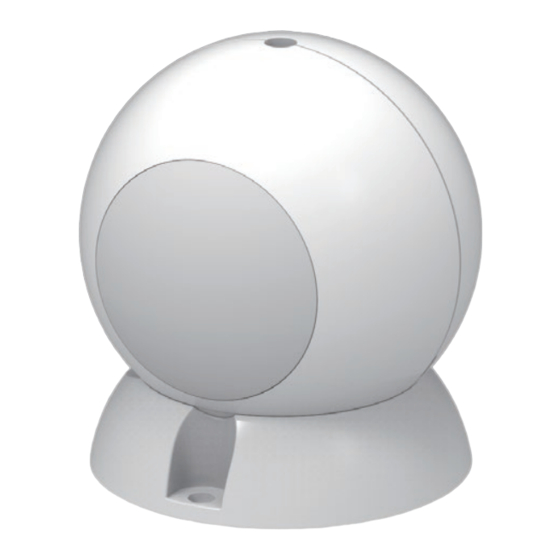
Parts Identification
1. IR Lens w/ LED Indicator
The LED Indicator is located at the center of the IR lens.
In Normal operation mode, the LED Indicator will flash in the following conditions:
- When movement is detected under low battery condition.
- When movement is detected under Test mode.
- When the Test Button is pressed under low battery condition.
2. Battery Compartment
The PIR is powered by one CR123A 3V Lithium battery.
3. Test Button
The test button is used for testing the radio performance and for learning purpose.
4. Magnetic Base
The PIR is deployed on the magnetic base when installing. The magnet within PIR and the base will ensure the PIR
remains attached to the base regardless of PIR location and angle.
Features
Occupancy/Vacancy Detection
When the PIR detects movement, it will transmit a trigger signal. The PIR then begins counting down the occupancy/vacancy
timer. The timer length is adjustable from 30 seconds to 60 minutes via the Control Panel.
During the timer, if the PIR detects movement, the timer will be reset.
When the timer expires without any motion detection, the PIR will transmit a motion detection restore signal and return to
normal operation.
Sensitivity Adjustment
The PIR sensitivity can be adjusted to meet different requirements as either security or occupancy/vacancy sensor. Up to 5
levels of sensitivity may be selected via the Control Panel.
After the PIR is learned into the Control Panel, you can further set its Occupancy/Vacancy Timer & Sensitivity level from the
Control Panel Webpage.
1.
Press and hold the Test button on the PIR for three seconds, the LED indicator will light up.
2.
Refer to your Control Panel operation manual to edit the device.
3.
Go to Occupancy/Vacancy Timer & Sensitivity and select a desired setting from the dropdown menu.
4.
Click OK to confirm. The Sensor's LED will turn bright and then dim to indicate successful operation.
Battery and Low Battery Detection
The PIR uses one CR123A 3V Lithium battery as its power source. The PIR main body must be removed from base to access
Light Sensor
Temperature Sensor
O
O
O
X
X
O
O
O
X
X
1
Humidity
X
X
X
O
X
Advertisement
Table of Contents

Related Manuals for Climax Technology POVS-1 Series


Summary of Contents for Climax Technology POVS-1 Series
- Page 1 POVS-1 Series PIR Occupancy/Vacancy Sensor Introduction POVS-1 is a Passive Infrared Motion Sensor that can function as either a security sensor which activates alarm when triggered, or an occupancy/vacancy sensor which controls home automation or lighting functions via the Control Panel.
- Page 2 battery compartment. The battery compartment has a strip which should be pressed under the battery when battery is inserted. When removing battery, simply lift the strip. The PIR features Low Battery Detection function. When the battery voltage is low, the PIR will transmit Low Battery signal to the Control Panel.
- Page 3 placed on the base. The magnet locations are identified by the circle mark on the casing. The PIR’s movement detection function is directional. It is more sensitive to movement from side, and less sensitive to vertical movement from top to bottom. Use the location of the bottom magnet as a reference to determine the horizontal and vertical direction of the PIR.
Need help?
Do you have a question about the POVS-1 Series and is the answer not in the manual?
Questions and answers