Table of Contents
Advertisement
Advertisement
Table of Contents

Related Manuals for Garmin CATALYST


Summary of Contents for Garmin CATALYST
- Page 1 GARMIN CATALYST ™ Driving Performance Optimizer Owner’s Manual...
- Page 2 © 2022 Garmin Ltd. or its subsidiaries All rights reserved. Under the copyright laws, this manual may not be copied, in whole or in part, without the written consent of Garmin. Garmin reserves the right to change or improve its products and to make changes in the content of this manual without obligation to notify any person or organization of such changes or improvements. Go to www.garmin.com...
-
Page 3: Table Of Contents
Drive Session Audio Settings....13 Charging the Device......22 Audible Prompt and Coaching Settings..........13 Device Maintenance....... 22 Race Timer..........14 Garmin Support Center......22 Adding a Track........14 Updating Software Using a Wi‑Fi Adding a Track Configuration....15 Network..........22 Adding a Driver Profile......15 Updating Software with Garmin Editing a Driver Profile...... - Page 4 Cleaning the Touchscreen....24 Cleaning the Camera Lens....24 Avoiding Theft........25 Restarting the Device......25 Removing the Device, Mount, and Suction Cup........... 25 Removing the Mount from the Suction Cup............. 25 Removing the Suction Cup from the Windshield......... 25 Removing the Adhesive Camera Mount............
-
Page 5: Getting Started
4 Connect the double-ball link to both double-socket arms. 5 Tighten the knobs on both double-socket arms slightly. 6 If necessary, rotate the powered magnetic mount so the Garmin ® logo faces right-side up, and adjust the mount for better viewing and operation. -
Page 6: Connecting The Mount To Vehicle Power
Bare Wire USB Cable WARNING Garmin strongly recommends having an experienced installer with the proper knowledge of electrical systems install the device. Incorrectly wiring the power cable can result in damage to the vehicle or the battery and can cause bodily injury. -
Page 7: Installing The Polarizing Filter On The Camera
2 Place the filter firmly onto the camera lens. 3 Verify the line on the outer rim of the filter is facing up and the Garmin logo is right side up. Removing the Polarizing Filter from the Camera 1 Firmly grip the camera in one hand and the polarizing filter in the other hand. -
Page 8: Installing The Remote Cam On Your Windshield
Installing the Remote Cam on Your Windshield NOTICE The adhesive mount is intended for a long-term installation and can be difficult to remove. You should carefully consider the mounting location before you install the mount. Before you can install the adhesive mount onto your windshield, you should review the windshield mounting considerations (Camera Mounting Considerations, page For the best results, the ambient temperature should be from 21°... - Page 9 Installation...
-
Page 10: Connecting The Camera Cable
Connecting the Camera Cable 1 Plug the camera cable into the micro-USB port on the camera. 2 Route the camera cable around your windshield so it does not obstruct your view of the track. The cable is designed to be routed out of sight. To hide the cable, route it behind the vehicle trim along the windshield, doorframe, or dash. -
Page 11: Connecting The Device To The Magnetic Mount
Connecting the Device to the Magnetic Mount The magnetic mount supplies power to the Garmin Catalyst device. Before you use your device on battery ™ power, you should charge it. Place the back of the device onto the magnetic mount. -
Page 12: Installing The Screw-Down Ball Mount On The Dashboard
NOTICE Avoid wires, gauges, air bags, air bag covers, HVAC, and other items when drilling pilot holes and attaching the mount to the vehicle. Garmin is not responsible for any damages or consequences arising from the installation. NOTICE Garmin recommends professional installation of the screw-down ball mount. -
Page 13: Device Overview
Device Overview Microphone Volume control Power button Micro USB power and data port Auxiliary memory card slot (for additional memory) 3.5 mm audio jack Magnetic mount interface with 14-pin connector Speaker Memory card slot with pre-installed microSD card (under cover) ®... -
Page 14: Using The Touchscreen
Settings Select to start a drive session. DRIVE Select to review the details of your recent drive sessions. REVIEW Select to synchronize data with your Garmin Connect ™ account. SYNC Displays the weather conditions at the closest track. Weather information Select to view information about any track on the device. -
Page 15: Status Bar Icons
1 If the device does not automatically sync session data, select SYNC. 2 Select an option: • If the device prompts you to sign in to Garmin Connect, select Sign In or Create a New Account. • If the device prompts you to connect to Wi‑Fi, select CONNECT. -
Page 16: Starting A Drive Session
Starting a Drive Session Before you can start a drive session, your device must acquire satellite signals. You can select in the status bar to check the current signal strength and accuracy. 1 From the home screen, select DRIVE. 2 Select a track. 3 Select an option: •... -
Page 17: Drive Session Audio Settings
Drive Session Audio Settings Before you start a race, you can select CHECK AUDIO to adjust audio settings for the drive session. RECORD CAMERA AUDIO: Enables or disables camera audio recording for drive session videos. AUDIBLE PROMPTS: Sets the level of audio coaching feedback and audible prompts you receive during a drive session (Audible Prompt and Coaching Settings, page 13). -
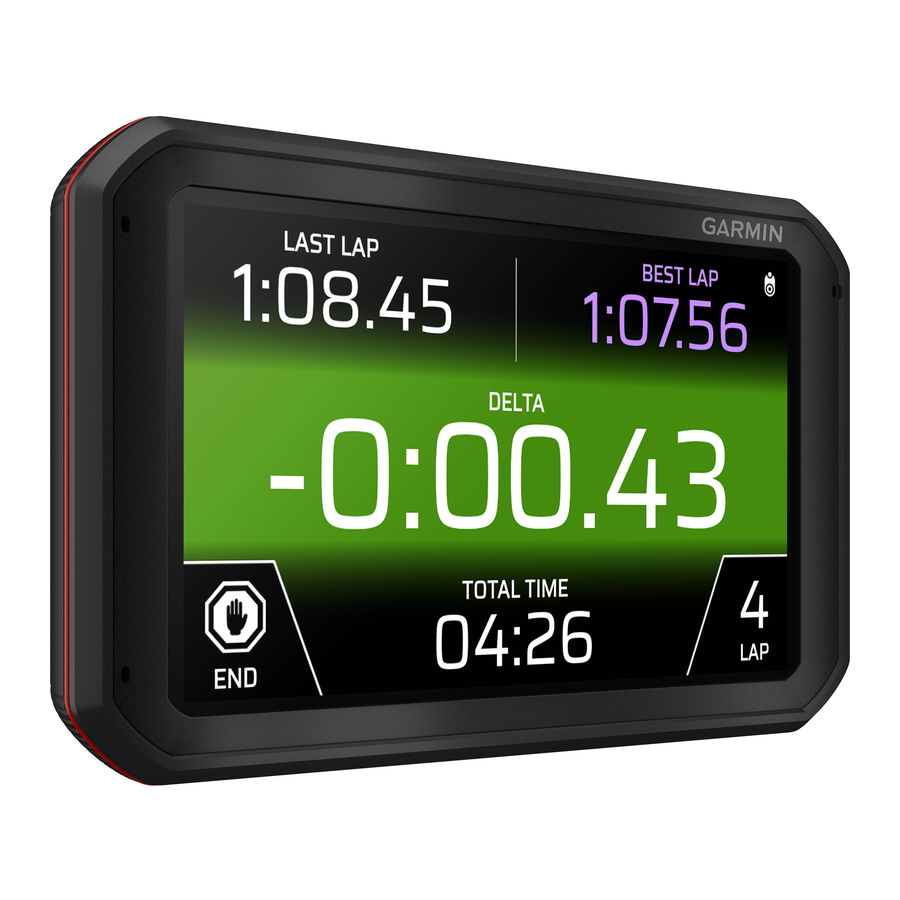
Page 18: Race Timer
Race Timer As you drive, the device keeps track of your progress and gives you audible coaching tips. The race timer keeps track of your lap number and shows your best lap times. Displays the last lap time during the current session. LAST LAP Displays the best lap time for the current session. -
Page 19: Adding A Track Configuration
Adding a Track Configuration You can add additional configurations for tracks that are stored on your device. 1 Select DRIVE. 2 Select a track. 3 Select ADD A TRACK CONFIGURATION. 4 Follow the on-screen instructions to enter track details and information about your drive session. 5 Select START. -
Page 20: Reviewing Drive Sessions
Reviewing Drive Sessions WARNING Do not review any drive sessions while driving. Failure to pay attention to your surroundings and road conditions can result in serious personal injury or death. The device records detailed information about each drive session. You can view the results of each drive session individually or compare data with another session. -
Page 21: Saving A Session Video
Saving a Session Video You can save a recorded session video with data overlays to your memory card. 1 From the session summary screen, select the video thumbnail, and select (Session Summary, page 16). 2 Select a data overlay option, and select NEXT. 3 Select a delta timer option, and select SAVE VIDEO. -
Page 22: Opportunities
Opportunities Select to view an overview of the opportunity. OVERVIEW Select to view optimal brake timing and coaching advice for the selected track BRAKING segment. Select to view optimal track usage and coaching advice for the selected track APEX segment. Select to view optimal speed and coaching advice for the selected track segment. -
Page 23: Reviewing Laps
Reviewing Laps The Laps page lets you review lap time and speed information for each lap. You can compare any two laps from the same session. From the session summary page, select LAPS. Laps Select to view a map of your track position during the lap. POSITION Select to view a map showing your speed at different points during the lap. -
Page 24: Comparing Laps
Select > Bluetooth. Pairing a Wireless Headset or Car Stereo 1 Place your headset and your Garmin Catalyst device within 33 ft. (10 m) of each other. 2 On your Garmin Catalyst device, select > Bluetooth. 3 On your Garmin Catalyst device, verify Bluetooth wireless technology is enabled. -
Page 25: Adjusting Sound And Notification Volume
This option deletes your travel history, apps, accounts, settings, saved networks, paired devices, and all other user data. Installed maps are not deleted. User files in the Garmin folder may not be deleted. Device Information Viewing E-label Regulatory and Compliance Information 1 From the settings menu, swipe to the bottom of the menu. -
Page 26: Specifications
• Connect the device to an optional power adapter accessory, such as a wall power adapter. You can purchase an approved Garmin AC-DC adapter suitable for home or office use from a Garmin dealer or www.garmin.com. The device may charge slowly when connected to a third-party adapter. -
Page 27: Updating Software With Garmin Express
Updating Software with Garmin Express ™ You can use the Garmin Express application to download and install the latest software updates for your device. 1 If you do not have the Garmin Express application installed on your computer, go to garmin.com/express... -
Page 28: Installing Garmin Express
3 Open the downloaded file, and follow the on-screen instructions to complete the installation. Updating the Camera Software Software updates for your Garmin Catalyst device may include software updates for the remote camera. The device prompts you to install updates for the camera the next time you connect it to the powered magnetic mount. -
Page 29: Avoiding Theft
• Remove the residue left on the windshield by the suction cup. • Do not keep your unit in the glove compartment. • Register your device using the Garmin Express software (garmin.com/express). Restarting the Device You can restart your device if it stops functioning. -
Page 30: The Device Does Not Charge In My Vehicle
My camera feels warm while it is operating Garmin cameras are designed for the automotive environment. It is normal and expected for the products to become warm or hot and remain safe for use in warm climates with full sun exposure. The temperature of the device itself can exceed the specified maximum operating ambient temperature for the device and remain safe for use. -
Page 31: Replacing The Memory Card
Replacing the Memory Card You can replace the memory card to increase the storage capacity or to replace a card that has reached the end of its useful life. The camera requires a microSD memory card from 32 to 256 GB with a speed rating of Class 10 or higher. -
Page 32: Connecting The Device To Your Computer
3 Select a file. 4 Select Edit > Copy. 5 Browse to a folder on the device. NOTE: For a removable drive or volume, you should not place files in the Garmin folder. 6 Select Edit > Paste. Disconnecting the USB Cable If your device is connected to your computer as a removable drive or volume, you must safely disconnect your device from your computer to avoid data loss. -
Page 33: Index
EULAs 21 theft, avoiding 25 time settings 21 touchscreen 10 files, transferring 28 travel history 21 troubleshooting 25, 26 Garmin Express 24 updating software 23, 24 unit ID 21 units of measure 15 updating headset, pairing 20 maps 22 home screen 10 software 22–24 USB, disconnecting 28 icons, status bar 11... - Page 34 May 2021 GUID-16C78876-E016-40FD-8A0A-049BA52B462B v5...
Need help?
Do you have a question about the CATALYST and is the answer not in the manual?
Questions and answers