Advertisement
Available languages
Available languages
Quick Links
INSTALLATION AND OPERATION MANUAL
755CFK Circulating Fan Kit
Use with Valor Portrait 534, 650 and 739 ONLY (Incompatible with 738)
WARNING
If the information in these instructions
is not followed exactly, a fire or
explosion may result causing property
damage, personal injury or loss of life.
GROUNDING: This power supply must
be installed and grounded in accordance
with local codes, or in the absence of local
codes, with the current Canadian Electrical
Code CSA C22.1. or in the USA the National
Electrical Code ANSI/NFPA70 latest edition.
Description of System
The models listed above have been designed to
accommodate the installation of an air circulation fan.
Operated by a variable speed control and a thermally
actuated switch, the fan is designed to boost the natural
convection through the heater; this may be a desirable
feature dependent on the fireplace location and room
layout.
The circulating fan may be installed before the heater
installation or as a retrofit at a later date provided
power is available at the fan location.
Operation
The fan is designed for automatic operation using a
thermal switch. It will take approximately 10-15 minutes
for the appliance to warm up and allow the switch to
activate the fan.
To operate the fan, rotate the speed control knob
clockwise from OFF to HIGH. Further rotation will control
the fan speed, once the automatic thermal switch has
been activated.
4000506-08
© 2021, Miles Industries Ltd.
755CFK
This kit must be installed or serviced by
a qualified installer, service agency or
the gas supplier. These instructions are
to be used in conjunction with the main
installation instructions for the above
listed models.
INSTALLER: Leave this manual with the
appliance.
CONSUMER: Retain this manual for future
reference.
If the fire is turned off, the fan will continue to operate
until the thermal switch cools, unless the speed control
is manually turned to the OFF position. A switched
power supply to the fan, with the switch conveniently
located on the wall may be desirable.
Should electrical power fail, the heater operation will
remain unaffected.
NOTE
When the heater is operated at lower settings,
the fan may cycle off and on repeatedly as
the thermal switch temperature cannot be
maintained due to the operation of the fan.
Electrical Requirements
The fan kit requires a power supply of 120 Volts,
1 phase, 60 Hz. Full load current is less than 1 amp.
1
Advertisement

Related Manuals for Valor 755CFK


Summary of Contents for Valor 755CFK
- Page 1 INSTALLATION AND OPERATION MANUAL 755CFK 755CFK Circulating Fan Kit Use with Valor Portrait 534, 650 and 739 ONLY (Incompatible with 738) This kit must be installed or serviced by WARNING a qualified installer, service agency or the gas supplier. These instructions are...
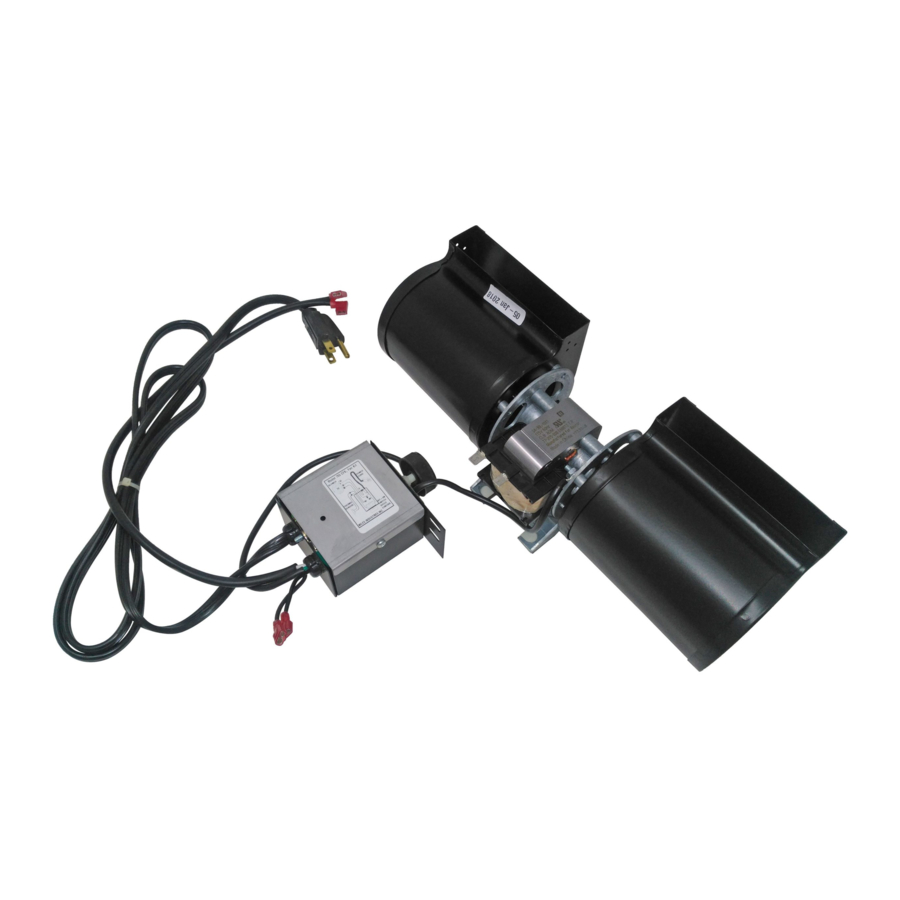
- Page 2 Fan Kit Components Fan Spacing Tabs (2) Fan Unit, incl. Wire Harness 4000537 The complete #755CFK kit contains the following: • Fan mounting assembly: fan mounting plate, fan retaining clamp, wing nut and washer; • Fan and motor unit: wiring...
- Page 3 Installation with Valor Models Horizon 534 and H4 650 1. Remove the fireplace’s front and set aside. (Refer to 8. Place the fan unit on the fan mounting plate. Ensure the front’s installation instructions). that the fastening stud on the mount lies between the support legs of the fan and that the fan is 2.
- Page 4 11. Bend up the control box bracket. The bracket is flat when the unit is received. Screw the control box to the tab. Burner Module Switch Flipped Over Location Switch Mounted to Underside of Burner Module Using 2 Existing Screws 12.
- Page 5 Installation with Valor Models G3 739 (2 methods) (This kit cannot be installed on models 738) Method A—Installing from the rear of the 3. Place the fan on the fan monting plate as far back as appliance possible against tabs. Center it in width so that the fastening stud on the mounting plate lies between Method A—Overview...
- Page 6 7. From the rear of the appliance, find the thermal 9. Slide the control box forward in the firebox between switch fixing bracket located under the burner the valve and the firebox wall. behind the valve. Slide the thermal switch in the 10.
- Page 7 7. Place the fan unit on the fan mounting plate. Ensure Method B—Installing from the front of the appliance that the fastening stud on the mount lies between the support legs of the fan and that the fan is pushed Method B—Overview tight against the tabs on the mounting plate.
- Page 8 11. Thread the fan’s electrical cord out of the firebox 15. Under the burner module plate, right behind the through the appliance’s side access hole. valve, there is a small bracket with two clips. Slide the thermal switch in the bracket. If the bracket clips are too tight, open them up with a screwdriver’s blade.
-
Page 9: Maintenance
Miles Industries Ltd. warrants all components of or lubrication; however, periodic cleaning of the unit the model 755CFK Circulating Fan Kit for a period of compartment to remove household lint will help to one year from the date of purchase against defects maintain peak performance and extend the fan life. -
Page 10: Description Du Système
GUIDE D’INSTALLATION ET D’OPÉRATION 755CFK Ventilateur de circulation d’air 755CFK Pour foyers Valor Horizon 534, H4 650, G3 739 (incompatible avec 738) Ce kit doit être installé ou réparé par AVERTISSEMENT un installateur qualifié, une agence de service certifiée ou un fournisseur de gaz. - Page 11 Contenu Ventilateur, incl. harnais de connexion 4000537 Onglets d’espacement (2) Le 755CFK comprend les pièces suivantes : • Les pièces de montage du ventilateur, incluant la plaque de montage et le support de rétention avec écrou à oreilles et rondelle;...
- Page 12 Installation sur les modèles Valor Horizon 534 et H4 650 1. Enlevez la devanture du foyer et mettez-la de côté. 8. Placez le ventilateur sur la plaque de montage. (Consultez le guide d’installation de la devanture). Assurez-vous que la cheville de fixation sur la plaque est située entre les montants du...
- Page 13 11. À l’aide d’une lame, soulevez et pliez la languette qui se trouve au fond de l’appareil. Fixez le boîtier de contrôle à cette languette avec une vis fournie. Interrupteur fi xé sous le Switch Mounted to Underside of Burner Module module du brûleur avec Using 2 Existing Screws 2 vis existantes.
- Page 14 Installation sur les modèles Valor G3 739 (2 méthodes) (Ce ventilateur NE peut PAS être installé sur le G3 738) Méthode A—Installation de l’arrière de l’appareil 3. Placez le ventilateur sur la plaque de montage contre la paroi arrière. Centrez le ventilateur en Méthode A—Concept...
- Page 15 7. De l’arrière de l’appareil, repérez le support de 9. Glissez le boîtier de contrôle dans l’appareil entre la montage de l’interrupteur thermique sous la soupape et la paroi extérieure. plaque du brûleur derrière la soupape. Insérez 10. Insérez le ventilateur et fixez la plaque d’accès à l’interrupteur dans les pinces du support.
- Page 16 7. Placez le ventilateur sur la plaque de montage. Méthode B—Installation par le devant de l’appareil Assurez-vous que la cheville de fixation sur la plaque est située entre les montants du ventilateur et que Méthode B—Concept celui-ci repose contre les onglets d’espacement de la paroi arrière de sa plaque de montage.
- Page 17 10. Branchez l’interrupteur thermique à le boîte de 14. Fixez les fils au fond de l’appareil à l’aide du serre-fil contrôle du ventilateur. autocollant fourni. 11. Faites passer le cordon d’alimentation à travers le 15. Sous la plaque du brûleur, derrière la soupape, trou d’accès du côté.
-
Page 18: Entretien
Ce ventilateur ne requiert pas d’entretien régulier ou Miles Industries Ltd. garantie toutes les pièces du de lubrification. Cependant, un nettoyage périodique Ventilateur de circulation d’air 755CFK contre les du compartiment pour enlever la poussière accumulée défauts de matériaux ou de main-d’oeuvre pour une aidera à...
Need help?
Do you have a question about the 755CFK and is the answer not in the manual?
Questions and answers