Table of Contents
Advertisement
Quick Links
Gravity Meat Slicers
Models MS-IT-0220-B, 0220-U, 0250-B, 0250-U, 0250-I, 0250-IP,
0275-I, 0275-IP, 0300-B, 0300-U, 0300-I
Items 13610, 13616, 13618, 13620, 13621, 13623, 13625, 13624,
13626, 13628, 21624
Instruction Manual
Revised - 05/04/2021
Toll Free: 1-800-465-0234
Fax: 905-607-0234
Email: service@omcan.com
www.omcan.com
Advertisement
Table of Contents

Subscribe to Our Youtube Channel
Related Manuals for Omcan MS-IT-0220-B


Summary of Contents for Omcan MS-IT-0220-B
- Page 1 Gravity Meat Slicers Models MS-IT-0220-B, 0220-U, 0250-B, 0250-U, 0250-I, 0250-IP, 0275-I, 0275-IP, 0300-B, 0300-U, 0300-I Items 13610, 13616, 13618, 13620, 13621, 13623, 13625, 13624, 13626, 13628, 21624 Instruction Manual Revised - 05/04/2021 Toll Free: 1-800-465-0234 Fax: 905-607-0234 Email: service@omcan.com www.omcan.com...
-
Page 2: Table Of Contents
Table of Contents Model MS-IT-0220-B / Model MS-IT-0220-U / Model MS-IT-0250-B Model MS-IT-0250-U / Model MS-IT-0250-I / Model MS-IT-0250-IP Model MS-IT-0275-I / Model MS-IT-0275-IP / Model MS-IT-0300-B Model MS-IT-0300-U / Model MS-IT-0300-I Section Page General Information ----------------------------------------------------------------------------------------- 3 - 4... -
Page 3: General Information
If the package has suffered rough handling, bumps or damage (visible or concealed), please note it on the bill of lading before accepting the delivery and contact Omcan within 24 hours, so we may initiate a claim with the carrier. A detailed report on the extent of the damage caused to the machine must be filled out within three days, from the delivery date shown in the shipping documents. -
Page 4: Safety And Warranty
Si el paquete ha sufrido un manejo de poco cuidado, golpes o daños (visible o oculto) por favor anote en la factura antes de aceptar la entrega y contacte Omcan dentro de las 24 horas, de modo que podamos iniciar una reclamación con la compañia. - Page 5 Safety and Warranty GENERAL SAFETY REGULATIONS The slicers must be used only by suitably trained personnel. Furthermore, this personnel must have read this manual carefully. In particular, please comply to the following instructions: • Install the machine according to the instructions contained in the “Installation” section. •...
-
Page 6: Technical Specifications
1 YEAR PARTS AND LABOUR BENCH WARRANTY Within the warranty period, contact Omcan Inc. at 1-800-465-0234 to schedule a drop off to either an Omcan authorized service depot in the area, or to an Omcan Service warehouse to repair the equipment. - Page 7 Technical Specifications On request the following are available: • Safety micro-switch preventing the motor from starting when the blade guard is removed. WARNING: RESIDUAL RISKS Notwithstanding all the possible cautions taken during the design and the construction of the machine, residual risks (cutting) still exist during use or during cleaning or maintenance.
-
Page 8: Installation
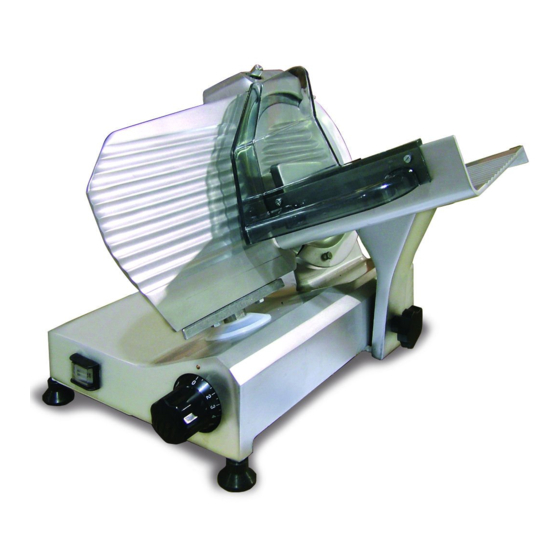
Technical Specifications MAIN COMPONENTS 1. Startup Button (White 2. Stop Button (Black or 3. N.A. 4. Slice Thickness or Green) Red) Control Knob 5. Adjustable Foot 6. Carriage Tray Support 7. Base 8. Product Tray 9. Blade Plate 10. Product Grip 11. - Page 9 Installation The user is responsible for ascertaining that the electrical system is suitably dimensioned and functions correctly (supply line, outlet, distribution panel, differential protecting breaker, grounding). Before carrying out the connection ascertain that the mains characteristics correspondent to those indicated on the machine plate.
-
Page 10: Operation
Operation USING THE MACHINE LOADING THE PRODUCT ON THE TRAY AND SLICING • Ascertain that the thickness control knob is correctly positioned to ‘0’. • Draw back the carriage completely (towards the operator) to loading position. • Lift the product grip by pulling it away by 10 cm from the blade and put it in rest position. •... -
Page 11: Maintenance
Maintenance DISASSEMBLING THE MACHINE FOR CLEANING • Disconnect the plug from the mains. • Turn the gauge plate know to ‘0’. • Remove the various components as described in the following paragraphs. • Unscrew (counterclockwise) the blade guard tie-rod. • If the blade guard is blocked, press on the rod knob to move it a little. - Page 12 Maintenance WARNING Maintenance must always be carried out when the machine is disconnected from the mains and if no other position is specifically required, with the thickness control knob on ‘0’. The following maintenance operations are to be entrusted only to personnel authorized by the manufacturer: •...
- Page 13 Maintenance LUBRICATION Carriage sliding guides product grip (once a week) Use only food grade mineral oil, or use white Vaseline oil. DO NOT USE VEGETABLE OILS. • Spread a small quantity of oil on the bar and move the assembly 3 or 4 times. Clean as required to remove excess of oil.
-
Page 14: Troubleshooting
Troubleshooting The table below indicates the most common problems that may arise during slicing and the necessary remedies. PROBLEM POSSIBLE CAUSE REMEDY The machine does not start No power supply. Ascertain that the plug is correctly when the white or green button is inserted. -
Page 15: Instructions Français
Troubleshooting WARNING In any case, to remove the blade and dispose of it, you must contact the manufacturer or personnel duly authorized by the manufacturer. NEVER DISPOSE OF WASTE IN AREAS WHERE ACCESS IS NOT DELIMITED BY BARRIERS AND FORBIDDEN BY WARNING SIGNS AS THIS WASTE REPRESENTS A SERIOUS DANGER, ESPECIALLY FOR CHILDREN AND ANIMALS. - Page 16 1 AN PIÈCES ET TRAVAIL BANC GARANTIE Dans la période de garantie, contacter Omcan Inc. au 1-800-465-0234 pour planifier une déposer soit un dépôt Omcan de service autorisé dans la zone, ou à un entrepôt de service Omcan de réparer l’équipement.
- Page 17 Instructions Français En tout cas, pour le recyclage approprié, nous suggérons au rebut des produits séparément (différenciée des déchets) selon les normes actuelles. NE PAS JETER MATÉRIAUX D’EMBALLAGE DANS L’ENVIRONNEMENT! SPÉCIFICATIONS TECHNIQUES La machine se compose essentiellement d’une base supportant une lame circulaire montée en position inclinée.
- Page 18 Instructions Français • Déclaration de conformité de l’UE; • Manuel d’instructions pour l’installation, l’utilisation et la maintenance. PRODUITS QUI PEUVENT ÊTRE TRANCHÉS • Tous les types de charcuterie (crus, cuits, fumés). • La viande sans os (crus ou cuits, à une température non inférieure à + 3 ° C). •...
- Page 19 Instructions Français INSTALLATION INSTALLATION DE LA MACHINE Placez la machine sur un bien nivelé, supérieure lisse et sec convenablement dimensionnée pour supporter le poids de la machine. CONNEXION ÉLECTRIQUE Installer la machine près d’une prise compatible dérivé d’un système répondant aux normes locales. L’utilisateur est responsable pour déterminer que le système électrique est convenablement dimensionné...
- Page 20 Instructions Français OPÉRATION UTILISATION DE LA MACHINE CHARGEMENT DU PRODUIT SUR LE PLATEAU ET SLICING • Vérifier que le bouton de commande de l’épaisseur est correctement positionné à ‘0’. • Reculer le chariot (vers l’opérateur) à la position de chargement. •...
- Page 21 Instructions Français DÉMONTAGE DE LA MACHINE DE NETTOYAGE • Débrancher la fiche du secteur. • Tourner la plaque de jauge savent à ‘0’. • Retirez les différents composants tels que décrits dans les paragraphes suivants. • Dévissez (dans le sens antihoraire) le protège-lame tirant. •...
- Page 22 Instructions Français ATTENTION L’entretien doit toujours être effectué lorsque la machine est déconnectée du réseau et si aucun autre poste est spécifiquement requise, avec le bouton de contrôle de l’épaisseur sur ‘0’. Les opérations de maintenance suivantes doivent être confiés qu’à du personnel autorisé par le fabricant: •...
- Page 23 Instructions Français LUBRIFICATION Carriage glissières produit poignée (une fois par semaine) Utilisez uniquement de l’huile minérale de qualité alimentaire, ou utiliser de l’huile blanche de vaseline. NE PAS utiliser des huiles végétales. • Étendre une petite quantité d’huile sur la barre et déplacer l’ensemble 3 ou 4 fois. Nettoyer si nécessaire pour enlever l’excès d’huile.
- Page 24 Instructions Français DÉPANNAGE Le tableau ci-dessous indique les problèmes les plus courants qui peuvent survenir au cours de tranchage et les mesures correctives nécessaires. PROBLÈME CAUSE POSSIBLE REMÉDIER La machine ne démarre pas Pas d’alimentation. Vérifier que la prise est lorsque le bouton blanc ou vert est correctement insérée.
- Page 25 Instructions Français • Les matières plastiques, etc. Que démantèlement est confiée à des tiers ou fait en interne (dans ce dernier cas, vous aurez à séparer les différents matériaux) s’il vous plaît noter que l’élimination des matériaux ne peut être effectuée par des entreprises dûment autorisées.
-
Page 26: Parts Breakdown
Parts Breakdown Model MS-IT-0220-B 13610 Model MS-IT-0220-U 13616... - Page 27 Plate for 13610, 13616 33942 Nut for 13610, 13616 14968 Nut for 13610, 13616 14999 Screw TC for 13610, 13616 Omcan F Stone 45x08x06 for 13610, Omcan F Stone 40x08x06 for 13610, 17212 14883 15000 Slide Bar Spring for 13610, 13616 13616...
- Page 28 Parts Breakdown Model MS-IT-0220-B 13610 Model MS-IT-0220-U 13616 Item No. Description Position Item No. Description Position Item No. Description Position 15016 Circlip for 13610, 13616 25162 Bottom Cover for 13610, 13616 33949 Safety Switch Holder for 13610, 13616 14933 Foot for 13610, 13616...
- Page 29 Parts Breakdown Model MS-IT-0250-B 13618 Model MS-IT-0250-U 13620...
- Page 30 Carriage Screw for 13618, 13620 33988 Nut for 13618, 13620 15105 Nut for 13618, 13620 15140 Carriage Nut for 13618, 13620 Omcan F Stone 45x08x06 for 13618, 17212 15106 Pin for 13618, 13620 15141 Pin for 13618, 13620 13620 33990...
- Page 31 Parts Breakdown Model MS-IT-0250-B 13618 Model MS-IT-0250-U 13620 Item No. Description Position Item No. Description Position Item No. Description Position Slide Support Complete for 13618, 18933 Micro Switch for 13618, 13620 25163 Tie Rod Ring for 13618, 13620 33964 13620 Complete Sharpening Assy.
- Page 32 Parts Breakdown Model MS-IT-0250-I 13621...
- Page 33 15037 Sharpener Pin for 13621 34005 Plastic Dowel for 13621 34040 Carriage Slide Bar for 13621 18016 Omcan G Stone 50x08x06 for 13621 34006 Meat Tray Shaft Spring for 13621 34041 Stop Plate for 13621 15038 Washer for 13621 34007...
- Page 34 Parts Breakdown Model MS-IT-0250-IP 13623...
- Page 35 Screw for 13623 34073 Nut for 13623 24541 Blade Cover for 13623 34143 Wing Nut for 13623 17212 Omcan F Stone 45x08x06 for 13623 15105 Nut for 13623 34144 Plate for 13623 34075 Honing Shaft for 13623 14976 Wrist Guard Plate for 13623...
- Page 36 Parts Breakdown Model MS-IT-0275-I 13625...
- Page 37 34269 Sharpener Pin for 13625 34005 Plastic Dowel for 13625 34343 Carriage Slide Bar for 13625 18016 Omcan G Stone 50x08x06 for 13625 34006 Meat Tray Shaft Spring for 13625 34344 Stop Plate for 13625 34271 Washer for 13625 34007...
- Page 38 Parts Breakdown Model MS-IT-0275-IP 13624...
- Page 39 Bearing for 13624 34170 Grinding Shaft for 13624 13590 Blade for 13624 34242 Screw for 13624 18016 Omcan G Stone 50x08x06 for 13624 34207 Screw for 13624 34243 Wing Nut for 13624 34172 Washer for 13624 23902 Blade Cover for 13624...
- Page 40 Parts Breakdown Model MS-IT-0300-B 13626 Model MS-IT-0300-U 13628...
- Page 41 Stop Plate for 13626, 13628 34373 Sharpener Pin for 13626, 13628 18937 Meat Tray Shaft Spring for 13626, 13628 15073 Foot for 13626, 13628 Omcan G Stone 50x08x06 for 13626, 18016 18936 Meat Carriage Shaft for 13626, 13628 15198 Capacitor for 13626, 13628 13628...
- Page 42 Parts Breakdown Model MS-IT-0300-I 21624...
- Page 43 Bead for 21624 AG330 Sharpening Pin for 21624 AG369 Pressamerce for 21624 AG412 Sharpener Pommel for 21624 18016 Omcan G Stone 50x08x06 for 21624 AG370 Astina Zampina for 21624 AG413 Pipette for 21624 AG331 Washer for 21624 AG371 Sharpener Protection for 21624...
- Page 44 Parts Breakdown Model MS-IT-0300-I 21624 Item No. Description Position Item No. Description Position Item No. Description Position AG438 Washer for 21624 AG450 Blade Cover Tie for 21624 AG462 Knurled Pommel for 21624 AG439 Screw for 21624 AG451 Bead for 21624 AG463 Pressamerce Pommel for 21624 AG440...
-
Page 45: Electrical Schematics
Electrical Schematics Model MS-IT-0220-B 13610 Model MS-IT-0220-U 13616 Model MS-IT-0250-B 13618 Model MS-IT-0250-U 13620 Model MS-IT-0250-I 13621 Model MS-IT-0250-IP 13623 Model MS-IT-0275-I 13625 Model MS-IT-0275-IP 13624 Model MS-IT-0300-I 21624... - Page 46 Electrical Schematics Model MS-IT-0300-B 13626 Model MS-IT-0300-U 13628...
-
Page 47: Warranty Registration
Warranty Registration Thank you for purchasing an Omcan product. To register your warranty for this product, complete the information below, tear off the card at the perforation and then send to the address specified below. You can also register online by visiting: Merci d’avoir acheté... - Page 48 Since 1951 Omcan has grown to become a leading distributor of equipment and supplies to the North American food service industry. Our success over these many years can be attributed to our commitment to strengthen and develop new and existing relationships with our valued customers and manufacturers.
Need help?
Do you have a question about the MS-IT-0220-B and is the answer not in the manual?
Questions and answers