Table of Contents
Advertisement
Available languages
Available languages
Quick Links
WARNING Failure to read and follow the operator's
manual and all operating instructions before
using could result in death, serious injury,
and/or property damage.
WARNING High water pressure could cut through
skin resulting in serious injury. Spray gun
traps high water pressure, even when motor
is stopped and water is disconnected. NEVER
aim spray gun at people, animals, or plants. ALWAYS
point spray gun in safe direction, press red button and
squeeze trigger to release high pressure, every time you
turn off pressure washer.
Items Included:
Operator's Manual (not shown)
Spray Gun
Decorative
Shield
Master ON/OFF
Switch
Electric Cord
with GFCI
Water
Inlet
You will need:
• #2 Phillips screwdriver
Unpack Electric Pressure Washer
1.
Remove everything from carton.
2.
Ensure you have all included items prior to assembly. If items are
damaged or missing, call 1-800-743-4115.
3.
O-ring connections come lubricated from the factory, Check and if
lubrication is needed, apply lubricant as described in the operator's
manual.
Assemble Main Unit
1. Slide wheel shafts (A) into holes at sides of main unit. Wheels are
installed correctly when you hear a CLICK and they are securely in
place.
1
2. Install decorative shield (B), and secure using two screws.
NOTICE As the screws are turned in, they will break through the front of
the unit allowing you to secure the decorative shield.
3. Slide the handle (C) into the slots at top of main unit. Install two (2)
screws to secure the handle to the main unit.
4. Slide accessory tray (D) into slots at back of main unit. Install two
(2) screws to secure the accessory tray to the main unit.
5. Install stability foot (E), and secure using two screws.
6. Match the contour of the decorative handle molding (F) with that of
the handle. Slide decorative handle molding into handle opening until
it snaps into place.
6
Assemble Hose Reel
NOTICE The handle is shown removed from the unit for clarity.
1. Assemble both halves of hose reel (G) and secure using four
screws.
7
2. Slide handle (H) into hexagon hole of hose reel and secure using one
screw.
7
3. Place hose reel assembly (J) into slots of handle (K).
4. Place large retainer (M) on right side of hose reel shaft as shown,
and secure using two screws. Place small retainer (N) on left side of
hose reel shaft as shown, and secure using two screws.
5. Insert one end of high pressure hose (P) into opening of hose
reel (Q).
9
6. Turn handle to wind hose around hose reel (R).
Copyright © 2012. All rights reserved. No part of this material may be reproduced or transmitted in any form without the express written permission of Briggs & Stratton Power Products Group, LLC.
Every effort has been made to ensure that the information in this document is accurate and correct. However, we reserve the right to alter or otherwise improve the product and this document at any time without prior notice and without incurring obligation.
*This pressure washer is rated in accordance to the Pressure Washer Manufacturers Association (PWMA) standard PW101-2010 (Testing and Rating Performance of Pressure Washers).
Quick Setup Guide
WARNING Risk of electrocution. Contacting both
power conductors, at the same time could
cause electric shock or burn resulting in
death or serious injury.
• Inspect cord before each use, DO NOT use if cord is
damaged.
• Keep all connections dry and off the ground.
• DO NOT touch plug with wet hands.
Hose Reel
High Pressure
Hose
Metal Wand
Detergent
Tank
Spray Tips (3)
Accessory
Tray
Nozzle and
Spray Tip
Cleaner
Water Outlet
Stability Foot
1
A
2
B
2
C
3
3
4
5
4
5
E
8
6
F
8
G
7
10
H
8
J
K
N
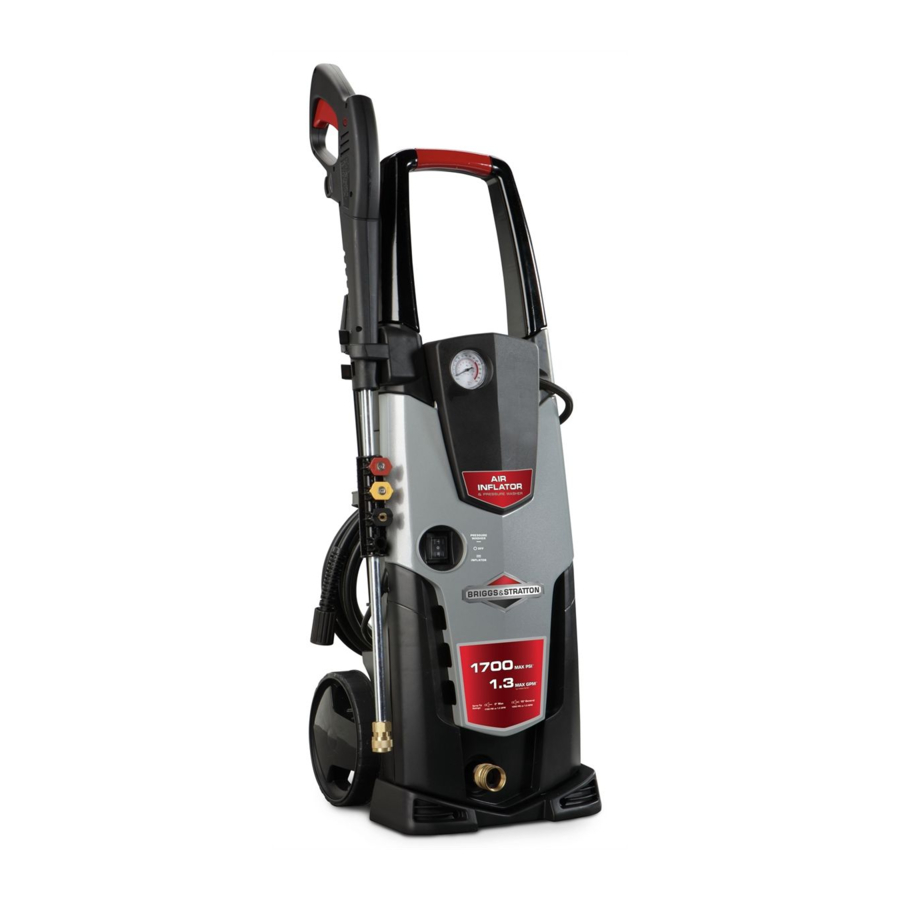
Electric Pressure Washer
with Hose Reel
Connect Hoses and Water Supply
1. Attach garden hose (50 ft. / 15.24 m maximum) to water supply.
2. Run cold water through garden hose for 30 seconds to flush the
hose of debris. Turn off water.
3. Confirm that water inlet screen (S) is installed in water inlet located
at lower front of unit; Do Not remove except for cleaning.
NOTICE If inlet screen is damaged or missing, DO NOT use electric
pressure washer. Call (800) 743-4115 for assistance.
NOTICE DO NOT run the pump without the water supply connected and
turned on.
• Damage to equipment resulting from failure to follow this
instruction will void warranty.
4. Attach opposite end of garden hose (T) to the water inlet coupling
(U). Tighten by hand.
5. Completely remove the high pressure hose from hose reel. Attach
high pressure hose (V) to the unit's water outlet (W) located at lower
back of unit. Tighten by hand.
6. Attach opposite end of high pressure hose to the spray gun. Press
red button (X) on spray gun, then insert end of high pressure hose
(Y) into gun until it SNAPS into place. Release the red button and
make sure connection is secure.
Connect Wand and Spray Tips
1. Turn ON water, point gun in a safe direction, press trigger release
(DD), then squeeze trigger (EE) to purge pump system and spray
gun of air and impurities.
2. Insert and twist wand (Z) into spray gun (AA). Once wand slides
into gun, apply further inward pressure to wand and twist 1/4 turn
clockwise until securely in place.
3. When the metal wand is installed, select spray tip you want to use.
Pull back on collar of wand (BB), insert spray tip (CC) and release
collar. Tug on spray tip to make sure it is securely in place.
Turbo
Wand
NOTICE For spray tip instructions, see operator's manual.
How to Start Your Electric Pressure
Washer
1.
Put on safety goggles.
WARNING Risk of eye injury. Spray could splash back or propel
objects resulting in serious injury. Always wear indirect
vented (chemical splash) safety goggles marked to comply
with ANSI Z87.1 when using or in vicinity of this equipment.
NEVER substitute safety glasses or dry-condition goggles for indirect
vented safety goggles.
2.
Turn on water.
NOTICE DO NOT run the pump without the water supply connected and
turned on.
3.
Press the master ON/OFF switch (FF) to the OFF (O) position.
A
WARNING Risk of electrocution. Use of an extension cord could
cause electric shock or burn resulting in death or serious
injury.
• DO NOT use an extension cord with this electric pressure washer.
Your home's electrical circuit receptacle or extension cord may not
provide lifesaving ground-fault circuit-interruption protection.
4.
Plug electrical power cord into an electrical circuit rated for 120
Volts AC at 15 Amps that is properly installed and grounded in
accordance with all local codes and ordinances.
light (JJ) on the GFCI should appear.
WARNING Risk of electrocution. Non-operating ground fault
circuit interrupter (GFCI) could result in death, or bodily
injury, and/or property damage. If indicator light does not
stay on after test and reset, do not use GFCI.
NOTICE The indicator light must be visible for the electric pressure
washer to operate.
5.
Press TEST button (GG). The indicator light (JJ) should
disappear.
19
6.
Press RESET button (HH). The indicator light (JJ) should
illuminate.
19
D
NOTICE DO NOT use the electric pressure washer if above test fails.
7.
Press the master ON/OFF switch (FF) to the ON position ( | ).
8.
Point gun in a safe direction, press trigger lock button
squeeze trigger (EE). The electric pressure washer motor will start
and stop as spray gun trigger is depressed and released.
How to Stop Your Electric Pressure
Washer
The electric pressure washer motor runs only when the trigger is
engaged. To stop the electric pressure washer and turn off the motor:
1.
Release spray gun trigger (EE).
2.
Press the master ON/OFF switch (FF) to the OFF (O) position.
NOTICE Releasing the trigger will shut off the motor but does not shut
off electrical power to the unit.
G
3.
Turn off water supply.
4.
ALWAYS point spray gun in a safe direction and squeeze spray gun
trigger (EE) to relieve built up pressure in the unit.
NOTICE Spray gun traps high water pressure, even when motor is
stopped and water is disconnected.
5.
Disconnect GFCI plug from outlet.
6.
Coil power cord and place on accessory tray.
7.
Wrap high pressure hose on hose reel.
8.
For long term storage instructions, see operator's manual.
M
To protect the pump from damage caused by freezing, read
the operator's manual for winter or long term storage.
Have Questions?
Do not return to store. We can help.
Call Customer Service Toll-Free 1-800-743-4115
or visit our website www.BRIGGSandSTRATTON.com
11
11
12
13
16
14
15
17
The indicator
18
19
17
(DD)
and
16
16
17
16
18
Q
9
P
10
R
11
U
S
T
12
V
W
13
X
Y
14
Z
AA
15
BB
CC
16
DD
EE
17
OFF
FF
18
19
JJ
HH
GG
Advertisement
Table of Contents

Related Manuals for Briggs & Stratton 20510


Summary of Contents for Briggs & Stratton 20510
- Page 1 Have Questions? Quick Setup Guide Do not return to store. We can help. Call Customer Service Toll-Free 1-800-743-4115 Electric Pressure Washer or visit our website www.BRIGGSandSTRATTON.com with Hose Reel Connect Hoses and Water Supply WARNING Failure to read and follow the operator’s WARNING Risk of electrocution.
- Page 2 ¿Tiene alguna pregunta? Guía de configuración rápida No vuelva a la tienda. Nosotros podemos ayudarle. Limpiadora a presión eléctrica Llame al número gratuito de atención al cliente 1-800-743-4115 con carrete de manguera o visite nuestro sitio web www.BRIGGSandSTRATTON.com. AVISO NO use la bomba sin el suministro de agua conectado y ADVERTENCIA Si no se leen ni se siguen las ADVERTENCIA Riesgo de electrocución.
Need help?
Do you have a question about the 20510 and is the answer not in the manual?
Questions and answers