
Related Manuals for Vexve X Series


Summary of Contents for Vexve X Series
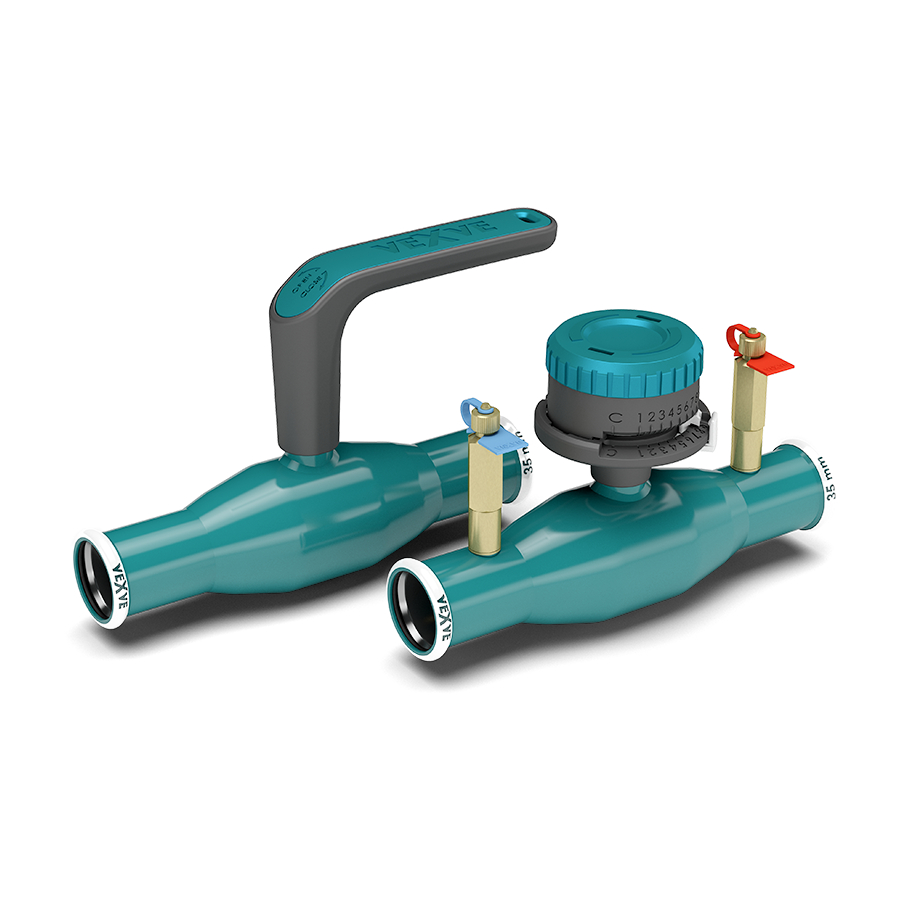
- Page 1 Vexve X shut-off and balancing valves, ™ steel and stainless steel installation, operation, adjustment and maintenance manual...
-
Page 2: Table Of Contents
4.4 Determining the pre-set value for the balancing valve 4.5 Setting the pre-set values 4.6 Measuring the valve’s flow rate Maintenance 5.1 Replacing the O-ring in the valves of X series Appendices 6.1 Structure of balancing valves < DN 50 6.2 Structure of ball valves < DN 50 6.3 Pressure loss diagrams for balancing valves... - Page 3 Vexve Oy shall not be liable for loss or damage incurred due to the incorrect transportation, handling, installation, use or maintenance of the product. Vexve Oy shall not be liable for loss or damage due to the presence of objects, particles or impurities that should not be in the system.
-
Page 4: General
Graph 1. Pressure-temperature graph. Note: If you intend to use the valve with other media or in other applications, contact Vexve to verify that the value is compatible with the planned use. The structure of the valves in the X series is shown in Appendices 6.1 and 6.2. -
Page 5: Valve Identification
Operating temperature range Tmin…Tmax: -30…120 ºC Product no: 142032X Product number LVI-no: 4011627 LVI number (only in Finland) Direction of ow CE marking Flow direction (balancing valves) Product brand 0219 www.vexve.com Date of manufacture Manufacturer's website address Figure 1. Identification plate www.vexve.com... -
Page 6: Reception Of Consignments And Storage
3. Reception of consignments and storage Package Check that the content of the delivery corre- sponds to the order. Also check that the valve Vexve's products come in packages designed and related accessories were not damaged in for transportation. The packages are made from transit. -
Page 7: Installing The Valve
The end of the pipe to be connected must be cut straight and all sharp burrs must be removed carefully from the external and internal surfaces. Any impurities in the valve or pipe could damage the valve or its coupling heads. www.vexve.com... -
Page 8: Making A Press Fit Connection
Remove all burrs from the cut pipe using a tool Mark the correct installation depth on the pipe intended for the purpose. using the Vexve installation depth gauge. 6. Checking the coupling heads of the valve 3. Cleaning Clean any loose debris from the coupling head... - Page 9 Fit the coupling head of the pipe into the valve to the fullest extent and ensure that the installation depth marking matches up. 10. Removing the collar Remove the cracked collar by hand if it does not detach of its own accord. www.vexve.com...
- Page 10 In the Figure 2, D = the diameter of the pipeline Flow direction >>> 10 D Flow direction >>> Figure 2. Minimum installation distances Note: The recommended installation position for the valve is with the shaft in the vertical or horizontal position. www.vexve.com...
-
Page 11: Installation On The End Of The Pipe
A closed area must not be allowed to arise between the valve and the cap plug because the valve may be damaged if the water expands in a closed area (for example, due to a change in temperature). www.vexve.com... -
Page 12: Commissioning And Pressure Testing
20,39 1,42 3,52 6,77 9,14 13,99 24,53 1,70 4,39 8,35 11,01 17,09 29,30 2,04 5,40 9,96 12,85 20,24 34,13 2,32 6,66 11,76 22,78 37,10 2,61 8,18 13,75 17,29 25,14 39,73 Table 1. Kv values for Vexve X balancing valves www.vexve.com... -
Page 13: Setting The Pre-Set Values
The measur- ing device determines the flow rate based on the pressure loss and the Kv value corresponding to the valve's pre-set value. Contact Vexve Oy for additional information on suitable flowmeters. www.vexve.com... -
Page 14: Maintenance
5. Maintenance Valves of Vexve X series are practically maintenance-free. The need for maintenance is significantly reduced by selecting the correct valve for the application and ensuring error-free installation, commissioning and use. Warning: When the valve is connected to the pipeline, the temperature of the external surface may be dangerously high. -
Page 15: Replacing The O-Ring In The Valves Of X Series
5.1 Replacing the O-ring in the valves of X series · Remove the handle or control knop by pulling · Put the new stem sealing bush in place by pressing the upper surface evenly downwards hard on it directly upwards ·... -
Page 16: Appendices
Compo- Name Units nent number Body Extension pipe, pressed Ball seal Support plate Spring plate Stem bush Stem Sealing cuff Retaining ring Sliding plate O-ring Ball Flow pipe Precision control knop LBP O-ring Measuring block, blue Measuring block, red www.vexve.com... -
Page 17: Structure Of Ball Valves < Dn
6.2 Structure of ball valves < DN 50 Compo- Name Units nent number Body Extension pipe, pressed Ball Ball seal Support plate Spring plate Stem bush Stem Stem sealing bush Retaining ring Sliding plate O-ring O-ring Handle Handle cover LBP O-ring www.vexve.com... -
Page 18: Pressure Loss Diagrams For Balancing Valves
6.3 Pressure loss diagrams for balancing valves DN 15 0,01 Q(m³/h) DN 20 0,01 Q(m³/h) www.vexve.com... - Page 19 DN 25 Q(m³/h) DN 32 Q(m³/h) www.vexve.com...
- Page 20 DN 40 Q(m³/h) DN 50 Q(m³/h) www.vexve.com...
- Page 21 www.vexve.com...
- Page 22 www.vexve.com...
- Page 23 www.vexve.com...
- Page 24 Vexve Oy Pajakatu 11 Riihenkalliontie 10 38200 Sastamala 23800 Laitila Finland Finland Tel: +358 10 734 0800 vexve.customer@vexve.com www.vexve.com...
Need help?
Do you have a question about the X Series and is the answer not in the manual?
Questions and answers