Table of Contents
Advertisement
Available languages
Available languages
Quick Links
Advertisement
Table of Contents

Subscribe to Our Youtube Channel
Related Manuals for Holzmann WHL1200


Summary of Contents for Holzmann WHL1200
- Page 1 Originalfassung WERKBANK MIT HÄNGESCHRANK BETRIEBSANLEITUNG UND LOCHWAND Übersetzung / Translation WORKBENCH WITH WALL CABINET USER MANUAL AND PEGBOARD WHL1200 Edition: 16.07.2019 – Revision - 00 – RaR - DE/EN...
-
Page 2: Table Of Contents
Ersatzteilbestellung / Spare Parts Order ............23 15.1 Explosionszeichnung / Exploded View ............24 15.1.1 Partlist workbench ..................24 15.1.2 Partlist pegboard ..................25 15.1.3 Partlist wall cabinet ..................26 16 GARANTIEERKLÄRUNG (DE) 17 GUARANTEE TERMS (EN) 18 PRODUKTBEOBACHTUNG | PRODUCT MONITORING HOLZMANN MASCHINEN GmbH www.holzmann-maschinen.at WHL1200... -
Page 3: Technik / Technic
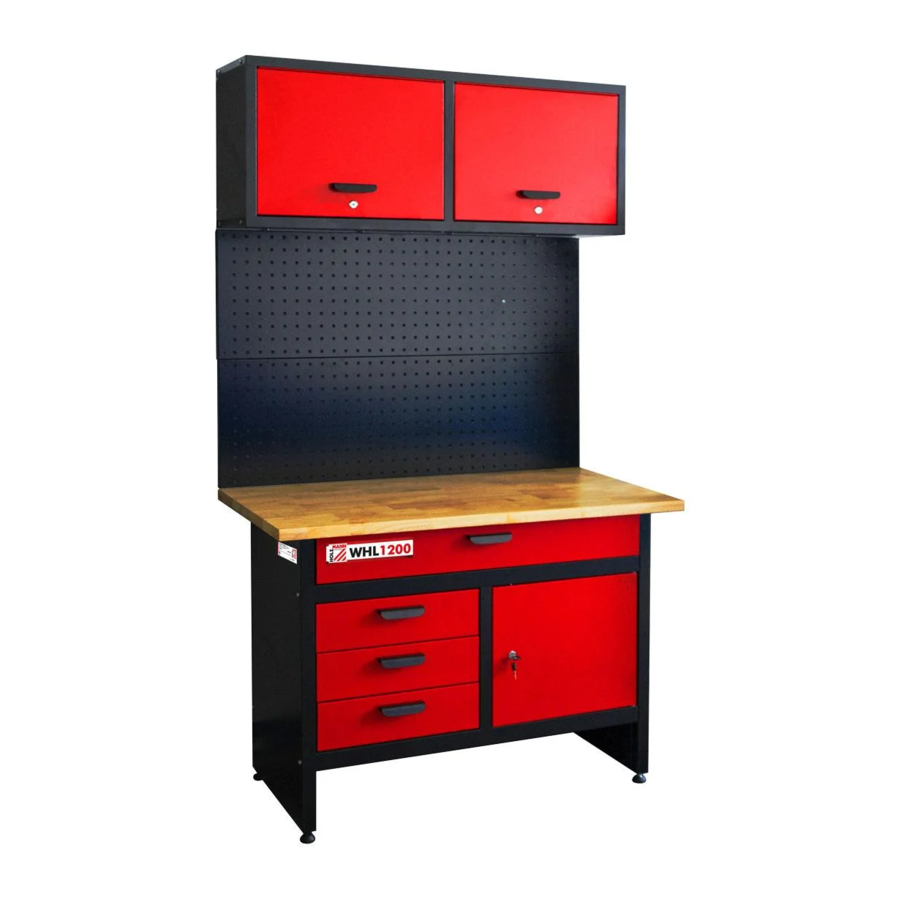
TECHNIK / TECHNIC 2 TECHNIK / TECHNIC Lieferumfang / Delivery Content HOLZMANN MASCHINEN GmbH www.holzmann-maschinen.at WHL1200... -
Page 4: Komponenten / Components
25/30 Max. Beladung Hängeschrank / max load wall cabinet Max. Beladung Zwischenfächer Hängeschrank / max. load shelf wall cabinet Gesamtdimension WHL1200 / overall dimension WHL1200 1200x600x<2060 Gewicht Werkbank (Netto) / weight workbench (net) Gewicht Hängeschrank (Netto) weight door cabinet (net) -
Page 5: Vorwort (De)
Sehr geehrter Kunde! Diese Betriebsanleitung enthält Informationen und wichtige Hinweise zur Inbetriebnahme und Handhabung der Werkbank mit Hängeschrank und Lochwand WHL1200, nachfolgend jeweils vereinfachend als Maschine bezeichnet. Die Anleitung ist Bestandteil der Maschine und darf nicht entfernt werden. Bewahren Sie sie für spätere Zwecke an einem geeigneten, für Nutzer (Betreiber) leicht zugänglichen,... -
Page 6: Sicherheit
Die nicht bestimmungsgemäße Verwendung bzw. die Missachtung der in dieser Anleitung dargelegten Ausführungen und Hinweise hat das Erlöschen sämtlicher Gewährleistungs- und Schadenersatzansprüche gegenüber der Holzmann Maschinen GmbH zur Folge. 4.2 Anforderungen an Benutzer Die Maschine ist für die Bedienung durch eine Person ausgelegt. Voraussetzungen für das Bedienen der Maschine sind die körperliche und geistige Eignung sowie Kenntnis und Verständnis... -
Page 7: Spezielle Sicherheitshinweise Für Diese Maschine
Tragfähigkeit und einwandfreien Zustand. Befestigen Sie die Lasten sorgfältig. Halten Sie sich niemals unter schwebenden Lasten auf! Für einen ordnungsgemäßen Transport beachten Sie auch die Anweisungen und Angaben auf der Transportverpackung bezüglich Schwerpunkt, Anschlagstellen, Gewicht, einzusetzende Transportmittel sowie vorgeschriebene Transportlage etc. HOLZMANN MASCHINEN GmbH www.holzmann-maschinen.at WHL1200... -
Page 8: Montage
Die Front.- und Rückseite der Lade wie abgebildet mit den Schrauben (B), Scheiben (C) und Muttern (D) befestigen. Montageschritt Den Griff wie abgebildet an der Frontseite mittels Schrauben (F), Scheiben (C) und Muttern (G) befestigen. HOLZMANN MASCHINEN GmbH www.holzmann-maschinen.at WHL1200... - Page 9 Mutter (D) verbinden. 5. Montage Untergestell Die beiden Seitenteile mit Füßen (1) und (2) sowie den Querbalken (4) wie abgebildet an der Bodenplatte mittels Schrauben (A) befestigen. Anschließend die beiden Rückwände (6) mittels Blechschrauben (E) montieren. HOLZMANN MASCHINEN GmbH www.holzmann-maschinen.at WHL1200...
- Page 10 7. Montage Türstopper Den Türstopper (8) mittels 3 Blechschrauben (3) montieren. 8. Montage Arbeitsplatte Die Arbeitspatte (7) wird mittels Schrauben (6) am Untergestell befestigt. 9. Montage Tür Die Tür (9) in den Bohrungen am Untergestell einhängen. HOLZMANN MASCHINEN GmbH www.holzmann-maschinen.at WHL1200...
- Page 11 Schloss wie abgebildet montieren. 3. Montage Wandschrankbasis Die beiden Seitenteile (2) an der Rückwand mittels Schrauben (4) befestigen. Trennwand (5) und oberes und unteres Blech (3,4) mittels Schrauben (A) an der Rückwand und Seitenteilen befestigen HOLZMANN MASCHINEN GmbH www.holzmann-maschinen.at WHL1200...
- Page 12 7. Montage Gasdruckdämpfer Die 4 Gasdruckdämpfer (10), 2 pro Tür, wie abgebildet mit den Schrauben (E) an Tür und Basis montieren. 8. Montage Zwischenfächer. Die Zwischenfächer können eingeschoben werden und stützen sich auf den montierten Hacken ab. HOLZMANN MASCHINEN GmbH www.holzmann-maschinen.at WHL1200...
-
Page 13: Reinigung
REINIGUNG WHL1200 aufstellen 1. Werkbank vor einer Mauer aufstellen 2. Lochwand oberhalb Werkbank wie abgebildet an der Wand fixieren. Es können ein oder beide Löchwände montiert werden. 3. Wandschrank an der Mauer oberhalb der Lochwand wie abgebildet an der Wand fixieren. -
Page 14: Preface (En)
Dear Customer! This operating manual contains information and important notes for the safe start-up and handling of the workbench with wall cabinet and pegboard WHL1200, hereinafter referred to as "machine". The manual is an integral part of the machine and must not be removed. Keep it for later... -
Page 15: Safety
Operating the machine outside the technical limits specified in this manual. The improper use or disregard of the versions and instructions described in this manual will result in the voiding of all warranty and compensation claims against Holzmann Maschinen GmbH. 10.2 User Requirements The machine is designed to be operated by one person. -
Page 16: Special Safety Instructions For That Machine
To transport the assembled machine, e.g. on a truck or trailer, remove the load from the machine, if necessary additionally fix machine with the aid of blocking wedges and lash the machine with tension belts. HOLZMANN MASCHINEN GmbH www.holzmann-maschinen.at WHL1200... -
Page 17: Assembly
Fasten the front and back side of the drawer as shown with the screws (B), washers (C) and nuts (D). Step 3 Attach the handle to the front as shown using screws (F), washers (C) and nuts (G). HOLZMANN MASCHINEN GmbH www.holzmann-maschinen.at WHL1200... - Page 18 Fasten the two side parts with feet (1) and (2) as well as the cross beam (4) to the base plate with screws (A) as shown. Then mount the two rear panels (6) using self-tapping screws (E). HOLZMANN MASCHINEN GmbH www.holzmann-maschinen.at WHL1200...
- Page 19 3 self-tapping screws (3). 8. Assembly the wooden top The wooden top (7) is attached to the base frame with screws (6). 9. Assembly the door Clip the door (9) into the holes on the base frame.. HOLZMANN MASCHINEN GmbH www.holzmann-maschinen.at WHL1200...
- Page 20 Fasten the two side parts (2) to the rear panel using screws (4). Fasten the centre panel (5) and the upper and lower panel (3, 4) to the rear panel and side panels using screws (A). HOLZMANN MASCHINEN GmbH www.holzmann-maschinen.at WHL1200...
- Page 21 Assembly the 4 gas struct (10), 2 per door, as shown with the screws (E) on the door and base. 8. Assembly shelves. The shelves can be slide in and rest on the shelf holders. HOLZMANN MASCHINEN GmbH www.holzmann-maschinen.at WHL1200...
-
Page 22: Cleaning
CLEANING Installation of WHL1200 1. set up the workbench in front of a wall 2. fix the pegboard above the workbench to the wall as shown in the illustration. One or both pegboards can be mounted. 3. fix the wall cabinet to the wall above the pegboard as shown in the illustration. -
Page 23: Ersatzteile / Spare Parts
Bestelladresse sehen Sie unter Kundendienstadressen im Vorwort dieser Dokumentation. (EN) With Holzmann spare parts, you use spare parts that are ideally matched to your machine. The optimum fitting accuracy of the parts shortens the installation time and extends the service life of the machine. -
Page 24: Explosionszeichnung / Exploded View
Rear panel Screw M6x12 Wood top Screw M6x10 Door stop Washer ø6 door Nut M6 Left drawer runner Screw ST4.2x9 Right drawer runner Screw M5x10 12-1 Drawer base panel Nut M5 12-2 Drawer front panel Feet HOLZMANN MASCHINEN GmbH www.holzmann-maschinen.at WHL1200... -
Page 25: Partlist Pegboard
ERSATZTEILE / SPARE PARTS 15.1.2 Partlist pegboard Name Qty. Name Qty. pegboard Universal dowels sleeve Screw ST4.2x70 HOLZMANN MASCHINEN GmbH www.holzmann-maschinen.at WHL1200... -
Page 26: Partlist Wall Cabinet
Universal dowel Door Screw ST4.2x50 Shelf left Door-lock Shelf right Screw door lock Wall bracket Bracket door lock Gas struct Handle door lock Screw M6x12 Handle door Washer ø6 Screw M5x10 Nut M6 Nut M5 HOLZMANN MASCHINEN GmbH www.holzmann-maschinen.at WHL1200... -
Page 27: Garantieerklärung (De)
Nach Ablauf der Garantiezeit können Instandsetzungs- und Reparaturarbeiten von entsprechend geeigneten Fachfirmen durchgeführt werden. Es steht Ihnen auch die HOLZMANN-Maschinen GmbH weiterhin gerne mit Service und Reparatur zur Seite. Stellen Sie in diesem Fall eine unverbindliche Kostenanfrage, unter Angabe der Informationen siehe C) an unseren Kundendienst oder senden Sie uns Ihre Anfrage einfach per umseitig beiliegendem Formular ein. -
Page 28: Guarantee Terms (En)
DIY use and a warranty period of 1 year for professional/industrial use - starting with the purchase of the final consumer (invoice date). In case of defects during this period which are not excluded by paragraph 3, Holzmann will repair or replace the machine at its own discretion. -
Page 29: Produktbeobachtung | Product Monitoring
V i e l e n D a n k f ü r I h r e M i t a r b e i t ! / T h a n k y o u f o r y o u r c o o p e r a t i o n ! KONTAKTADRESSE / CONTACT: HOLZMANN MASCHINEN GmbH 4170 Haslach, Marktplatz 4 AUSTRIA... - Page 30 PRODUKTBEOBACHTUNG | PRODUCT MONITORING HOLZMANN MASCHINEN GmbH www.holzmann-maschinen.at WHL1200...
Need help?
Do you have a question about the WHL1200 and is the answer not in the manual?
Questions and answers