Advertisement
Available languages
Available languages
Quick Links
SAVE THESE INSTRUCTIONS AND DELIVER TO OWNER AFTER INSTALLATION
•
To reduce the risk of death, personal injury or property damage from fire, electric shock, falling parts, cuts/abrasions, and other
hazards please read all warnings and instructions included with and on the fixture box and all fixture labels.
•
Before installing, servicing, or performing routine maintenance upon this equipment, follow these general precautions.
•
Installation and service of luminaires should be performed by a qualified licensed electrician.
•
Maintenance of the luminaires should be performed by person(s) familiar with the luminaires' construction and operation and
any hazards involved. Regular fixture maintenance programs are recommended.
•
It will occasionally be necessary to clean the outside of the refractor/lens. Frequency of cleaning will depend on ambient dirt
level and minimum light output which is acceptable to user. Refractor/lens should be washed in a solution of warm water and
any mild, non-abrasive household detergent, rinsed with clean water and wiped dry. Should optical assembly become dirty on
the inside, wipe refractor/lens and clean in above manner, replacing damaged gaskets as necessary.
•
DO NOT INSTALL DAMAGED PRODUCT! This luminaire has been properly packed so that no parts should have been damaged
during transit. Inspect to confirm. Any part damaged or broken during or after assembly should be replaced.
•
Recycle: For information on how to recycle LED electronic products, please visit www.epa.gov.
•
These instructions do not purport to cover all details or variations in equipment nor to provide every possible contingency to
meet in connection with installation, operation, or maintenance. Should further information be desired or should particular
problems arise which are not covered sufficiently for the purchaser's or owner's purposes, this matter should be referred to
Acuity Brands Lighting, Inc.
WARNING
RISK OF ELECTRIC SHOCK
✓ Disconnect or turn off power before installation or
servicing.
✓ Verify that supply voltage is correct by comparing
it with the luminaire label information.
✓ Make all electrical and grounded connections in
accordance with the National Electrical Code
(NEC) and any applicable local code require-
ments.
✓ All wiring connections should be capped with UL
approved recognized wire connectors.
CAUTION
RISK OF INJURY
✓ Wear gloves and safety glasses at all times when
removing luminaire from carton, installing, ser-
vicing or performing maintenance.
✓ Avoid direct eye exposure to the light source while
it is on.
LED IMPORTANT SAFETY INSTRUCTIONS
READ AND FOLLOW ALL SAFETY INSTRUCTIONS!
WARNING
RISK OF BURN
✓ Allow lamp/fixture to cool before handling. Do not
touch enclosure or light source.
✓ Do not exceed maximum wattage marked on lumi-
naire label.
✓ Follow all manufacturer's warnings, recommenda-
tions and restrictions for: driver type, burning
position, mounting locations/methods, replace-
ment and recycling.
CAUTION
RISK OF FIRE
✓ Keep combustible and other materials that can
burn, away from lamp/lens.
✓ Do not operate in close proximity to persons, com-
bustible materials or substances affected by heat
or drying.
Advertisement

Subscribe to Our Youtube Channel
Related Manuals for Acuity Brands Aculux initia


Summary of Contents for Acuity Brands Aculux initia
- Page 1 Should further information be desired or should particular problems arise which are not covered sufficiently for the purchaser’s or owner’s purposes, this matter should be referred to Acuity Brands Lighting, Inc. WARNING...
- Page 2 Failure to follow any of these instructions could void product warranties. For a complete listing of product Terms and Conditions, please visit www.acuitybrands.com. Acuity Brands Lighting, Inc. assumes no responsibility for claims arising out of improper or careless installation or handling of its products. ABL LED General Warnings, Form No. 503.203...
-
Page 3: Installation Instructions
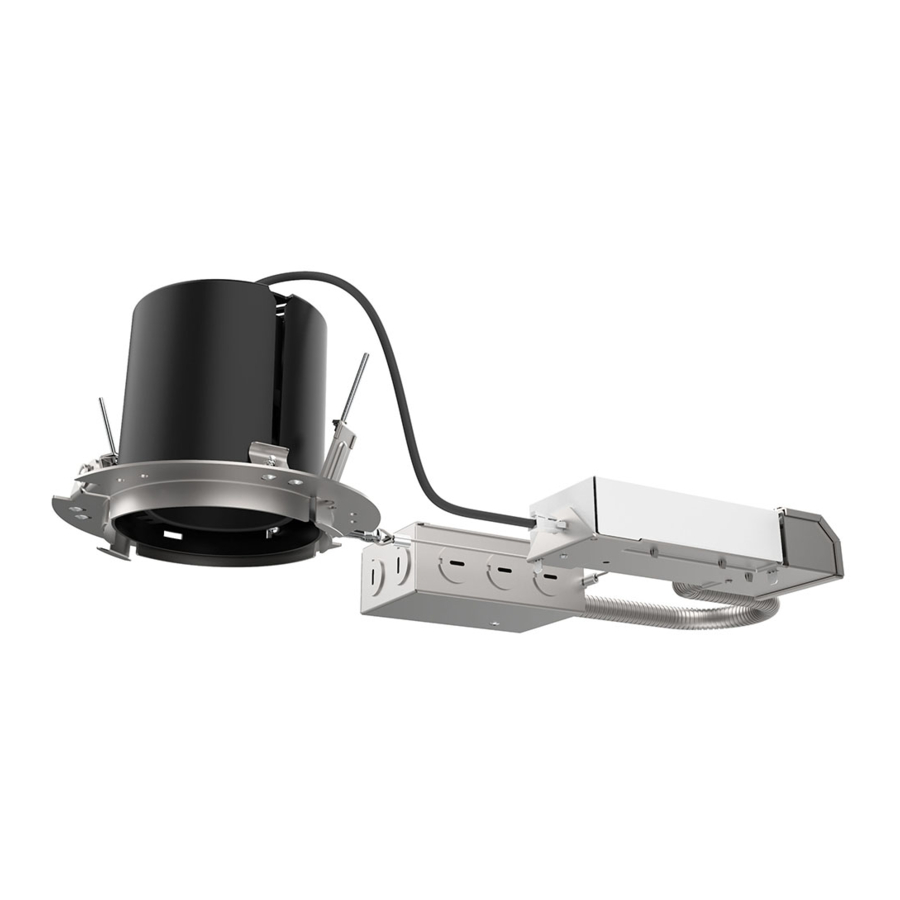
OUNTING IXTURE Fig. 1 Aculux Initia contains residential hanger bars & commercial style “butterfly” brack- ets (available only for Non-ICAT fixtures) for compatibility with typical construction. Both mounting systems are adjustable on the housing for maximum installation TYPE N... - Page 4 ACULUX INITIA™ Adjustable Accent, Downlight, & Wall Wash INSTALLATION INSTRUCTIONS (for new construction housings) OUNTING IXTURE CONTINUED IMMING OMPATIBILITY AND IRING Suspended T-bar Grid Ceilings: 1. Locate center of proposed opening on ceiling tile and cut appropriate sized hole. Knock-out for non- 2.
- Page 5 IRING ONTINUED EZ1 MVOLT fixture: Aculux Initia fixtures use electronic LED drivers that are compatible with most incandescent, magnetic low voltage, electronic low voltage, and low voltage 0-10V Universal input voltage (120VAC thru 277VAC) housings with eldoLED ECOdrive dimmers. Refer to dimming compatibility document posted on web site for specific 1% dimming driver with linear dimming curve.
- Page 6 EVELING IMING AND NSTALLATION Aculux Initia fixtures are shipped with a paint shield/gauge that should be Note: LED assembly must be leveled for proper trim installation used to level the LED assembly with the finished ceiling. Install Aculux Initia trims using push-in springs as provided.
-
Page 7: Led Replacement
ACULUX INITIA™ Adjustable Accent, Downlight, & Wall Wash INSTALLATION INSTRUCTIONS (for new construction housings) LED R ENS AND PTIC NSTALLATION AND EPLACEMENT EPLACEMENT CONTINUED Aculux LED housings contain a lens holder that accepts up to (2) glass light control To Remove LED Assembly (Fig. 20) or color control accessories with select trims and Aculux optical films 1. - Page 8 EILING OMPATIBILITY Aculux Initia fixtures are compatible with various ceiling materials with a thickness range from 1/2” minimum to 1-1/2” maximum with no additional accessories. They are not compatible with ceilings thicker than 1-1/2”. For best results, the installer should cut a clean opening matching the dimensions in the table below for the specific configuration, flange style, and housing style of the product.
- Page 9 Estas instrucciones no pretenden cubrir todos los detalles o las variaciones de los equipos ni abarcar todas las posibles eventu- alidades relacionadas con la instalación, el funcionamiento o el mantenimiento. Si necesita más información o surgen prob- lemas específicos que no estén debidamente cubiertos para los fines del comprador o propietario, remítase a Acuity Brands Lighting, Inc.
- Page 10 El incumplimiento de alguna de estas instrucciones puede anular la garantía del producto. Para obtener una lista completa de los Términos y Condiciones del producto, visite www.acuitybrands.com. Acuity Brands Lighting, Inc. no se hace responsable de los reclamos que puedan surgir por la instalación o manipulación inadecuada o negligente de sus productos.
-
Page 11: Instrucciones De Instalación
MONTAJE DEL ACCESORIO Fig. 1 Aculux Initia contiene barras de suspensión residenciales y soportes de "mariposa" de estilo comercial (disponibles solo para dispositivos que no son ICAT) para compatibilidad con la construcción típica. Ambos sistemas de montaje son ajustables en la carcasa para TIPO NO-IC PARA USO EN TECHOS SIN AISLAMIENTO una máxima flexibilidad de instalación. - Page 12 ACULUX INITIA™ Acento Ajustable, Luz Descendente y Bañador de Pared INSTRUCCIONES DE INSTALACIÓN (para carcasas de construcción nueva) MONTAJE DEL DISPOSTIVO (CONTINUACIÓN) COMPATIBILIDAD Y CABLEADO DE ATENUACIÓN Techos de rejilla de barra en T suspendidos: 1. Ubique el centro de la abertura propuesta en el modular Orificio troquelado del techo y corte un orificio del tamaño apropiado.
- Page 13 COMPATIBILIDAD Y CABLEADO DE ATENUACIÓN (CONTINUACIÓN) Dispositivo EZ1 MVOLT: Los dispositivos Aculux Initia utilizan controladores de LED electrónicos que son compatibles con la mayoría de los atenuadores incandescentes, de baja tensión Carcasas de voltaje de entrada universal (de 120 VCA a 277 VCA) con regulador magnética, baja tensión electrónica y baja tensión de 0-10 V.
- Page 14 NIVELACIÓN DEL DISPOSITIVO FIJAR LA DIRECCIÓN E INSTALACIÓN DE REFLECTORES Los dispositivos Aculux Initia se envían con un protector contra pintura / calibrador que Nota: El ensamble LED debe nivelarse para una instalación adecuada. debe usarse para nivelar el ensamble LED con el techo terminado.
- Page 15 ACULUX INITIA™ Acento Ajustable, Luz Descendente y Bañador de Pared INSTRUCCIONES DE INSTALACIÓN (para carcasas de construcción nueva) INSTALACIÓN Y REEMPLAZO DE LENTES Y ÓPTICAS REEMPLAZO DE LED (CONTINUACIÓN) Las ensambles LED de Aculux contienen un soporte de lente que acepta hasta (2) Para retirar el ensamble LED (Fig.
- Page 16 *Este documento ha sido traducido del inglés por razones de conveniencia. En el caso de hubiera alguna inconsistencia entre el texto del documento en inglés y esta traducción, prevalecerá el texto en inglés. Todas las marcas registradas a las que se hace referencia son propiedad de sus respectivos dueños. Las marcas registradas de Acuity Brands Lighting que están marcadas con el símbolo ® están registradas en los EE.
- Page 17 éventualités possibles en ce qui concerne l’installation, l’utilisation ou l’entretien. Pour obtenir plusd’informations ou pour résoudre des problèmes qui sont insuffisamment traités dans les consignes de sécurité par rapport auxbesoins de l’acheteur ou du propriétaire, veuillez soumettre ces questions à Acuity Brands Lighting, Inc. AVERTISSEMENT AVERTISSEMENT RISQUE DE BRÛLURE...
- Page 18 Le non-respect de ces instructions peut annuler les garanties du produit. Pour consulter la liste complète des conditions d’utilisation du produit, visiter le site www.acuitybrands.com. Acuity Brands Lighting, Inc. décline toute responsabilité pour les réclamations résultant d’installation ou de manipulation incorrecte ou imprudente de ses produits.
-
Page 19: Instructions D'installation
FIXATION DU LUMINAIRE Fig. 1 Aculux Initia est équipé de barres de suspension résidentielles et de supports « papillon » de style commercial (disponibles uniquement pour les luminaires non-ICAT) compatibles avec une construction typique. Les deux systèmes de fixation peuvent être ajustés sur le TYPE NON-IC POUR UTILISATION DANS DES PLAFONDS NON ISOLÉS... - Page 20 Éclairage d’appoint réglable de 1 po, plafonnier et lèche-mur ACULUX INITIA INSTRUCTIONS D’INSTALLATION (pour les logements neufs) FIXATION DU LUMINAIRE (SUITE) COMPATIBILITÉ DE VARIATEUR ET CÂBLAGE Dalles de plafond suspendues à ossature en T : 1. Localisez le centre de l’ouverture proposée sur la dalle de plafond et faites un trou de la bonne taille.
- Page 21 COMPATIBILITÉ DE VARIATEUR ET CÂBLAGE (SUITE) Luminaire EZ1 MVOLT : Les luminaires Aculux Initia fonctionnent avec des circuits de commande des DEL électroniques qui sont compatibles avec la plupart des variateurs à incandescence, Boîtiers de tension d’entrée universelle (120 VCA à 277 VCA) avec le variateur de basse tension magnétique, basse tension électronique et basse tension 0-10 V.
- Page 22 Éclairage d’appoint réglable de 1 po, plafonnier et lèche-mur ACULUX INITIA INSTRUCTIONS D’INSTALLATION (pour les logements neufs) NIVELLEMENT DU LUMINAIRE RÉGLAGE ET INSTALLATION DE LA GARNITURE Les luminaires Aculux Initia sont livrés avec un cache-peinture/jauge qui per- Remarque : L’ensemble DEL doit être mis à niveau pour pouvoir installer met de mettre à...
- Page 23 Éclairage d’appoint réglable de 1 po, plafonnier et lèche-mur ACULUX INITIA INSTRUCTIONS D’INSTALLATION (pour les logements neufs) INSTALLATION ET REMPLACEMENT DE LENTILLES ET D’OPTIQUES REMPLACEMENT DE LA DEL (SUITE) Les boîtiers DEL Aculux sont équipés d’un porte-lentille qui peut accueillir un maxi- Pour retirer l’ensemble DEL (Fig.
- Page 24 COMPATIBILITÉ AVEC LE PLAFOND Les luminaires Aculux Initia sont compatibles avec divers matériaux de plafond d’une épaisseur allant de 1/2 po minimum à 1-1/2 po maximum sans accessoires sup- plémentaires. Ils ne sont pas compatibles avec les plafonds d’une épaisseur supérieure à 1-1/2 po.
Need help?
Do you have a question about the Aculux initia and is the answer not in the manual?
Questions and answers