
Subscribe to Our Youtube Channel
Related Manuals for Fora VSM100 Pro


Summary of Contents for Fora VSM100 Pro
- Page 1 VSM100 Pro Vital Signs Monitor (Blood Glucose, Blood Pressure, Temperature, SpO2 and ECG Measurement) Operator’s Manual...
- Page 3 FORA Vital Signs Monitor VSM100 Pro About the Manual The precautions, warnings and notes throughout this manual are very important. Please read this manual carefully before using VSM100 Pro Vital Signs Monitor. Version 2.0 2021/05 311-2300200-004...
- Page 4 SAFETY INFORMATION WARNING! A warning statement in this manual identifies hazards that could lead to patient injury, illness or death. These warnings pertain to the entire VSM100 Pro Vital Signs Monitor. CAUTION! A caution statement in this manual identifies hazards that could lead to minor personal injury, product damage or property damage.
- Page 5 The monitor is waterproof IPX2 degree. However, do not immerse it in water or drip fluids on heat exhale holes on the rear panel. When storage space is less than 20 records, the VSM100 Pro will display the reminder information. ...
- Page 6 In order to minimize interference and the danger of burns to the patient, only use FORA ECG cables. Keep the ECG cable as far away as possible from any electrosurgical cables. Make sure that the electrosurgical return conductor (neutral) is properly attached to the patient.
- Page 7 probe’s directions for use. Certain ambient environmental conditions, probe application errors, and certain patient conditions may affect SpO readings and pulse signal. CAUTION! The SpO probe is not intended for use as an apnea monitor. Do not immerse the probe or patient cables in water, solvents, or cleaning solutions (the sensors and connections are not waterproof).
- Page 8 Blood Glucose Warnings WARNING! Carefully read the owner’s manual of the blood glucose monitoring system before use.
- Page 9 IMPORTANT SAFETY PRECAUTIONS Read Before Use Users need to adhere to Standard Precautions when handling or using this device. All parts of the glucose monitoring system should be considered potentially infectious and are capable of transmitting blood-borne pathogens between patients and healthcare professionals. For more information, refer to “Guideline for Isolation Precautions: Preventing Transmission of Infectious Agents in Healthcare Settings 2007”...
-
Page 10: Table Of Contents
Table of Contents INTRODUCTION ........................... 9 Intended Use ......................... 9 Main measurement function ....................9 Contents of System ......................9 Monitor Overview ........................ 10 Before Measurement - Connecting Accessories .............. 11 Monitor Main Display Area ....................15 Monitor Functions....................... 20 Print .......................... - Page 11 Accessory Disposal ....................77 ECG Accessory Disposal ....................77 Technical Assistance ......................77 ERROR MESSAGES ........................79 Blood Pressure Measurement Error Messages ............... 79 Measurement Error Messages ................. 79 Blood Glucose Measurement Error Messages ..............79 Ear Temperature Measurement Error Messages .............. 80 SPECIFICATIONS ........................
-
Page 12: Introduction
INTRODUCTION Intended Use The Vital Signs Monitor is intended for the monitoring of parameters such as ECG, non-invasive blood pressure (systolic, diastolic, and mean arterial pressure), pulse rate, body temperature, blood glucose, and oxygen saturation of arterial hemoglobin (SpO2) of adult patient. -
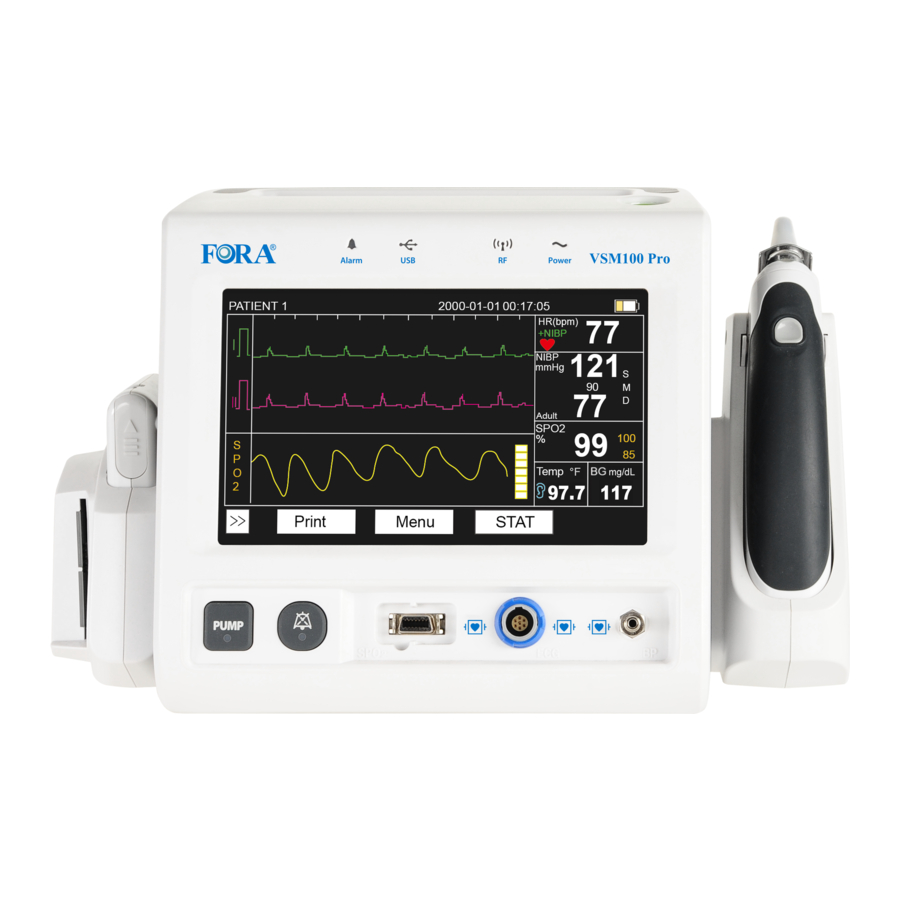
Page 13: Monitor Overview
Monitor Overview Blood glucose meter Smart card reader Non-invasive blood pressure (NIBP) measurement button (When PUMP indicator lights up, press the button to start a NIBP measurement. For emergency stop during the measurement, press this button again) Silence button (When the alarm sounds, press this button to temporarily mute the audio. -
Page 14: Before Measurement - Connecting Accessories
Before Measurement - Connecting Accessories Start with the monitor off, and connect all accessories to the monitor. The following figures show the accessary ports on the front and back panels. (For reference only, some of the accessories show may differ from actual products). Accessary ports on the front panel 1. - Page 15 Accessories of VSM100 Pro include: 1. SpO finger sensor and extension cable Note: If you are going to change the sensor, make sure you choose the corresponding brand to your model. In case you have to use a different brand, please consult your agent firstly.
- Page 16 4. Barcode scanner (Optional) 5. AC power cord Note: Without this item, the monitor can still work until the battery run out. Different specifications of AC power cord are for different countries. Make sure you use the correct one in your country. ...
- Page 17 CAUTION! Make sure that all accessories are securely connected to monitor before performing any test, or it may cause inaccurate results. Note: Before taking measurements, please pair up the glucose meter (please refer to page 32) and infrared thermometer (please refer to page 34) with the monitor and the cuff is completely evacuated.
-
Page 18: Monitor Main Display Area
Monitor Main Display Area Description Area Display ECG-related info ECG display area Display SpO -related info display area Display ECG- >> button different channel Touch this button to print out the readings Print button Touch this button to save the ECG data and to print Print button (ECG) out the ECG waveforms... - Page 19 For details, please refer to the following sections. Note: To view or change related settings, directly touch SpO , BG, Temp, HR, NIBP areas. When a reading exceeds the set alarm limit, the reading turns red. If the time and date display on the main screen shows red, which indicates an error appeared.
- Page 20 Print button (ECG) Touch this button to save the ECG data and to print out the ECG waveforms. Note: When you touch this button, the monitor beeps. However, the monitor does not detect whether a printer is connected. Please make sure the printer is well connected. ...
- Page 21 NIBP display area Measurement unit Systolic pressure Mean arterial pressure 5 min of consecutive Diastolic pressure Patient population Heart rate display area When the setting is "AUTO", the "+" will appear Heart beat source comes from Heart rate reading “NIBP”, “SpO ”...
- Page 22 VSM100 Pro will overwrite the oldest record instead of creating a new record if the old one was recorded 10 seconds ago. If not, VSM100 Pro will append the new record at the end of the latest record. So, the recorded file will show every power-failure time.
-
Page 23: Monitor Functions
Print The Print Function provides options for printing out data. Touch the “Print” button and the printer will print out the readings. Please use printers that are designed for VSM100 Pro. Heart Rare/Source Systolic BP... -
Page 24: Print
Function provides options for printing ECG waveform. Touch this button to save the ECG data and to print out the ECG waveforms. Please use printers that are designed for VSM100 Pro. Menu The Menu function allows system configurations to be adjusted. Touch the Menu button to enter the setting windows. - Page 25 If you exit without saving the changes, a window pops up: Gender Touch the “Gender” button to select gender: male or female. Patient ID Touch the numbers and letters to key in. Touch “Enter” to confirm the ID. You can also use a barcode scanner to input the Patient ID.
- Page 26 Age Touch the numbers to key in. OK: save the input. C: clear the display area to “0”. Exit: exit this page without saving. Input range: 200 ~ 0. (If the input is out of this range, it cannot be saved.) ...
- Page 27 Weight Touch the numbers to key in. OK: save the input. C: clear the display area to “0”. Exit: exit this page without saving. Input range: 999 ~ 1 (lb) / 400 ~ 1 (kg). (If the input is out of this range, touching “OK” does not function.) ...
- Page 28 R.R. Touch the numbers to key in. Touch “OK” to confirm the R.R. number. Touch “C” to clear the display area to “0”. Touch “Exit” to exit this page without saving. Input range: 0~99 (min) (If out of this range, touching “OK” does not function.) ...
- Page 29 Stool Touch the numbers to key in. Touch “OK” to confirm the stool number. Touch “C” to clear the display area to “0”. Touch “Exit” to exit this page without saving. Input range: 0~99 (If out of this range, touching “OK” does not function.) ...
- Page 30 3 min 5 min 10 min 15 min The monitor takes a measurement in the specified interval. 30 min 1 Hr 1.5 Hr 2 Hr 4 Hr HR Source Auto(default) The monitor automatically switches to a stable heart rate. Take the pulse rate from SpO measurement.
- Page 31 Probe Info On The monitor beeps when: 1. The probe is disconnected. 2. The sensor cannot receive signals while taking a measurement. Off (default) The monitor does not beep with the probe conditions. Auto Save Off (default) 1 min The monitor will save each reading according to the selected 5 min interval setting.
- Page 32 (Blood Glucose) mmol/L Setting for mmol/L unit Setting for US unit Metric System Int'l Setting for Int'l unit Alarm Type Description When any reading exceeds its Temp 109.4~95. 1 (°F) 100.3~89.6 (°F) limit, the reading turns yellow. When any reading exceeds its 600~71 120~10 (Blood Glucose)
- Page 33 Exit this page Below is an example of data record: Note: When storage space is less than 20 records, VSM100 Pro will display the reminder information. While storage space is full, the new reading will not be stored.
- Page 34 Configure the system settings. The auto upload selection can be chosen on 5, 10, 20, 30 and 60 minutes. The settings are described as below. Group ID Touch the numbers and letters to key in. You can also use a barcode scanner to input the Group ID.
- Page 35 1 (default) Speaker Touch the icon “ ” to increase or “ ” to decrease the volume. 1 is the lowest, 3 is the loudest. (Only for Information tone). Date/Time Touch “ ” and “ ” to adjust the Date and Time. OK: save the settings. Exit: exit this page without saving.
- Page 36 BGM (Blood Glucose Meter) Before using the blood glucose meter for the first time, be sure to perform Wireless Device setup below. Enter Menu ► SYS ► Wireless Device Touch “Set” for BGM. “Set…” is displayed. The monitor is ready for pairing up.
- Page 37 Turn on the blood glucose meter. Put blood glucose meter into the meter holder on the blood glucose meter. “OK” is displayed when the meter is identified.
- Page 38 Infrared Thermometer Before using the thermometer for the first time, be sure to perform Wireless Device setup below. Touch “Set” for IRTM. “Setting…” is displayed. The monitor is ready for identification.
- Page 39 Turn on the thermometer. Put the IR thermometer into the thermometer holder. “OK” is displayed when the meter is identified. Bluetooth Turn on Bluetooth for data transmission in PC mode Print Turn on Bluetooth for data transmission in Print mode Turn off Bluetooth.
- Page 40 Touch pad If the monitor does not correctly respond to touch input, please perform the following steps to do touchpad calibration. STEP 1: Touch “+” icon on the upper-left corner. STEP 2: Touch the lower-right corner. STEP 3: Touch “+” on the lower-left corner. STEP 4: Touch “+”...
- Page 41 STEP 5: Touch the blue area and the calibration is done. Note: In STEP 3, before you touch the blue area (200±30, 200±30); you can touch to test the touch screen accuracy. The coordinate of the touched point will be displayed on the upper-left corner of the blue area.
- Page 42 Set up the ECG function. The settings are described as below. ECG setting Description The monitor beeps as the pulse goes. HR Beep Off (default) The monitor does not beep along with the pulse. Off (default) Lead off Info Setting for Lead off Alarm Lead Select 5 Lead (default) Setting for Lead wires...
- Page 43 Auto (default) The monitor automatically switches OFF (default) Setting view the demo waveform Demo mode 5 mm/mv Setting vertical scales (Selectable for Print out only) mm/mv(default)
- Page 44 Alarm HR Touch the numbers to key in. Touch “OK” to input the weight number. Touch “C” to clear the display area to “0”. Touch “Exit” to exit this page without saving. Input range: 250-51 (If out of this range, touching “OK” does not function) ...
- Page 45 Color ECG waveforms color settings are described below. Based on ambient light, adjust the colors feasible for graphic display Amp For setting up amplitude, please touch Amp selection field to change the setting. Extra Setting For setting up sweep speed, please select extra setting to bring up page 2 and tap Sweep Speed field to change the setting.
- Page 46 Saved Files shows the recorded lists as follow.
-
Page 47: Perform Measurements
PERFORM MEASUREMENTS Before taking measurements, make sure all accessories are firmly connected into the instrument. Measurement Affecting Factors The following factors may lead to inaccurate results: Excessive ambient light Excessive motion Anemia or low hemoglobin concentrations Fingernail polish ... - Page 48 Check and relocate the sensor frequently (every 2 hours) to prevent skin deterioration. Remove the sensor, the monitor will display the last SpO reading for 30 seconds. NOTE: The monitor will display “Probe disconnect!” if the sensor is not connected properly. ...
-
Page 49: Blood Pressure Measurement
Skin irritation or ulceration may occur if applying the sensor to the same location continuously for a long period of time. To prevent this condition, it is recommended moving the sensor application site every 2 hours, or more often if the patient is uncomfortable. -
Page 50: Stat
NOTE: If you press during measurement, the measure will be stopped. PUMP If the result is out of range, the alert alarm will keep beeping, and the result will turn into red. If the meter has detected a big movement or great vibration(s) of the arm during the measurement and cannot produce results, the meter will then re-pumps automatically and take another measurement. -
Page 51: Ecg Measurement
Our electrode is color-coded according to International Electrotechnical Commission (IEC) to eliminate the confusion. VSM100 Pro Vital Signs Monitoring system provides 5-lead for user’s selection, please follow the guidelines below. Placement of electrodes for the patient without artificial pacemaker... - Page 52 5-lead electrodes placement: The following table shows IEC (International Electrotechnical Commission) and AHA (American Heart Association) regulations of color-coded electrodes. Before Measurement Shave the hair where the electrodes will be placed. Using cotton moistened with 70% alcohol to clean the area where the electrodes will be placed and let it air dry.
- Page 53 Taking Measurement You must enter ECG setting page to confirm your settings every time before taking a measurement. Attach the electrodes to the appropriate locations according to our guideline. Wait for few seconds and the monitor will continuously show the ECG waveforms. ...
- Page 54 Press “ ” again to see “aVR”, “aVL” and “aVF” signals. NOTE: If you would like to pause and look into details, simply touch the screen to pause for 10 seconds. The monitor will display “Lead-off” and the alert alarm will keep beeping if the electrode is not attached properly.
-
Page 55: Glucose Measurement
Glucose Measurement IMPORTANT SAFETY PRECAUTIONS - READ BEFORE USE Use this device ONLY for the intended use described in this manual. Do NOT use accessories which are not specified by the manufacturer. Do NOT use the device if it is not working properly or if it is damaged. This device does NOT serve as a cure for any symptoms or diseases. - Page 56 For example; 1) 120 mg/dL ÷ 18 = 6.6 mmol/L 2) 7.2 mmol/L x 18 = 129 mg/dL approximately. Intended Use This system is intended for use outside the body (in vitro diagnostic use) by health care professionals in clinical settings as an aid to monitoring the effectiveness of diabetes control.
- Page 57 Test results might be wrong if the contact bar is not fully inserted into the test slot. NOTE: The VSM100 Pro monitor should only be used with VSM100 Pro Test Strips. Using other test strips with this meter may produce inaccurate results. Setting the Meter Before using your meter for the first time or if you change the meter battery, you should check and update these settings.
- Page 58 and have your desired settings saved. Entering the Setting Mode Start with the meter off (no test strip inserted). Press SET. Warning: healthcare professionals must wear gloves 1. Setting the unit of measurement Press M to switch between mg/dL and mmol/L. Press SET. 2.
-
Page 59: The Four Measuring Modes
The Four Measuring Modes The meter provides you with four modes for measuring, General, AC, PC and MODES USE WHEN General any time of day without regard to time since last meal (displayed as “Gen”) no food intake for at least 8 hours 2 hours after a meal testing with the control solution You can switch between each mode by:... - Page 60 NOTE: The code number on the display is only for your reference, it may not be actual code for this meter. Warning: It is important to make sure that the LCD displayed code is the same as the code on the test strip vial before testing.
-
Page 61: Testing With Blood Sample
wipe it off, then squeeze out another drop and place it on the tip of the vial cap. Hold the meter to move the absorbent hole of the test strip to touch the drop. Once the confirmation window fills completely, the meter will begin counting down. NOTICE: ... - Page 62 the next patient. Preparing the Puncture Site Stimulating blood perfusion by rubbing the puncture site before blood extraction has a significant influence on the glucose value obtained. Blood from a site that has not been rubbed exhibits a measurably different glucose concentration than blood from the finger.
- Page 63 3. Obtaining a blood sample Use the pre-set lancet to puncture the desired site. Wipe off the first appeared drop of blood with a clean cotton swab. The size of the drop should be at least as big as․(actual size), which is 1.1 microliter (μL) of volume.
-
Page 64: Maintenance
WARNING: The used lancet and test strip may be biohazardous. Please discard them carefully according to your local regulations. 7. Data transmission After removing the test strip, the flashing “Con” will appear along with the blood glucose test result, indicating that you need to put the meter into the holder in order to transmit the result. - Page 65 "beep" afterwards. NOTE: Replacing the battery does not affect the test results stored in the memory. As with all small batteries, these batteries should be kept away from children. If swallowed, promptly seek medical assistance. Batteries might leak chemicals if unused for a long time. Remove the batteries if you are not going to use the device for an extended period (i.e., 3 months or more).
- Page 66 Warning: healthcare professionals must wear gloves 4. Remove the wipe. Allow the meter surface to dry completely. 5. Discard the used wipes and never reuse them. 6. Remove and discard gloves in appropriate receptacles and wash hands. After disinfection, remove the used gloves and wash hands before proceeding to the next patient.
- Page 67 For more information on the risk of blood-borne pathogen transmission from blood glucose meter and safety lancet, please refer to: “FDA Public Health Notification: Use of Fingerstick Devices on More than One Person Poses Risk for Transmitting Bloodborne Pathogens: Initial Communication” (2010) http://www.fda.gov/MedicalDevices/Safety/AlertsandNotices/ucm224025.htm “CDC Clinical Reminder: Use of Fingerstick Devices on More than One Person Poses Risk for Transmitting Bloodborne Pathogens”...
-
Page 68: System Troubleshooting
Important Control Solution Information Use only our control solutions with your meter. Do not use the control solution beyond the expiry date or 3 months after first opening. Write the opening date on the control solution vial and discard the remaining solution after 3 months. -
Page 69: Detailed Information
POSSIBLE CAUSE WHAT TO DO Defective test strip. Repeat the test with a new test strip. Sample applied after automatic switch-off (3 Repeat the test with a new test strip. Apply sample only minutes after last user when flashing appears on the display. action). -
Page 70: Temperature Measurement
Temperature Measurement Before You Begin IMPORTANT SAFETY PRECAUTIONS - READ BEFORE USE The following basic safety precautions should always be taken. Close supervision is necessary when the thermometer is used by, on, or near children, handicapped persons or invalids. Use the thermometer only for the intended use described in this manual. Do not use the thermometer if it is not working properly, or if it has suffered any damage. - Page 71 Restrictions of Use This thermometer is clinically proven to produce accurate temperature measurements. However, please be advised if you have the following situations: The accuracy cannot be ensured for a person who has deformity in the ear such that the thermometer probe cannot be properly inserted into the ear canal.
-
Page 72: Replacing The Battery
Thermometer Parts 1. Probe lens 2. Probe cover ejection button 3. On/Memory button 4. Manufacturing label 5. Battery cover 6. Probe lens 7. Probe 8. Probe cover detector 9. Scan button LCD Screen 1. Ear temperature indicator 2. Probe cover missing Temperature scanning in progress 4. -
Page 73: Using The Device
NOTE: Although the thermometer works when “ ” appears, we still recommend that you change the battery to obtain an accurate result. Remove the battery if stored for a long period of time. The battery should be kept out of reach of children. If they are swallowed, promptly see a doctor for help. -
Page 74: Recalling The Memory
NOTE: Turn off the thermometer by pressing On / Memory button twice. It will automatically turn off if left idle for 3 minutes. If you need to take another reading, wait “ ” flashing before taking another measurement. The thermometer does not send out any infrared signal. - Page 75 thermometer under a running tap or submerge it into water. Use a soft and dry cloth to clean it. Do not use abrasive cleaners. Store the thermometer in a cool and dry location. Free from dust and away from direct sunlight.
-
Page 76: Alarm And Message
ALARM AND MESSAGE The monitor provides both audible and visible alarm indicators to alert the operator of system status changes and physiological parameter alarms. Alarms are provided for all monitored parameters. Each parameter limit alarm condition triggers both audible and visible alarms until one of the following events occurs: ... - Page 77 and investigate the cause of the alarm. Low priority alarm signal: The operator may not be interrupted, but the operator is able to investigate the cause of the alarm later. Alarm Message List Alarms and messages for heart rate may be generated by the ECG, SpO2 or NIBP module.
- Page 78 HIGH The BG value has dropped below the value set in the menu (Blood Glucose) (Visual alarm) The BG value has dropped below the value set in the menu (Visual alarm) Information signal Description SpO2 Probe OFF Warning Tone The SpO sensor is missing or defective.
-
Page 79: Taking Care Of The Monitor
TAKING CARE OF THE MONITOR Note: Before performing any maintenance or service to the monitor, disconnect the AC power line from the electrical outlet. Store the monitor at -4 °F to 140 °F (-20 °C ~ to 60 °C), 10% to 85% R.H., non-condensing. -
Page 80: Spo 2 Sensor
Sensor Clean the reusable SpO sensor with a 70% isopropyl alcohol solution and allow to air dry. Do not immerse the sensor or cable. Every 3 months, inspect the temperature sensor, SpO sensor, and accessories for fraying or other damage. Replace as necessary. Battery Removal and Replacement As necessary, replace the internal battery after heavy use or the battery no longer charges. - Page 81 Both the monitor and the battery can be recycled. When you wish to dispose of the monitor or are replacing the battery, please recycle according to your local regulations.
-
Page 82: Error Messages
ERROR MESSAGES Blood Pressure Measurement Error Messages ERROR MESSAGE DEFINITIONS RECOMMENDS CORRECTION Error 01 Cuff serious leakage or inflation too slow. Check Cuff and connector Amplitude is enlarged over 4x than the Error 02 Pump again previous 2 Amplitudes. Cuff pressure is too high.( > 300mmHg) Check tube and pump again Error 03 No pulse or Detected pulse count less than 3... -
Page 83: Ear Temperature Measurement Error Messages
A used test strip is detected Replace with a new test strip Review the instructions and repeat Incorrect strip code or other the test with a new test strip. If the coding errors problem persists, contact the customer service. Ambient temperature is above system operation range System operation range is 50°F to 104°F (10°C to 40°C). - Page 84 No probe cover is detected while measuring ear Please put on probe cover again. temperature. Review the instructions and re-start the measurement procedure. If the Thermometer errors problem persists, please contact the agent. Please replace batteries as soon as Low battery with “ ”...
-
Page 85: Specifications
SPECIFICATIONS BLOOD PRESSURE Measurement Method Oscillometric Cuff Pressure Range 0 - 300 mmHg Maximum inflation pressure 300 mmHg Systolic range 60 - 250 mmHg Diastolic range 30 -180 mmHg MAP range 40 - 210 mmHg Resolution 1 mmHg Pressure Accuracy ±3mmHg or ±2% of reading Automatic Cycles OFF, 3min, 5 min, 10 min, 15 min, 30 min, 1 hr, 1.5 hr ,2 hr,... - Page 86 -4°F to 140°F and Humidity 10% to 85% R.H., Storage Temperature Non-condensing Input Dynamic Range Maximum input DC offset voltage range = ±300mV Gain Setting and Accuracy Selectable 250 (5mm/mV) or 500 (10mm/mV) Input Impedance 2.5MΩ Heart Rate Range 30 - 250 bpm Heart Rate Accuracy ±4% Lead / Electrode...
- Page 87 Parameters Vital signs: NIBP, SpO ,ECG,BG,Temperature, Pulse Rate, Pulse Bar, Patient data: ID, Weight, Height, Respiration, Patient Size ,Reading Number, other comments (from doctor, nurse) System : Date, Time, Battery Status, Location Status Indication Alarm Silence; Sensor; Low Battery, Charging state, External Power Allow to recall the patient data and record the patient Patient Data Management...
- Page 88 Harmonized Standard IEC 60601-1 IEC 60601-1-2 IEC 60601-1-8 IEC 60601-2-27 IEC 60601-2-49 IEC 80601-2-30 ISO 80601-2-61...
-
Page 89: Important Information Regarding Electro Magnetic Compatibility (Emc)
The VSM100 Pro is intended for use in the electromagnetic environment specified below. The customer or the user of the VSM100 Pro should assure that it is used in such environment. ELECTROMAGNETIC EMISSIONS IEC60601-1-2... - Page 90 ELECTROMAGNETIC IMMUNITY IEC60601-1-2 Immunity IEC 60601 Compliance Electromagnetic Environment – Test Test Level Level Guidance Electrostatic Floor should be wood, concrete, or ceramic discharge ±6KV contact ±6KV contact tile. If floors are covered with synthetic (ESD) ±8KV air ±8KV air material, the relative humidity should be at least 30%.
- Page 91 Recommend separation distance The following list where P is the maximum output power rating of the transmitter in watts (W) according to the transmitter manufacturer and d is the recommended separation distance in meters (m). Field strengths from fixed RF transmitters as determined by an electromagnetic site survey,*2) should be less than the compliance level in each frequency range.*3) Interference may occur in the vicinity of equipment marked following symbol: Electromagnetic Immunity IEC60601-1-2...
- Page 92 Recommended separation distance between portable and mobile RF communications equipment and the vital signs monitor The vital signs monitor is intended for use in an electromagnetic environment in which radiated RF disturbances are controlled. The customers or the users of the vital signs monitor can help prevent electromagnetic interference by maintaining a minimum distance between portable and mobile RF communications equipment (transmitters) and the vital signs monitor as recommended below, according to the maximum output power...
- Page 93 FEDERAL COMMUNICATIONS COMMISSION STATEMENT 15.21 You are cautioned that changes or modifications not expressly approved by the part responsible for compliance could void the user’s authority to operate the equipment. 15.105(b) Federal Communications Commission (FCC) Statement This equipment has been tested and found to comply with the limits for a Class B digital device, pursuant to part 15 of the FCC rules.
- Page 94 VSM100 Pro Distributed by ForaCare, Inc. 893 Patriot Drive Suite D, Moorpark, CA 93021 USA Products made in Taiwan If you have questions, please call ForaCare Customer Care Service Center at 1-888-307-8188 (8:30 am - 5:00 pm PST, Mon. - Fri.).
Need help?
Do you have a question about the VSM100 Pro and is the answer not in the manual?
Questions and answers