Yale Assure Lock YRD226 Installation And Programming Instructions
Touchscreen deadbolt
Hide thumbs
Also See for Assure Lock YRD226:
- Installation and programming instructions (25 pages) ,
- Installation and programming instructions (28 pages)
Advertisement
This manual will walk you through all the required steps to add your new
Yale Assure Lock to your door.
• Remove existing deadbolt
• Double check door measurements
• Install your Assure Lock
• Program your Assure Lock
• Add your Assure Lock to your smart home system or Yale
Access app if purchased with Yale Smart Module or Yale Access
Upgrade Kit
Tools Needed
Tools Needed For New
Doors Or Adjusting Existing Door
Utility
Drill
Knife
Failure to follow these instructions could result in damage to the product, voiding the factory warranty and could lead to failure of the product to provide access.
Yale Assure Lock
®
Installation and Programming Instructions
(YRD226/YRD620/YRD622)
Standard
Phillips Head
Screwdriver
Wood
Tape
Pencil
Mortise
Measure
Chisel
P/N YRD226-MNL-0001 Rev J
Touchscreen Deadbolt
®
Before you begin
DOWNLOAD
THE BILT APP
Using the app on your smart
phone, scan this QR for step-by
-step installation instructions & to
register your lock
Level
1
Part of ASSA ABLOY
Advertisement

Related Manuals for Yale Assure Lock YRD226


Summary of Contents for Yale Assure Lock YRD226
- Page 1 • Double check door measurements • Install your Assure Lock • Program your Assure Lock • Add your Assure Lock to your smart home system or Yale Access app if purchased with Yale Smart Module or Yale Access Upgrade Kit...
- Page 2 What's In The Box Yale Smart Module (with select models) Let's Get Started Keys Optional Installation Guide Fire Kit Parts and Door Template (Required for Fire Rated Openings) Touchscreen Keypad Loosen screw to remove cover Battery Cover Mounting Plate Inside Lock...
- Page 3 Remove Existing Deadbolt Do not discard old lock hardware until Assure Lock has been successfully installed. Frame P/N YRD226-MNL-0001 Rev J Part of ASSA ABLOY...
- Page 4 Check Door Measurements And Make Adjustments If Needed Door Checker Use door checker from installation guide envelope to verify your door measurements and make any needed adjustments. Check Your Door Guide Let's Get Started New Door Marking Template With the door checker, use the template from installation guide envelope to prep a new door that has not been predrilled for hardware.
- Page 5 Install Deadbolt and Strike Plate *2-3/8" Backset, default *Deadbolt position is based on For Deadbolt backset. Choose position Actual Size appropriate for your door. Reference Door Checker measurements E and F. AYRDB-DRIVE Adjustable Drive-In Deadbolt available for purchase *2-3/4" Backset, optional For Strike Plate Actual Size Choose...
- Page 6 Install Touchscreen Keypad Inside of Door Outside of Door Door face hole must be at least 2-1/8". If hole is too small, a door lock installation kit or jig should be used to increase hole size. Bolt must be in retracted (unlocked) position.
- Page 7 Install Inside Mounting Plate Actual Size optional 3 of 3 To be used with Fire Cup for Fire Rated openings P/N YRD226-MNL-0001 Rev J Part of ASSA ABLOY...
- Page 8 Attach Cable This Side Up mark Make sure cable is securely attached Use cable hooks for proper routing, when possible. Position wires carefully when not using hook. Do not pinch wire. P/N YRD226-MNL-0001 Rev J Part of ASSA ABLOY...
- Page 9 Install Inside Lock Actual Size Make sure thumbturn is vertical. If thumbturn does not move freely, refer to "Hardware Troubleshooting". P/N YRD226-MNL-0001 Rev J Part of ASSA ABLOY...
- Page 10 Test Mechanical Operation If thumbturn operation fails, check the installation beginning with Step 7. P/N YRD226-MNL-0001 Rev J Part of ASSA ABLOY...
- Page 11 Included with select models optional Inside of Door Batteries must not be installed prior to inserting and/or removing Yale Smart module. For more information about Yale Smart modules and smart home features visit US.YaleHome.com/Smart P/N YRD226-MNL-0001 Rev J Part of ASSA ABLOY...
- Page 12 Bolt must be in retracted (unlocked) position before installing batteries. Inside of Door Press the Yale logo to wake the lock. You will be guided through setup by audio instructions on the lock. Additional entry codes and further programming can be done through the Settings Menu.
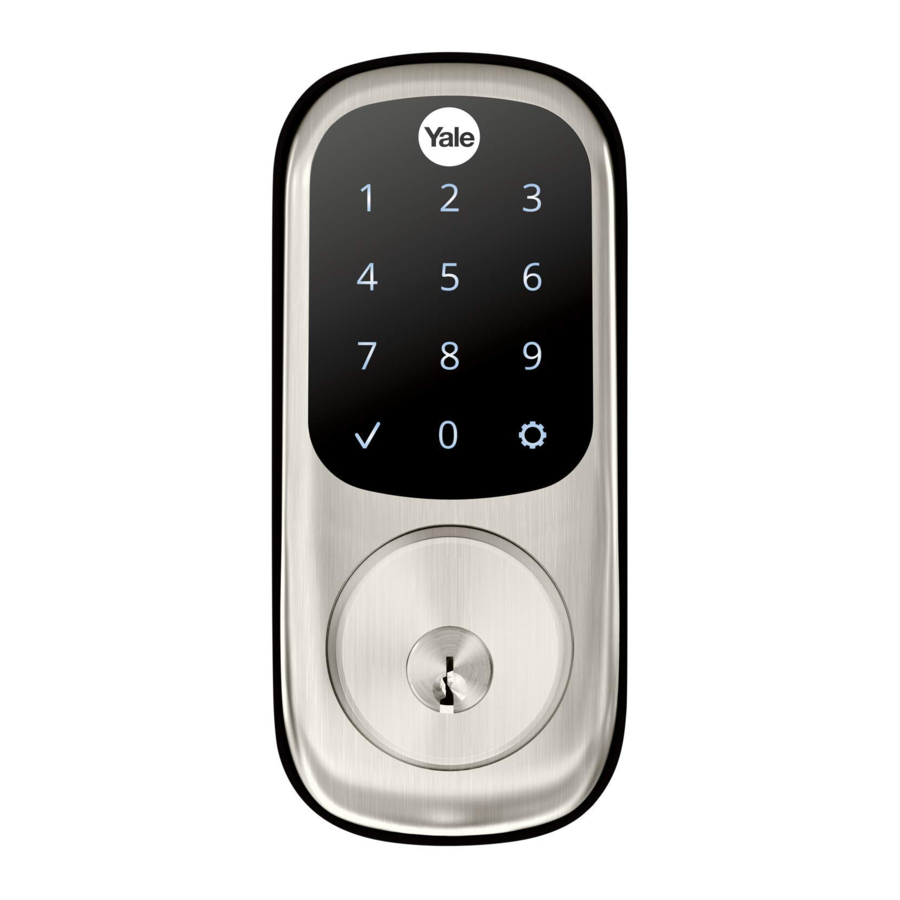
- Page 13 Using Your Lock Touchscreen Keypad Press to wake keypad or lock door Location of RFID Signal Receiver Press to return to (YRD620/YRD622 ACC ONLY) previous Settings Menu Press to enter Enter Master Entry Code or unlock and press to access Settings Menu Low Battery All Code Lockout...
- Page 14 Creating Master Entry Code The Master Entry Code is used to change lock settings. A security best practice is to set your Master Entry Code with 6 or more digits and create a separate code that is used daily to lock and unlock the door. "Register Master Code.
- Page 15 Creating Entry Codes Master Entry Code must be created first. *Max Entry Codes = 250 with Smart Module; 25 without. "Menu Mode, press the gear key Enter Master to continue." Entry Code Press Press Press Enter 4-8 digit Entry Code Press Press Press...
- Page 16 Deleting Entry Codes "Menu Mode, enter number, press the gear key Enter Master to continue." Entry Code Press Press Press Press Press Deleting one Entry Code: To delete all Entry Codes: To delete one Entry Code, (Does not delete you must enter the Entry Master Entry Code) Code you wish to delete.
- Page 17 Unlocking Door with Entry Codes Enter Entry Code Press Unlocking Door with RFID (YRD620/YRD622 ACC ONLY) See "Customizing YRD620/YRD622 Lock Using Settings Menu", page 20 to configure RFID communication. Touch and hold fob or card to P/N YRD226-MNL-0001 Rev J Part of ASSA ABLOY...
- Page 18 Setting Definitions Settings Default Setting Definition The Master Entry Code is used for programming and feature settings. It must be created prior to Creation Master Entry Code required* programming the lock. The Master Entry Code will also operate (unlock/lock) the lock. This feature is enabled by the Master Entry Code.
- Page 19 Here is an example of how to set Auto Lock to 30 seconds: Master Entry Code *The Master Entry Code must be created prior to any other programming of the lock. **Network Module Setting function appears only with Yale Smart module installed. P/N YRD226-MNL-0001 Rev J Part of ASSA ABLOY...
- Page 20 Customizing YRD620/YRD622 ACC ONLY Lock Using Settings Menu *Master Entry Code Required 1. Press Yale logo to wake up lock 2. Enter Master Entry Code* followed by icon. Lock Response: "Welcome to the Settings Menu. Press each number to hear available settings and then press the settings icon to enter."...
- Page 21 Troubleshooting Symptom Suggested Action Keypad becomes active when the Yale logo is pressed. • Verify contact with the logo. If keypad numbers are visible, check they respond when pressed. • Lock does not respond – Check batteries are installed and oriented correctly (polarity) in battery case.
- Page 22 1. Remove plate from door frame with a manual screwdriver. (Using an electric driver may strip screw For help with misalignments, watch our door alignment heads or enlarge screw holes.) video: US.YaleHome.com/en/support/yale-assure-lock- faqs/electronic-lock-installation/ P/N YRD226-MNL-0001 Rev J Part of ASSA ABLOY...
- Page 23 Resetting Lock to Factory Defaults Please use this procedure only when network primary controller is missing or otherwise inoperable. When lock is reset to factory defaults all Entry Codes (including the Master Entry Code*) are deleted and all programming features are reset to original default settings (see below).
- Page 24 Ÿ Consult the dealer or an experienced radio/TV technician for help. Ÿ Warning: Changes or modifications to this device, not expressly approved by Yale Home could void the user's authority to operate the equipment. Industry Canada: IC ID : 11626A-YRD622BLEV1 This Class A digital apparatus meets all requirements of the Canadian Interference Causing Equipment Regulations.
- Page 25 • Insert or remove Yale Smart Module • Reinstall batteries • Reinstall battery cover 6. If you're adding a new Yale Smart Module, follow the instructions included with it Trusted every day Part of ASSA ABLOY P/N AYR202-ZW-INSTAL-FUL Rev F...
- Page 26 24/7 Tech Support : 1-855-492-0505 • www.US.YaleHome.com Yale is a registered trademark of Yale Home. Other products' brand names may be trademarks or registered trademarks ® of their respective owners and are mentioned for reference purposes only. © Copyright 2020. All rights reserved.
- Page 27 • Insert or remove Yale Smart Module • Reinstall batteries • Reinstall battery cover 6. If you're adding a new Yale Smart Module, follow the instructions included with it Trusted every day Part of ASSA ABLOY P/N AYR202-ZB-INSTAL-FUL Rev E...
- Page 28 24/7 Tech Support : 1-855-492-0505 • www.US.YaleHome.com Yale is a registered trademark of Yale Home. Other products' brand names may be trademarks or registered trademarks ® of their respective owners and are mentioned for reference purposes only. © Copyright 2020. All rights reserved.
- Page 29 Yale Locks Z-Wave Plus™ v2 System Integrators Guide for Marketing Yale Assure Electronic Deadbolts YRD216-ZW3, YRD226-ZW3, YRD256-ZW3 YRC216-ZW3, YRC226-ZW3, YRC256-ZW3 Document Revision: 1.4 October 20, 2020...
-
Page 30: Table Of Contents
Contents Yale Z-Wave Plus Product Info ................3 Supported Command Classes ................ 3 Association Table: ..................4 Notifications Table ..................4 Configurable Parameters ................9... -
Page 31: Yale Z-Wave Plus Product Info
Yale Z-Wave Plus Product Info • Manufacturer ID: Assa Abloy (0x0129) • Z-Wave Device Type: Door Lock Keypad • Z-Wave Role Type: Listening Sleeping Slave (LSS) • Product ID: o 0x46D1 for YRD216-ZW3 (Push Button Deadbolt) o 0x46D2 for YRD226-ZW3 (Keyed Touch Screen Deadbolt) -
Page 32: Association Table
• Command Class Supervision • Command Class Indicator* • Command Class Basic* * Command Class Requires Security Association Table: Table 1 - Association Table Group Maximum Description Commands Nodes • Command_Class_Battery, V1 o Battery_Report • Command_Class_Configuration, V4 o Configuration_Report • Command_Class_Notification, V8 o Notification_Report •... - Page 33 Where Alarm 0x (01 – level represents Keypad Lock 0x12 0x06 0x05 user slot users) number Where Alarm 0x(01- level represents Keypad Unlock 0x13 user slot 0x06 0X06 users) number (0x00 = Master Code) by key cylinder 0x01 or inside thumb- 0x06 0x01 turn...
- Page 34 user slot number Schedule(s) has Daily Repeating 0x(01- been set/erased Schedule 0x60 0x06 0xFE for specified Set/Erased users) user ID Schedule(s) has Year Day 0x(01- been set/erased Schedule 0x62 0x06 0xFE for specified Set/Erased users) user ID Schedule(s) has All Schedule 0x(01- been Types...
- Page 35 0x00 alarm report. A disabled user Disabled user 0x(01- pin code was entered at 0x83 0x06 0xFE entered at the keypad users) keypad A valid user can be both a normal user and a Non-Access Valid user but 0x(01- user. If a non- outside of 0x84 access user is...
- Page 36 ** The Yale lock also supports a 3 low battery alarm: too low to operate. This alarm is sent out as a Battery Report (with value = 0xFF) through the Battery Command Class. This is the last low battery alarm level before the product stops...
-
Page 37: Configurable Parameters
Configurable Parameters Table 3 - Configurable Parameters Info Configuration Properties Info String Param. Num. Name Format Length Default 0x01 Set Volume Level to Signed (High 0x03 0x02 (Low high (1), low (2), or Volume Integer 1 byte Volume) (Silent) Volume) silent (3). - Page 38 wrong code entry limit. Set the Operating Mode to normal 0x00 0x02 0x00 mode(0), vacation Operating Signed (Normal (Privacy (Normal mode(1) or privacy mode Integer 1 byte Mode) Mode) Mode) mode(2). Set One Touch One Touch Unsigned 0x00 0xFF 0xFF Locking feature to Locking Integer...
Need help?
Do you have a question about the Assure Lock YRD226 and is the answer not in the manual?
Questions and answers