Table of Contents

Related Manuals for MAKSIWA SF.250.C


Summary of Contents for MAKSIWA SF.250.C
- Page 1 SF.250.C BAND SAW - 250 mm - ___________________________________________________________________ INSTRUCTION MANUAL ___________________________________________________________________ ATTENTION: READ THIS MANUAL BEFORE USING THE PRODUCT.
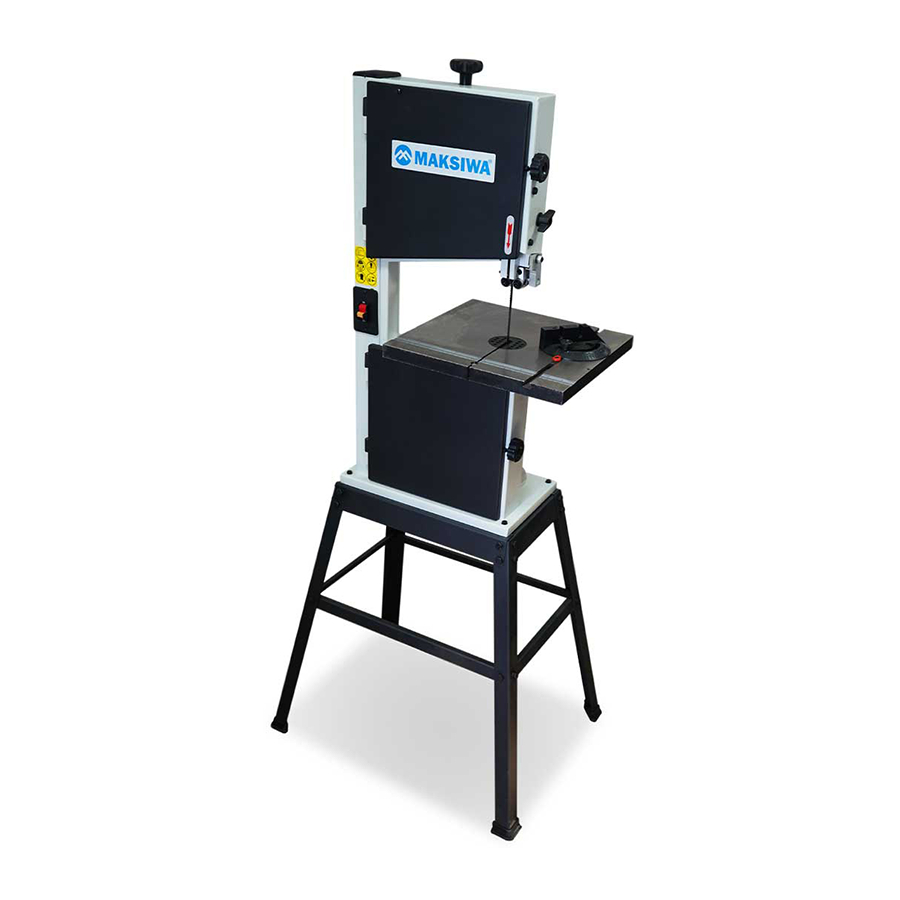
- Page 2 PICTURE1 (Illustrative picture) Tape tension adjustment knob Upper Door Door opening handle Column Adjustment Knob Column Support Table Half Moon Guide Base Lower Door 10. Graduated Scale 11. Side Guide 12. ON / OFF 13. Cutting Tape...
- Page 3 PICTURE 2 (Illustrative picture)
- Page 4 Always wear safety glasses. Also wear a face INSTRUCTION MANUAL mask. Important information you should know: Secure the part to be worked. Ensure that the Only work with sharp tools. Tools that are not sharp workpiece is held firmly against the side guides. This do not cut properly and overload the engine.
- Page 5 extension, ensure your ability to transmit the electrical Do not force anything against the fan to hold the motor current used by your product. An undersized cable will shaft. cause a voltage drop resulting in loss of power and Do not force the cut. Partial or total forced shutdown of overheating.
-
Page 6: Specifications
MAKSIWA Band Saw avoid burning risks, the motor leaves the factory SF.250.C is designed to operate indoors and must be connected to 220V. Check the electrical voltage of your placed on a firm, stable and level surface. CAUTION: To outlet before starting the machine. - Page 7 parts. 3. To assemble the base, start by attaching two legs 640 mm long (A) to a crossbar 335 mm (B), as shown in the figure below. To the mounting the base use the 24 screws 5/16 ’’ x 16 mm, 24 5/16 ’’...
- Page 8 13. Install the Half Moon Guide (A) in the channel (B) 11. Assemble the side table according to the following located steps: at the top of the table, to make straight cuts or - Remove the Allen screw 1/4 '’x 28 mm (A) to insert the angled, as shown in the following figure.
-
Page 9: Test Connection
Never leave the cutting tape exposed, except the part that will make the cut. Your MAKSIWA band saw SF.250.C is composed of an easy and safe adjustment system. To adjust it, simply release the handle (A) located on the right side of the machine, adjust to the desired height according to the part to be cut, and tighten the handle (A) again. -
Page 10: Tilting The Table
TILTING THE TABLE To make slanted cuts the band saw SC.250.C MAKSIWA has a table that can tilt from 0º to 45º. To do this, simply release the handle (C) located at the rear of the machine, below the table, and rotate the table (A) according to the desired degree, checking the scale of the part (B). -
Page 11: Security Lock
To adjust the upper handwheel, loosen the butterfly nut (A) located at the rear of the machine and turn the The band saw SC.250.C MAKSIWA has in its key handle (B) to find the alignment of this handwheel. After starting device a safety device that allows the correcting the problem, fix the nut (A) again to lock. -
Page 12: Belt Adjustment And Replacement
TABLE AND BASE Cleaning the SF.250.C band saw is relatively easy with a vacuum cleaner to remove excess wood chips and sawdust, and dust with a dry cloth. If there is any resin, use a resin remover and a clean cloth to remove it. -
Page 13: Cut Quality
For your greater safety, entrust repairs, maintenance following these steps described above. and adjustments (including inspection and replacement) to the technical assistance recommended by MAKSIWA, CUT QUALITY which will always use genuine spare parts and The smoothness of any cut depends on a number of accessories, reassembling your router in the same way variables.
Need help?
Do you have a question about the SF.250.C and is the answer not in the manual?
Questions and answers