Table of Contents
Advertisement
Available languages
Available languages
Quick Links
Advertisement
Table of Contents

Related Manuals for Belkin OmniView PRO F1D108-OSD


Summary of Contents for Belkin OmniView PRO F1D108-OSD
-
Page 1: User Manual
P73055/F1D108-OSD/EU/man.qxd 4/21/00 The OmniView Guide de l’utilisateur de l’OmniView OmniView Benutzerhandbuch OmniView Manuale utente OmniView P73055 2:25 PM Page 1 ™ User Manual ™ ™ ™ Handleiding ™ F1D108-OSD... - Page 2 P73055/F1D108-OSD/EU/man.qxd 4/21/00 2:25 PM Page 2...
- Page 3 P73055/F1D108-OSD/EU/man.qxd 4/21/00 English ..........1 Français (Europe) .
- Page 4 P73055/F1D108-OSD/EU/man.qxd 4/21/00 2:25 PM Page 4...
-
Page 5: Package Contents
P73055/F1D108-OSD/EU/man.qxd 4/21/00 Thank you for purchasing the Belkin Components OmniView 8 PCs from one keyboard, mouse and monitor has never been easier! The OmniView ™ PRO gives you the ultimate in control. Compatible with AT and PS/2 style computers, it is loaded with features such as On-Screen Display, Integrated Mouse Conversion Technology and separate DB25 daisy-chain ports. -
Page 6: Technical Specifications
P73055/F1D108-OSD/EU/man.qxd 4/21/00 Technical Specifications Console Connectors: Keyboard: 6 pin MiniDIN Mouse: 6 pin MiniDIN (for PS/2 mouse) DB9 male (for spare serial mouse) Monitor: HDDB15 female Computer Port Connectors: Keyboard: 6 pin MiniDIN Mouse: 6 pin MiniDIN (for PS/2 mouse) DB9 male (for serial mouse) Monitor: HDDB15 male... -
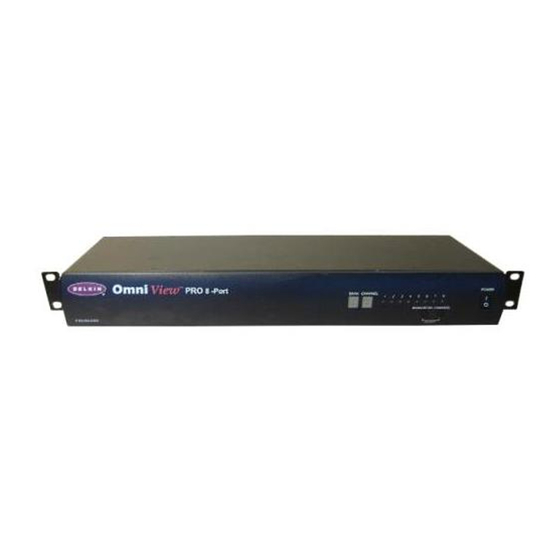
Page 7: Product Detail
P73055/F1D108-OSD/EU/man.qxd 4/21/00 FRONT PANEL REAR PANEL SLAVE INPUT DB25 Daisy-chain port MASTER INPUT SLAVE OUTPUT DB25 Daisy-chain port CONSOLE connectors VGA monitor connector DC power jack PS/2 mouse connector switches Keyboard connector 2:25 PM Page 3 Product Detail Current Active Bank Select/ Bank Display Scan Button... - Page 8 SE requires cables to connect the eight computers you will be controlling. Below are the Belkin part numbers and their descriptions. We recommend purchasing Cable Kits based on the type of mouse port your computer uses. Cable kits have all the cables you...
-
Page 9: Hardware Installation
P73055/F1D108-OSD/EU/man.qxd 4/21/00 Hardware Installation Bank 0 (Master) Bank 1 (slave) CONSOLE Keyboard, mouse and monitor Bank 2 (slave) etc... Bank F (slave) Single-unit operation or Daisy-chained operation The OmniView PRO has the capability to be daisy-chained to 15 more units (for a total of ™... -
Page 10: Dip Switch
Plugging and unplugging cables may cause irreversible damage to your computers and the OmniView PRO. Belkin Components will not be held responsible for damage caused. Set the DIP switches. If you have only one OmniView... - Page 11 Connect the first computer's VGA cable to the OmniView (Belkin Part# F2N025-XX-T or A3H981-XX), connect the male end of the cable to the VGA port on the computer, and the female end on the PC1 VGA port at the back of OmniView ™...
- Page 12 Hardware Installation Connect the first computer's mouse cable to the OmniView (Belkin Part# F2N036-XX), connect one end to the PS/2 mouse port on the computer, and the other end to the PC1 PS/2 mouse port on the back of the OmniView...
- Page 13 P73055/F1D108-OSD/EU/man.qxd 4/21/00 Hardware Installation NOTE: Avoid pressing any keys on the keyboard or moving the mouse if the currently selected port has a computer that is in the process of booting up. This may cause the computer to not detect, or initialize the keyboard or mouse drivers properly. Daisy-Chaining the OmniView The OmniView PRO can be daisy-chained with additional OmniView...
- Page 14 P73055/F1D108-OSD/EU/man.qxd 4/21/00 Hardware Installation • Upon connecting the daisy-chain cable to the previous unit, it should automatically power up if the previous unit is powered up. However, it is still recommended that the power supply be used with the slave unit. You will see the LED display on the front panel show the units bank address setting.
- Page 15 P73055/F1D108-OSD/EU/man.qxd 4/21/00 Selecting which computer to operate can be done either by On-Screen Display, the CHANNEL button, or through keyboard hot-key commands. You will notice that after the OmniView PRO switches to another computer, the mouse will be inoperative for about ™...
- Page 16 P73055/F1D108-OSD/EU/man.qxd 4/21/00 Bank 0 (Master) Bank 1 (slave) CONSOLE Keyboard, mouse and monitor Bank 2 (slave) etc... Bank F (slave) AutoScan Mode: Enable AutoScan mode In AutoScan mode, the OmniView switching to the next. This time interval is set in the On-Screen Display menu. NOTE: There is no mouse or keyboard control in this mode.
- Page 17 • Pressing the TAB key opens up the Function menu. In this menu, you can select the SCAN TIME and the DISPLAY TIME. 2:25 PM Page 13 Usage (continued) Enable the On-Screen Display Menu Currently Belkin: F1D108-OSD selected 1. WIN98 Port is 2. NT SERVER in RED 3. MAC OS8 4. NET SRVR 5.
-
Page 18: Display Time
P73055/F1D108-OSD/EU/man.qxd 4/21/00 SCAN TIME: Amount of time the OmniView on one port before switching to the next port when in Scan Mode. DISPLAY TIME: Amount of time the OSD Menu or Port Name remains displayed on-screen after making a port selection. NOTE: If there are slave units present, the SCAN TIME and DISPLAY TIME settings are set on the MASTER unit only, and need not be set on the slave units. -
Page 19: Troubleshooting
A: • Check the cables and make sure they are inserted properly. • Your resolution and/or refresh rate is extremely high, or your cable is too long. Replace your VGA cables with coaxial, double-shielded cables such as Belkin A3H981-XX. • Check to make sure that the power adapter is plugged in and is working properly. - Page 20 A: • Check the cables and make sure they are inserted properly in the correct ports. • Check the cable and make sure that it is a straight-through DB9 male/female cable such as Belkin P/N F2N209-XX-T (XX is the length in feet). 2:25 PM...
- Page 21 P73055/F1D108-OSD/EU/man.qxd 4/21/00 Troubleshooting • Check your computer/motherboard documentation making sure that the serial ports are enabled, and that there are no IRQ or base address conflicts with other serial ports or modems. • Plug in a serial mouse directly to your computer, and reboot. If the mouse pointer still does not move, then there may be no serial mouse drivers installed, or the serial port on your computer may have other conflicts or problems.
-
Page 22: Fcc Statement
Belkin Components warrants this product against defects in materials and workmanship for one year. If a defect is discovered, Belkin will, at its option, repair or replace the product at no charge provided it is returned during the warranty period, with transportation charges prepaid, to the authorized Belkin dealer from whom you purchased the product. -
Page 23: Caractéristiques
• Aucun logiciel n’est requis • Garantie produit un an 2:31 PM Page 19 Introduction ™ PRO est également conçu pour gérer les résolutions les plus ™ de Belkin pour maîtriser encore mieux le système. Caractéristiques ® IntelliMouse ® et émulation ™ ™... -
Page 24: Contenu De L'emballage
P73055/F1D108-OSD/f/man.qxd 4/21/00 Contenu de l’emballage : OmniView ™ PRO 8 ports Alimentation 12VDC, 1000mA Ce manuel Carte d’enregistrement Deux supports de montage en rack Vis de montage Spécifications techniques Connecteurs de console : Clavier : Souris : Moniteur : Connecteurs de ports d’ordinateur : Clavier : Souris : Moniteur :... -
Page 25: Face Avant
P73055/F1D108-OSD/f/man.qxd 4/21/00 Détails relatifs au produit FACE AVANT FACE ARRIERE ENTREE ESCLAVE Port DB25 de mise en cascade ENTREE MAITRE SORTIE ESCLAVE Port DB25 de mise en cascade Connecteurs pour la CONSOLE Connecteur pour le moniteur VGA Prise de courant continu Connecteur pour Interrupteurs... - Page 26 Vérifiez bien que vous avez les câbles appropriés ! Plusieurs câbles sont nécessaires pour raccorder à l´OmniView vous allez commander. Vous trouverez ci-dessous les numéros de pièces Belkin ainsi que leur description. Nous vous conseillons d´acheter les kits de câbles correspondant au type de port souris utilisé...
-
Page 27: Installation Du Matériel
P73055/F1D108-OSD/f/man.qxd 4/21/00 Installation du matériel Banc 0 (Maître) Banc 1 (esclave) CONSOLE Clavier, souris et moniteur Banc 2 (esclave) etc. Banc F (esclave) Configuration en unité simple ou en cascade L’OmniView PRO peut être mis en cascade avec 15 autres unités (dans une configuration ™... - Page 28 Belkin Components ne sera pas tenu responsable des dommages occasionnés. Positionnez les interrupteurs DIP. Si vous n´avez qu´un seul OmniView positionnement du banc MAÎTRE.
- Page 29 CONSOLE. Raccordez le clavier et la souris à l´OmniView besoin d´un adaptateur AT vers PS/2 (numéro de pièce Belkin : F2N017f). Clavier PS/2 Raccordez le câble VGA du premier ordinateur à l´OmniView VGA (numéro de pièce Belkin : F2N025fXX-T ou A3H981fXX), insérez l’extrémité...
- Page 30 Raccordez le câble de la souris du premier ordinateur à l´OmniView un câble PS/2 (numéro de pièce Belkin : F2N036fXX), insérez une extrémité dans le port souris PS/2 de l´ordinateur et l´autre extrémité dans le port souris PS/2 PC1 situé à l’arrière de l’OmniView...
- Page 31 P73055/F1D108-OSD/f/man.qxd 4/21/00 Installation du matériel REMARQUE : Evitez d’appuyer sur une touche du clavier ou de bouger la souris si le port sélectionné correspond à un ordinateur en cours d’initialisation. En effet, ceci pourrait empêcher l’ordinateur de détecter ou d’initialiser comme il se doit les pilotes du clavier et de la souris.
- Page 32 P73055/F1D108-OSD/f/man.qxd 4/21/00 Installation du matériel • En raccordant le câble de mise en cascade à l’unité précédente, elle devrait automatiquement se mettre sous tension si l’unité précédente est sous tension. Il est néanmoins conseillé d’utiliser l’alimentation avec l’unité esclave. Le voyant lumineux situé...
- Page 33 P73055/F1D108-OSD/f/man.qxd 4/21/00 Pour sélectionner l´ordinateur désiré, vous pouvez recourir au paramétrage à l’écran, au bouton CHANNEL (Canal) ou à des raccourcis clavier. Vous constaterez qu’une fois que l´OmniView PRO a commuté sur un autre ordinateur, la souris ne fonctionne pas pendant 1 ™...
- Page 34 CONSOLE Clavier, souris et moniteur. Activer le mode de balayage automatique En mode de balayage automatique, l’OmniView secondes avant de passer au port suivant. Ce laps de temps est fixé dans le menu de paramétrage à l’écran. REMARQUE : Afin d’éviter toute erreur, ce mode ne permet pas de commande souris ou clavier.
- Page 35 • Kompatibel mit OmniView • Keine Software erforderlich • 1 Jahr Produktgarantie 2:33 PM Page 38 Einleitung ® wird unterstützt). Darüber hinaus arbeitet OmniView bedienen, indem Sie einfach zusätzlich den Belkin MAC ® Leistungsmerkmale ® IntelliMouse ® ™ PS/2 MAC Adapter ™...
-
Page 36: Technische Daten
P73055/F1D108-OSD/g/man.qxd 4/21/00 1 x OmniView PRO 8-Port ™ 1 x Netzteil (12 VDC, 1000 mA) 1 x dieses Benutzerhandbuch 1 x Registrierkarte 2 x Montageschienen für die Gestellmontage Montageschrauben Konsolenanschlüsse: Tastatur: MiniDIN, 6polig Maus: MiniDIN, 6polig (für PS/2-Maus) DB9-Stecker (zusätzlich für serielle Maus) Monitor: HDDB15-Buchse Computer Port Connectors:... - Page 37 P73055/F1D108-OSD/g/man.qxd 4/21/00 2:33 PM Page 40 Anschlüsse VORDERSEITE Anzeige der Bankauswahl- Netzschalter aktiven Bank /Abfrage-Schalter Anzeigen für die PC-Auswahlschalter aktiven Anschlüsse RÜCKSEITE SLAVE-EINGANGDB25-Anschluß für Kaskadierung MASTER-EINGANG SLAVE-AUSGANG DB25-Anschluß für Kaskadierung Anschlüsse für KONSOLE PC-Anschlüsse Ausgang für VGA-Signalausgang Anschluß für optionale VGA- serielle Maus serielle Maus...
- Page 38 Masterswitch bedienen werden. Die erforderlichen Kabel sind im folgenden mit ihren Belkin-Artikelnummern aufgeführt. Wir empfehlen den Erwerb von Kabelgarnituren (welche Kabelgarnitur zu verwenden ist, hängt vom Mausanschlusses Ihres Computers ab). Die Belkin-Kabelgarnituren enthalten alle Kabel, die Sie für die Verbindung eines Computers mit dem OmniView ™...
-
Page 39: Hardware Installation
P73055/F1D108-OSD/g/man.qxd 4/21/00 Hardware-Installation Bank 0 (Master) Bank 1 (slave) KONSOLE Tastatur, Maus und Monitor Bank 2 (slave) etc. Bank F (slave) Einzelbetrieb oder Kaskadierung An OmniView ™ PRO können bis zu 15 weitere OmniView-Einheiten angeschlossen werden. Über die maximal 16 OmniView-Geräte können Sie dann bis zu 128 Computer bedienen! Jedes OmniView ™... -
Page 40: Dip-Schalter
Gestellmontage sind die beigefügten Montageschienen seitlich am OmniView anzubringen. Achten Sie auf die Länge der Kabel, damit OmniView und Monitor ordnungsgemäßen Abstand haben. 2:33 PM Page 43 ™ PRO dauerhaft beschädigen. Belkin ™ PRO eingesetzt, ist dieses als ™ PRO an eine andere OmniView BANKADRESSE... - Page 41 PS/2-Tastatur Schließen Sie das VGA-Kabel für den ersten Computer am OmniView (verwenden Sie hierzu das Belkin VGA-Kabel F2N025gXX-T oder A3H981gXX). Das Steckerende des Kabels wird in den VGA-Anschluß am Computer eingesteckt, das Buchsenende in den VGA-Anschluß für PC1 auf der Rückseite des OmniView Rückseite des OmniView...
- Page 42 Hardware-Installation Schließen Sie das Mauskabel für den ersten Computer am OmniView Verwenden Sie hierzu ein PS/2-Kabel (Belkin Artikel-Nr. F2N036gXX). Ein Ende des Kabels wird in den PS/2-Mausanschluß am Computer eingesteckt, das andere in den Mausanschluß für PC1 auf der Rückseite des OmniView seriellen Mauskabels (Belkin Artikel-Nr.
- Page 43 P73055/F1D108-OSD/g/man.qxd 4/21/00 Hardware-Installation HINWEIS: Drücken Sie keine Tasten auf der Tastatur und bewegen Sie die Maus nicht, während der Computer am ausgewählten Anschluß gerade hochfährt. Dies kann nämlich dazu führen, daß der Computer die Tastatur- und Maustreiber nicht erkennt oder nicht ordnungsgemäß initialisiert. Verkettung von OmniView OmniView PRO verfügt über DB25-Anschlüsse zur Verkettung mit weiteren OmniView...
- Page 44 P73055/F1D108-OSD/g/man.qxd 4/21/00 Hardware-Installation • Ist das Verkettungskabel in das vorgeschaltete Gerät eingesteckt, sollte das Gerät automatisch eingeschaltet werden, wenn das vorgeschaltete Gerät eingeschaltet wird. Trotzdem wird empfohlen, für das Slave-Gerät das Netzteil zu verwenden. Die LED- Anzeige auf der Gerätevorderseite zeigt die eingestellte Bankadresse des Geräts. •...
-
Page 45: Bedienung
P73055/F1D108-OSD/g/man.qxd 4/21/00 Der zu bedienende Computer kann über das On-Screen Display, über den PC- Auswahlschalter (CHANNEL) oder über Tastaturbefehle ausgewählt werden. Wenn OmniView ™ PRO auf einen anderen Computer umschaltet, ist die Maus etwa 1 bis 2 Sekunden nicht funktionsfähig. Dieses Verhalten ist normal und gewährleistet die ordnungsgemäße Maussynchronisation. - Page 46 Bedienung KONSOLE Tastatur, Maus und Monitor Aktivieren des AutoScan-Modus Im AutoScan-Modus schaltet OmniView Computer zum nächsten. Das Zeitintervall wird über das On-Screen Display-Menü eingestellt. HINWEIS: Die Maus- und Tastatursteuerung ist dabei deaktiviert. Dies ist notwendig, um Fehler zu vermeiden: Wird nämlich während des Umschaltens auf den nächsten Anschluß...
-
Page 47: Inhoud Verpakking
P73055/F1D108-OSD/n/man.qxd 4/21/00 Belkin Components dankt u hartelijk voor de aankoop van de OmniView (Keyboard Video Mouse) schakelmodule. Nog nooit was het zo gemakkelijk en betaalbaar om met slechts één toetsenbord, muis en monitor acht PC’s aan te sturen! Met de OmniView ™... -
Page 48: Technische Specificaties
P73055/F1D108-OSD/n/man.qxd 4/21/00 Technische specificaties Aansluitingen console: Toetsenbord: 6-pins MiniDIN Muis: 6-pins MiniDIN (voor PS/2-muis) DB9-steker (voor afzonderlijke seriële muis) Monitor: HDDB15 contrasteker Aansluitingen computerpoorten: Toetsenbord: 6-pins MiniDIN Muis: 6-pins MiniDIN (voor PS/2-muis) DB9-steker (voor seriële muis) Monitor: HDDB15 steker Afmetingen: Breedte: 444,5 mm (17,5 in.) Hoogte:... - Page 49 P73055/F1D108-OSD/n/man.qxd 4/21/00 2:38 PM Page 61 Productopbouw VOORZIJDE Display actueel Knop keuze/scannen Inschakelen actieve bank van banken voeding Displays actueel Knop keuze van poorten actieve poorten ACHTERZIJDE SLAVE-INGANG DB25 busnetwerkpoort MASTER-INGANG SLAVE-UITGANG DB25 busnetwerkpoort Aansluitingen CONSOLE Aansluitingen PC-POORTEN Uitgang Uitgang VGA- Aansluiting Aansluiting seriële muis...
- Page 50 Zorg voor de juiste kabels! Voor de aansluiting van de acht computers die u met de OmniView u bepaalde kabels nodig. Hieronder vindt u de betreffende Belkin typenummers met de bijbehorende beschrijving. Wij adviseren de aanschaf van kabelsets die gebaseerd zijn op het type muispoort dat uw computer gebruikt.
- Page 51 P73055/F1D108-OSD/n/man.qxd 4/21/00 Apparatuur installeren Bank 0 (Master) Bank 1 (slave) CONSOLE Toetsenbord, muis en monitor Bank 2 (slave) enzovoort… Bank F (slave) Vrijstaand of in serie geschakeld bedrijf De OmniView PRO biedt de mogelijkheid tot doorlussen van 15 extra modules (op een ™...
- Page 52 BANK D BANK E BANK F OPMERKING: ‘AAN’ is naar beneden. ™ PRO. Door zijn modulaire maat van 48,3 cm ™ PRO, toetsenbord, muis en monitor de juiste (continued) ™ PRO. Belkin MASTER slave slave slave slave slave slave slave slave...
- Page 53 OmniView voor ‘monitor’. Sluit uw toetsenbord en muis aan op de OmniView toetsenbord, dan hebt u een AT-PS/2-adapter nodig (Belkin typenummer F2N017n). PS/2-toetsenbord Verbind de VGA-kabel van de eerste computer nu met de OmniView VGA-kabel (Belkin typenummer F2N025nXX-T of A3H981nXX) aan als volgt: het...
- Page 54 Apparatuur installeren Verbind de muiskabel van de eerste computer met de OmniView kabel (Belkin typenummer F2N036nXX), steek dan het ene kabeleinde in de PS/2-muispoort op de computer en het andere kabeleinde in de PS/2-muispoort voor PC1 aan de achterzijde van de OmniView PRO.
- Page 55 P73055/F1D108-OSD/n/man.qxd 4/21/00 Apparatuur installeren OPMERKING: Als een computer op de ingeschakelde poort bezig is met opstarten, raak dan de toetsen van het toetsenbord en de muis niet aan. Dit kan ertoe leiden dat de computer de stuurprogramma’s van het toetsenbord en de muis niet correct herkent en initialiseert. Doorlussen van de OmniView Via de DB25-busnetwerkpoorten kan de OmniView OmniView...
- Page 56 P73055/F1D108-OSD/n/man.qxd 4/21/00 Apparatuur installeren • Bij aansluiting van de doorluskabel op de voorafgaande module moet deze automatisch ingeschakeld worden als de voorafgaande module ingeschakeld wordt. Toch adviseren wij de voeding voor de slave-module te gebruiken. U kunt zien dat het led-display aan de voorzijde de bankadresinstelling van de module aangeeft.
- Page 57 P73055/F1D108-OSD/n/man.qxd 4/21/00 De computer die u wilt aansturen, kunt u als volgt bereiken: via het OSD-beeldschermmenu, met de ‘CHANNEL’(kanaal)-knop of via sneltoetsopdrachten op het toetsenbord. Wanneer de OmniView SE naar een andere computer overschakelt, is de muis een tot twee ™...
- Page 58 P73055/F1D108-OSD/n/man.qxd 4/21/00 Bank 0 (Master) Bank 1 (slave) CONSOLE Toetsenbord, muis en monitor Bank 2 (slave) enzovoort… Bank F (slave) Stand AutoScan: AutoScan-stand activeren In de stand AutoScan blijft de OmniView voordat hij doorschakelt naar de volgende. Deze tijdinterval kunt u instellen via het OSD- beeldschermmenu.
- Page 59 ‘SCAN TIME’ (scantijd) en de ‘DISPLAY TIME’ (weergavetijd) bepalen. 2:38 PM Page 71 Toepassingen (vervolg) OSD-beeldschermmenu activeren PRO gegenereerd en heeft geen enkele invloed op uw De actueel Belkin: F1D108-OSD gekozen 1. WIN98 poort wordt in ROOD 2. NT SERVER weergegeven 3. MAC OS8 4.
- Page 60 P73055/F1D108-OSD/n/man.qxd 4/21/00 ‘SCAN TIME’ (scantijd): Aantal seconden dat de OmniView scanstand op een poort blijft staan voordat hij naar een andere poort overschakelt. ‘DISPLAY TIME’ (weergavetijd): Aantal seconden dat het OSD-menu of een poortnaam op het beeldscherm zichtbaar blijft nadat u een poort gekozen hebt. OPMERKING: Als slave-modules deel uitmaken van uw systeem, hoeft u de ‘SCAN TIME’...
- Page 61 • Uw resolutie of herhalingsfrequentie is te hoog ingesteld of de gebruikte aansluitkabel is te lang. Vervang uw VGA-kabels door coaxiale, dubbel afgeschermde kabels zoals Belkin type A3H981nXX. • Controleer of de voedingsadapter aangesloten is en correct functioneert. Deze moet voldoen aan 12 V (gelijkstroom), 1000 mA minimaal.
- Page 62 A: • Controleer de kabels en zorg dat deze correct op de juiste poorten aangesloten zijn. • Controleer de kabel en zorg dat dit een doorgaande DB9-(stekker/contrastekker) kabel is, bijvoorbeeld Belkin type P/N F2N209nXX-T (XX is de lengte in voet). 2:38 PM...
- Page 63 P73055/F1D108-OSD/n/man.qxd 4/21/00 Probleemoplossing • Raadpleeg de documentatie van uw computer/moederkaart en zorg dat de seriële poorten geactiveerd zijn zonder IRQ- of beginadresconflicten met andere seriële poorten of modems. • Sluit een seriële muis rechtstreeks op uw computer aan en start deze opnieuw. Als de muisaanwijzer nog steeds niet beweegt, zijn er wellicht geen stuurprogramma’s voor een seriële muis geïnstalleerd of heeft de seriële poort op uw computer mogelijk andere conflicten of problemen.
- Page 64 Belkin, naar eigen goeddunken, het product gratis repareren of vervangen mits het binnen de garantieperiode vrij van transportkosten wordt terugbezorgd bij de officiële Belkin dealer van wie u het product hebt gekocht. Hierbij kan het tonen van het aankoopbewijs worden verlangd.
- Page 65 • Non richiede software • Un anno di garanzia sul prodotto 2:36 PM Page 77 Introduzione ™ PRO KVM della Belkin Components. Gestire 8 PC . OmniView PRO è stato progettato per gestire anche le ® ™ ® è sufficiente che aggiungiate il Caratteristiche ®...
-
Page 66: Specifiche Tecniche
P73055/F1D108-OSD/i/man.qxd 4/21/00 OmniView PRO 8-Port ™ Alimentazione 12VDC, 1000mA Questo manuale Due staffe di montaggio rack Viti di montaggio Connettori console: Tastiera: Mouse: Monitor: Connettori porte computer: Tastiera: Mouse: Monitor: Dimensioni: Larghezza: Altezza: Profondità: Peso: Temperatura d’esercizio: Temperatura di stoccaggio: Umidità: 2:36 PM Page 78... -
Page 67: Pannello Frontale
P73055/F1D108-OSD/i/man.qxd 4/21/00 Dettagli sul prodotto PANNELLO FRONTALE PANNELLO POSTERIORE ENTRATA SLAVE porta in catena di priorità DB25 ENTRATA MASTER USCITA SLAVE porta catena di priorità DB25 Connettori CONSOLE Connettore monitor VGA Jack di alimentazione Connettore Switch DIP mouse PS/2 Connettore stampante 2:36 PM Page 79... - Page 68 PRO richiede i cavi per collegare gli otto computer che vorrete gestire. Di seguito sono indicati i numeri delle parti Belkin con le relative descrizioni. Vi consigliamo di acquistare i kit di cavi in base al tipo di porta mouse del vostro computer. I kit cavi dispongono di tutti i cavi necessari per collegare un computer all’OmniView...
-
Page 69: Installazione Hardware
P73055/F1D108-OSD/i/man.qxd 4/21/00 Installazione hardware Bancata 0 (Master) Bancata 1 (slave) CONSOLE Tastiera, mouse e monitor Bancata 2 (slave) Ecc... Bancata F (slave) Funzione con unità singola o in catena di priorità OmniView PRO può essere collegato in catena di priorità con altre 15 unità supplementari ™... - Page 70 BANCATA F slave SPENTO SPENTO SPENTO NOTA: ON (ACCESO) è verso il basso ™ PRO. Il suo fattore forma 48.3cm lo ™ PRO, la tastiera, il mouse ed il monitor siano (continua) ™ PRO o ai ™ PRO. La Belkin...
- Page 71 AT-PS/2 (pezzo Belkin n. F2N017i). Tastiera PS/2 Collegare il cavo VGA del primo computer all’OmniView VGA (pezzo Belkin n. F2N025iXX-T o A3H981iXX) collegare l’estremità maschio del cavo alla porta VGA del computer e l’estremità femmina alla porta PC1 VGA sul retro dell’OmniView ™...
- Page 72 Installazione hardware Collegare il mouse del primo computer all’OmniView (pezzo Belkin n. F2N036iXX) collegare un’estremità della porta del mouse PS/2 al computer e l’altra alla porta del mouse PC1 PS/2 sul retro dell’OmniView un cavo per mouse seriale (pezzo Belkin n. F2N209iXX-T), collegare un’estremità alla porta seriale DB9 del computer e l’altra estremità...
- Page 73 P73055/F1D108-OSD/i/man.qxd 4/21/00 Installazione hardware NOTA: Evitare di premere qualsiasi tasto della tastiera o di muovere il mouse se il computer corrispondente alla porta selezionata è in fase di caricamento. In caso contrario il computer potrebbe non rilevare o non inizializzare i driver della tastiera o del mouse correttamente. Collegamento in catena di priorità...
- Page 74 P73055/F1D108-OSD/i/man.qxd 4/21/00 Installazione hardware • Al momento del collegamento del cavo in catena di priorità all’unità precedente, essa dovrebbe essere automaticamente alimentata se l’unità precedente viene alimentata. Tuttavia, si consiglia di utilizzare l’alimentazione con l’unità slave. Il LED sul pannello frontale visualizzerà...
- Page 75 P73055/F1D108-OSD/i/man.qxd 4/21/00 Il computer con il quale operare può essere selezionato con lo strumento On-Screen Display, con il pulsante CHANNEL (CANALE) o con i comandi dei tasti hot (di cambio veloce). Noterete che una volta che l’OmniView bloccato per circa 1 – 2 secondi. Si tratta di un’operazione normale che garantisce una corretta sincronizzazione del mouse.
- Page 76 CONSOLE Tastiera, mouse e monitor Attivare la modalità AutoScan: In modalità AutoScan, l’OmniView passare alla successiva. Questo intervallo di tempo viene impostato sull’On-Screen Display. NOTA: in questa modalità non è previsto nessun controllo del mouse o della tastiera. Questo particolare è necessario per evitare eventuali errori. Altrimenti, se l’utente sta spostando il mouse o sta utilizzando la tastiera quando l’...
Need help?
Do you have a question about the OmniView PRO F1D108-OSD and is the answer not in the manual?
Questions and answers