Table of Contents
Advertisement
Quick Links
Advertisement
Table of Contents

Subscribe to Our Youtube Channel
Related Manuals for Kogan V11 PRO


Summary of Contents for Kogan V11 PRO
- Page 1 V11 PRO CORDLESS 29.6V STICK VACUUM CLEANER KAVACSTV11A...
-
Page 3: Safety And Warnings
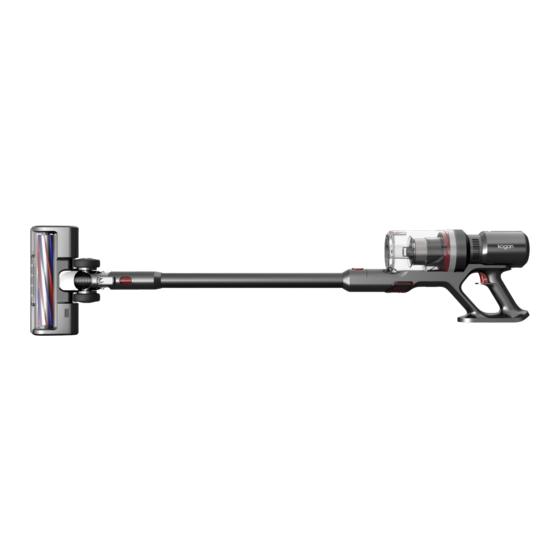
• This product is powered by a 29.6V DC lithium battery. Do not use any other model or capacity of the battery. Only use the original battery supplied by Kogan. • If the battery has any malfunction or abnormality, stop using the product immediately and contact Kogan.com for replacement. - Page 4 OVERVIEW Speed-adjustment Button Battery Pack Battery Lock Switch Button Dust Cup Dust Cup Lock Machine Body Release Button of Dust Cup Aluminium Tube Lock Aluminium Tube Floor Brush Lock Electric Floor Brush with Plush Roller Bar...
-
Page 5: Installation
INSTALLATION Electric Brush Installation • Align the electric main brush to the extension wand connector and push it gently. It will connect with an audible click. (To disassemble, press the lock button and detach). - Page 6 Extension Wand Installation • Connect as above and the floor brush or other accessories with the other end as illustrated. • Alternatively, connect the floor brush to clean hard surfaces such as floor and ceramic tiles or undercoat carpet. • Alternatively, connect the crevice nozzle or 2-in-1 bristle brush to clean difficult-to- reach areas such as ceilings, curtains and air conditioning inlets.
- Page 7 Dust Cup Installation and Removal • Push the button under the machine body forward and the dust cup assembly will pop up. Then rotate the dust cup assembly anticlockwise to remove. Roller Brush Replacement 1. Turning on cleaner • After installing all parts, turn on the switch button at the handle to start operation.
- Page 8 2. Suction adjustment • Suction power can be set to three levels by pressing the suction adjustment button on the top of the machine body. There are three LED indicator lights on the button: the blue indicator light for low, the pink-purple indicator light for medium and the red indicator for high.
-
Page 9: Operation
OPERATION Cleaning Method 1: This is suitable for cleaning hard surfaces such as floor and ceramic tiles and the undercoat carpet. Example: • Quickly remove dust thanks to the built-in independent motor and large plush roller brush rotating at high speed. •... - Page 10 Cleaning Method 2: • Convenient to install, easy for vertical cleaning and easy on the back thanks to the one-key snap joint. • Good for cleaning high places such as ceilings, roofs, air conditioners and curtains due to compatibility with different brush heads. Cleaning Method 3: •...
- Page 11 Example: • Driven by its built-in independent motor, the roller can rotate at a high speed and collect particles such as pollen and hair on bedding, improving sleeping health. Cleaning Method 4: This is suitable for cleaning various crevices and narrow areas in the household and car. Example:...
- Page 12 Cleaning Method 5: • The brush is suitable for cleaning the places such as curtain, car interior and air conditioner where hair can collect. • The one-key extensible brush can suck and clean simultaneously and remove dust efficiently. • A slim and soft hairbrush can deeply clean the fabrics such as curtains and sofas. •...
-
Page 13: Cleaning And Care
CLEANING & CARE During use: • Please do not let the unit get too close to hot objects such as heaters and cigarette butts. Before use: • To prevent damage, remove large and sharp objects from the vicinity. Do not vacuum any inflammable objects or liquids, such as gasoline, cigarette or alcohol. -
Page 14: Troubleshooting
Replacing/cleaning HEPA filter • Separate the dust cup from the machine body as per previous installation instructions. • Remove the top filter element of dust cup and clean it with a soft hairbrush or put the cup in warm water for washing. Before next use, ensure the dust cup and filter element are completely dry. -
Page 15: Specifications
SPECIFICATIONS Rated power 400W Battery configuration Li-ion 2000mAh 29.6V Charging time 2~3 hours Noise level 75dB Outer dimension 1172 x 256 x 217mm Weight (Net/Gross Weight) 2.9kg/4.6kg Capacity of Dust Cup 500ml IN THE BOX Motorised 2-in-1 Bristle Long Crevice Wall Bracket Charger Mattress Brush... - Page 16 Need more information? We hope that this user guide has given you the assistance needed for a simple set-up. For the most up-to-date guide for your product, as well as any additional assistance you may require, head online to help.kogan.com...
Need help?
Do you have a question about the V11 PRO and is the answer not in the manual?
Questions and answers