ON Semiconductor RSL10 Getting Started Manual
Smart shot camera
Hide thumbs
Also See for RSL10:
- Hardware reference manual (521 pages) ,
- Getting started (51 pages) ,
- Manual (37 pages)
Advertisement
Quick Links
RSL10 Smart Shot Camera
Getting Started Guide
Overview
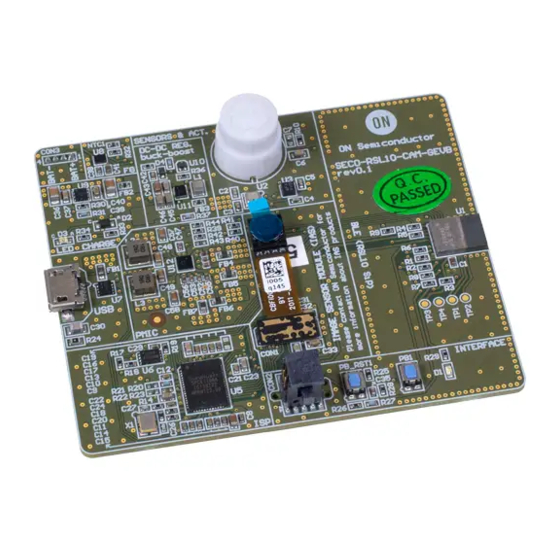
The RSL10 Smart Shot Camera (SECO-RSL10-CAM-GEVB) is a complete node-to-cloud platform that enables smart image
capture for portable, low duty cycle IoT applications including asset monitoring and security. Based on the RSL10 SIP and
the ARX3A0 CMOS image sensor, the platform features multiple trigger modes including time, motion detection, and
environmental sensor triggers (e.g., changes in temperature and humidity).
The RSL10 SIP serves as the processing hub of the camera, enabling Bluetooth® Low Energy connectivity of captured
image and sensor data to the provided mobile app (available on GooglePlay™, iOS®).
This guide provides initial instructions for using the RSL10 Smart Shot Camera and accompanying mobile application. For
further information about the platform, refer to the platform's
User Manual
(EVBUM2782).
Hardware Set-up
To get started with the platform, remove the protective layer from the camera module (1) and connect the provided USB cable
to your PC's USB port (2). A green LED, shown in Figure 1 below, will begin blinking to confirm that the device is ready
and in Advertising Mode.
Figure 1. Unboxing the RSL10 Smart Shot Camera
Installing the RSL10 Smart Shot Mobile App
In order to operate the board, download RSL10 Smart Shot mobile app from GooglePlay™ or iOS®. After installing the app,
ensure that Bluetooth and GPS are enabled on your phone. Select the icon to launch the application. The following sections
detail how to send images from the Camera to the app over Bluetooth Low Energy, as well as other functions of the app
including sending wireless firmware updates (FOTA).
Advertisement

Subscribe to Our Youtube Channel
Related Manuals for ON Semiconductor RSL10


Summary of Contents for ON Semiconductor RSL10
- Page 1 Installing the RSL10 Smart Shot Mobile App In order to operate the board, download RSL10 Smart Shot mobile app from GooglePlay™ or iOS®. After installing the app, ensure that Bluetooth and GPS are enabled on your phone. Select the icon to launch the application. The following sections detail how to send images from the Camera to the app over Bluetooth Low Energy, as well as other functions of the app including sending wireless firmware updates (FOTA).
- Page 2 Connect to the Camera After launching the app, the home screen displays the RSL10 Smart Shot Camera as a discovered device. Select the device to connect the camera to the mobile app. If you don’t see the camera on the screen, select Refresh.
- Page 3 RSL10Smartshot directory. On a iPhone, the image is stored in your Photos directory. Figure 3. Using the RSL10 Smart Shot App to Capture and Save a Picture The camera also can capture stream of images with different frame rates. Select the Settings icon to switch from Single Image Mode to Stream Mode.
- Page 4 Exit the Settings menu by tapping the bottom of the screen. Click the Play button to start streaming images, and click the Stop button to stop. Figure 5. Streaming Images...
- Page 5 The RSL10 Smart Shot Camera supports four environmental sensors, which are used to trigger image capture when a Setting Event Triggers change in value is detected. To set or change the triggers, select the Settings icon. You can turn the triggers ON or OFF, and set the minimum and maximum thresholds of temperature and humidity sensors.
- Page 6 Figure 7. Sensor Triggered Image Capture...
- Page 7 More information about the Amazon Rekognition setup is available in the RSL10 Smart Shot Camera User Manual (EVBUM2782). You should specify your AWS account credentials to use this feature. Select the Settings icon -> AWS Account on the Home Screen.
- Page 8 Enter the accessKey and secretKey associated with your AWS account and click Use. After logging in, you can use the Face icon shown below to analyze pictures captured with the RSL10 Smart Shot Camera. Figure 9. Using Amazon Rekognition to Analyze Captured Images...
- Page 9 (EVBUM2782). To send FOTA updates to the RSL10 Smart Shot Camera, push the PB1 button on the platform. The green LED will light up, and your board will switch to FOTA Mode. The platform will then be discoverable on the RSL10 FOTA app.
- Page 10 After selecting the device on the mobile app, you can update the firmware by clicking Select File to import the new firmware. Click Connect and Update to send the firmware to the device. Figure 11. Sending Firmware Updates...
- Page 11 Figure 12. Firmware Update Process Power Down Mode In Power Down Mode, all systems are put into low power modes to consume the lowest possible amount of power. Low Power Mode can be entered by keeping the on-board button PB1 pressed after releasing the reset button (PB_RST1).
- Page 12 Figure 13. On-board Power and Reset Buttons...
- Page 13 FDA Class 3 medical devices or medical devices with a same or similar classification in a foreign jurisdiction or any devices intended for implantation in the human body. Should Buyer purchase or use ON Semiconductor products for any such unintended or unauthorized...
Need help?
Do you have a question about the RSL10 and is the answer not in the manual?
Questions and answers