Advertisement
Quick Links
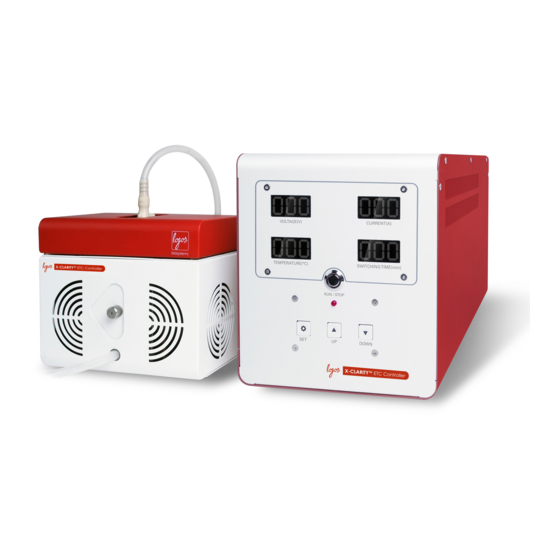
X-CLARITY™ TISSUE CLEARING SYSTEM
This Quick Start Guide provides instructions to install and use the X-CLARITY™ TISSUE CLEARING SYSTEM.
For detailed instructions, please refer to the user manual in the supplied USB drive.
System Setup
Buffer Reservoir
C10401
Pump
X-CLARITY™ ETC Chamber
C10301
1
X-CLARITY™ ETC Controller
C10101
Quick
Start
Guide
Document No: C14002
C10201
Advertisement

Related Manuals for logos biosystems X-CLARITY TISSUE CLEARING SYSTEM


Summary of Contents for logos biosystems X-CLARITY TISSUE CLEARING SYSTEM
- Page 1 Quick Start X-CLARITY™ TISSUE CLEARING SYSTEM Guide This Quick Start Guide provides instructions to install and use the X-CLARITY™ TISSUE CLEARING SYSTEM. For detailed instructions, please refer to the user manual in the supplied USB drive. Document No: C14002 System Setup X-CLARITY™...
- Page 2 Accessories Item Quantity Catalog # Description Multi-cable with two female ends to connect the X-CLARITY™ ETC C12101 Controller and X-CLARITY™ ETC Chamber Power cords for the X-CLARITY™ ETC Controller and pump X-CLARITY™ reservoir cap with temperature probe C12102 Snap-lock connector tube (clear tube) C12103 Peristaltic pump tube (light yellow tube) C12104...
-
Page 3: Making The Connections
Making the Connections 1. Connect the X-CLARITY™ ETC Controller and X-CLARITY™ ETC Chamber a. Take the multi-cable and connect the ends to the ports on the rear panels of the X-CLARITY™ ETC Controller and X-CLARITY™ ETC Chamber. Check the orientation of the pins before inserting the ends of the multi-cable into the X-CLARITY™... - Page 4 2. Buffer reservoir temperature control a. Fill the buffer reservoir with 1.2 L of the Electrophoretic Tissue Clearing Solution. b. Screw on the cap of the buffer reservoir making sure the temperature probe and buffer reservoir outlet tube are both in the reservoir. Reservoir outlet Reservoir outlet tube Reservoir inlet...
- Page 5 X-CLARITY™ ETC Controller-ETC Chamber-Buffer Reservoir Connection 3. Connecting the buffer reservoir to the X-CLARITY™ ETC Chamber a. Take one end of a peristaltic pump tube and attach it to the X-CLARITY™ ETC Chamber inlet located on the front panel of the X-CLARITY™ ETC Chamber. Make sure there is a tight seal to prevent buffer leakage.
- Page 6 Reservoir outlet Chamber inlet c. Open the pump head compression block by pulling the lever to the left. Pump head Lever (to the left) d. Lift the clamps on both sides of the pump head. Load the middle of the tube into the pump head between the rollers and the compression block.
- Page 7 e. Release the clamps. Close the compression block by pulling the lever to the right. Make sure the tube is secure. Lever (to the right) 4. Sample insertion a. Open the red safety cover of the X-CLARITY™ ETC Chamber. b. Unscrew the cap to the X-CLARITY™ ETC Chamber. Safety cover Chamber cap Tissue container...
- Page 8 c. Use the appropriate holder for your sample. Insert the tissue container holder into the chamber (upright). Note: To ensure proper clearing, the sample should always be oriented in the SAME direction when you take it out and place it back into the chamber. d.
- Page 9 Snap-lock connector Chamber outlet NOTE: To detach the snap-lock connector from the buffer outlet, press the stainless steel button on the side to release the tube from the X-CLARITY™ ETC Chamber. Stainless steel button NEVER OPEN OR CLOSE THE CHAMBER SAFETY COVER WITH THE TUBE IN PLACE. b.
- Page 10 Buffer Flow X-CLARITY™ buffer reservoir buffer reservoir outlet chamber inlet X-CLARITY™ ETC Chamber chamber outlet reservoir inlet X-CLARITY™ buffer reservoir...
- Page 11 Ready, Set, Run! 1. Flip the power switch to the on position on the rear panel of the X-CLARITY™ ETC Controller. You will know the machine is on when red numbers appear on the LED display on the X-CLARITY™ ETC Controller.
- Page 12 CAUTION!!! ™ DO NOT open the red safety cover of the X-CLARITY ETC Chamber while the snap-lock connector tube is attached as shown below. This can damage the tube. THE TUBE IS STILL ATTACHED! 2. DO NOT attach the snap-lock connector tube before closing the safety cover. THE SAFETY COVER HAS NOT BEEN CLOSED! ™...
- Page 13 ™ The magnetic sensor detects whether the safety cover is open or closed. The X-CLARITY Tissue Clearing System will not run if the safety cover is open even if you push the RUN/STOP button. No electric current will enter the chamber if the safety cover is not closed. Magnetic sensor 5.
- Page 14 Intentionally Left Blank Logos Biosystems, Inc. STE 930 Doosan Venture Digm; 415 Heungan-daero, Dongan-Gu; Anyang-Si, Gyeonggi-Do 431-755; Republic of Korea ∙ Tel: +82-31-478-4185 ∙ Fax: +82-31-478-4184 ∙ Email: sales@logosbio.com ∙ Website: www.logosbio.com...
Need help?
Do you have a question about the X-CLARITY TISSUE CLEARING SYSTEM and is the answer not in the manual?
Questions and answers