Advertisement
When using electrical appliances, basic safety precautions
should always be followed. Do not use the Emeril Pasta &
TM
Beyond
until you have read this manual thoroughly.
Owner's Manual
Save These Instructions – For Household Use Only
MODEL: PM-01
Visit TristarCares.com for tutorial
videos, product details, and more.
Guarantee Information Inside
Advertisement
Table of Contents

Related Manuals for Emeril Lagasse Pasta & Beyond PM-01


Summary of Contents for Emeril Lagasse Pasta & Beyond PM-01
- Page 1 Owner’s Manual Save These Instructions – For Household Use Only MODEL: PM-01 When using electrical appliances, basic safety precautions Visit TristarCares.com for tutorial should always be followed. Do not use the Emeril Pasta & videos, product details, and more. Guarantee Information Inside Beyond until you have read this manual thoroughly.
- Page 2 Emeril Lagasse Pasta & Beyond BEFORE YOU BEGIN The Emeril Lagasse Pasta & Beyond will provide you many years of delicious family meals and memories around the dinner table. But before you begin, it’s very important that you read this entire manual, making certain that you are totally familiar with this appliance’s operation and precautions.
-
Page 3: Table Of Contents
Parts & Accessories Using the Control Panel Assembling the Pasta Maker Assembling the Meat Grinder Assembling the Slicer/Shredder Assembling the Slow Juicer Assembling the Frozen Treat Maker General Operating Instructions Cleaning & Storage Troubleshooting Money-Back Guarantee Emeril Lagasse Pasta & Beyond ™... -
Page 4: Important Safeguards
10. Make sure the plug is firmly inserted into the mixing paddle have come to a complete stop. power outlet. Emeril Lagasse Pasta & Beyond ™... - Page 5 • Do not use an extension cord with this product. • To disconnect the power cord, press the Power Button to turn off the appliance before removing the plug from the wall. Emeril Lagasse Pasta & Beyond ™...
-
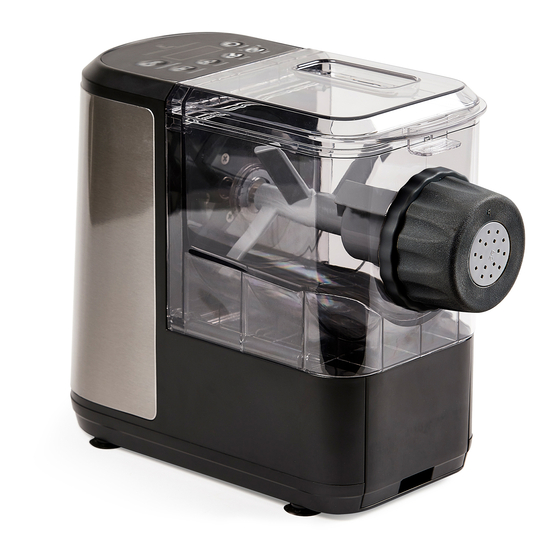
Page 6: Parts & Accessories
JUICE COLLECTOR DRY MEASURING CONTAINER Place under the Juice Housing for juice collection. Use for measuring dry ingredients. The Juice Collector has a pouring spout. Capacity: 1 ¼ cups Emeril Lagasse Pasta & Beyond ™... - Page 7 (refer to the “Assembling the Slow Juicer Housing” Blades and other metal parts used with and “Assembling the Frozen Treat Housing” sections). this appliance are sharp. Great care should be taken to avoid personal injury. *May be sold separately Emeril Lagasse Pasta & Beyond ™...
-
Page 8: Using The Control Panel
NOTE: Pasta needs to be cut to length by hand as it down to mix counterclockwise. Once done is extruded from the appliance. mixing or unjamming, press the Start/Pause Button to resume the current process. Emeril Lagasse Pasta & Beyond ™... - Page 9 Accessories are set in place and locked properly. Grinder Housing to the Mounting Ring by twisting the chosen housing left to lock in place. SLOTS FOR MIXING CHAMBER LID WHITE BUTTON WHITE BUTTON MOUNTING RING MOUNTING RING Emeril Lagasse Pasta & Beyond ™...
-
Page 10: Assembling The Pasta Maker
The parts of each housing are also color coded to help you identify which parts are used with which housing. PASTA DISC TYPES (G) Penne Spaghetti Linguine Tagliatelle Udon Angel Hair Fettucine Lasagna Emeril Lagasse Pasta & Beyond ™... -
Page 11: Assembling The Meat Grinder
NOTE: All meat grinder parts are marked with an “M” to identify which attachments are used for meat grinding. The parts of each housing are also color coded to help you identify which parts are used with which housing. Emeril Lagasse Pasta & Beyond ™... -
Page 12: Assembling The Slicer/Shredder
Outer Tab* Use the tab to twist the Slicer or Shredder Blade to lock and unlock. Do not put your finger into the blades to remove because the blades are sharp. Emeril Lagasse Pasta & Beyond ™... -
Page 13: Assembling The Slow Juicer
When choosing a filter and tip for juicing or making frozen foods: • The solid filter and star tip are for frozen foods. • The perforated filter and round tip are for juicing. Emeril Lagasse Pasta & Beyond ™... -
Page 14: Assembling The Frozen Treat Maker
“J” to identify which parts are used for juicing. The parts of each housing are also color coded to help you identify which parts are used with which housing. *May be sold separately Emeril Lagasse Pasta & Beyond ™... -
Page 15: General Operating Instructions
5. Add your flour and salt to the Mixing Chamber. 6. Place the lid on the Mixing Chamber. Press the Batch Button according to your recipe size. The paddle will begin mixing the flour. Fig. a Emeril Lagasse Pasta & Beyond ™... - Page 16 5 mins. 30 secs. 4 mins. 30 secs. 14 mins. Batch 2 Program: Dry Measuring Containers Pause Extrude Extrude Total Time 4 mins. 20 secs. 7 mins. 30 secs. 7 mins. 30 secs. 19 mins. Emeril Lagasse Pasta & Beyond ™...
- Page 17 Start/Pause Button in extrusion. to resume the program. Pasta is not coming Pasta Discs are clogged. out smooth. Pasta edges look rough Pasta dough is too dry. Add liquid. and crumbly. Emeril Lagasse Pasta & Beyond ™...
- Page 18 NOTE: It may take a small amount of time for the Pasta Discs. dough to extrude evenly and consistently from the appliance. A small amount of steam may emit from the front of the appliance while extrusion is occurring. Emeril Lagasse Pasta & Beyond ™...
- Page 19 Star Extrusion Cap. TIP: Remove fruit from the freezer about 10 minutes before using the fruit with this attachment. Doing so will allow for the fruit to soften slightly and lower the risk of blockage. Emeril Lagasse Pasta & Beyond ™...
- Page 20 3. Press the Forward Button to slice or shred clockwise for 6 minutes. NOTE: To unjam the appliance, see the “Using the Control Panel” section. 4. Press the Start/Pause Button at any time to pause the slicing or shredding process. Emeril Lagasse Pasta & Beyond ™...
-
Page 21: Cleaning & Storage
8. Any other servicing should be performed by an authorized service representative. Storage 3. Place the appliance in a clean, dry place. 1. Unplug the appliance. 2. Make sure all components are clean and dry. Emeril Lagasse Pasta & Beyond ™... -
Page 22: Troubleshooting
Dough could be too wet. remove flour from the Mixing Chamber wall. The cycle stopped and The dough is too wet and the dough Press the Forward Button to continue there is remaining dough. balled together. extruding dough.. Emeril Lagasse Pasta & Beyond ™... -
Page 23: Money-Back Guarantee
90-Day Money-Back Guarantee The Emeril Lagasse Pasta & Beyond is covered by a 90-day money-back guarantee. If you are not 100% satisfied with your product, return the product and request a replacement product or refund. Proof of purchase is required. Refunds will include the purchase price, less processing and handling. - Page 24 We are very proud of the design and quality of our Emeril Lagasse Pasta & Beyond This product has been manufactured to the highest standards. Should you have any questions, our friendly customer service staff is here to help you.
Need help?
Do you have a question about the Pasta & Beyond PM-01 and is the answer not in the manual?
Questions and answers