Table of Contents
Advertisement
Available languages
Available languages
Quick Links
Advertisement
Table of Contents

Subscribe to Our Youtube Channel
Related Manuals for Be Cool BC100TU2001F


Summary of Contents for Be Cool BC100TU2001F
- Page 1 BC100TU2001F HERZLICHEN GLÜCKWUNSCH! VIELEN DANK, DASS SIE SICH FÜR EIN PRODUKT VON BE COOL ENTSCHIEDEN HABEN. Diese Bedienungsanleitung gibt es in folgenden Sprachen DEUTSCH Seite 2 – 8 ENGLISH Seite 9 – 15...
- Page 2 LESEN SIE BITTE DIE BEDIENUNGSANLEITUNG SORGFÄLTIG DURCH BEVOR SIE MIT DER INSTALLATION, BEDIENUNG ODER WARTUNG BEGINNEN. SCHÜTZEN SIE SICH SELBST UND ANDERE, INDEM SIE DIE SICHERHEITSHINWEISE BEFOLGEN. DIE NICHTBEACHTUNG VON ANWEISUNGEN KÖNNTE ZU PERSONEN UND/ODER SACHSCHÄDEN UND/ODER ZUM VERLUST DES GARANTIEANSPRUCHS FÜHREN! WICHTIGE INFORMATIONEN ZUR SICHERHEIT, STANDORT UND ZUM ELEKTRISCHEN ANSCHLUSS.
- Page 3 Benutzen Sie das Gerät nicht in der Nähe von Wasser oder starker Feuchtigkeit, z.B. im feuchten Kellern, neben Schwimmbecken, Badewannen oder Duschen. Achten Sie darauf, dass kein Wasser in das Gerät eindringt. Stellen Sie keine Gegenstände auf das Gerät. Stellen Sie das Gerät auf einen stabilen und ebenen Untergrund. Decken Sie das Gerät niemals ab.
-
Page 4: Bezeichnung Der Einzelnen Teile
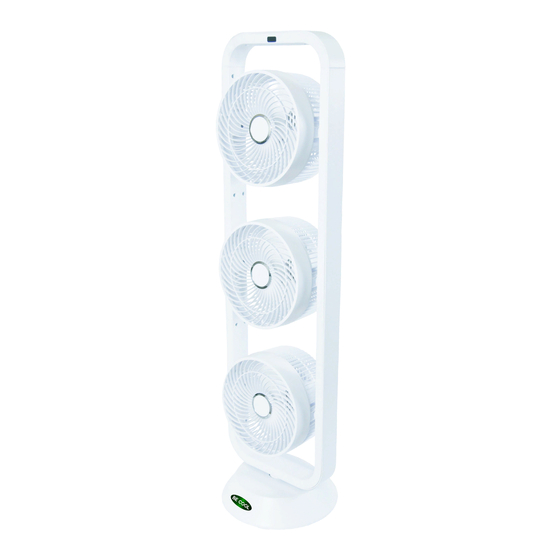
BEZEICHNUNG DER EINZELNEN TEILE INBETRIEBNAHME Stellen Sie das Gerät auf eine ebene und trockene Fläche (keine Verwendung in Nassräumen) und stecken den Stecker in eine Standard 220~240V Steckdose. Sie können die Funktionen des Ventilators direkt am Gerät oder mithilfe der Fernbedienung einstellen: BEDIENFELD GERÄT FERNBEDIENUNG... - Page 5 2. GESCHWINDIGKEIT: Das Gerät verfügt über drei Ventilatorköpfe. Sie können jeden Ventilatorkopf individuell einstellen. Um die gewünschte Geschwindigkeit für jeden einzelnen Ventilatorkopf einzustellen gehen Sie bitte wie folg vor: 1. Drücken Sie auf „FAN1“, „FAN2“ und/oder „FAN3“, je nachdem welchen Ventilatorkopf Sie einschalten möchten.
- Page 6 5. OSC Durch Betätigen dieser Taste bewegen sich die Ventilatorköpfe von rechts nach links und wieder zurück. Dadurch erreichen Sie eine horizontale Luftverteilung im Raum. Durch neuerliches Drücken der Taste wird die momentane Position beibehalten. REINIGUNGUNGSHINWEISE Achtung! Lassen Sie das Gerät vor der Reinigung vollständig zum Stillstand kommen und ziehen Sie den Stecker aus der Steckdose, um es vom Stromnetz zu trennen.
- Page 7 Technische Informationen Eingangspannung 220-240 V~ Frequenz 50-60 Hz Nenneingangsleistung 105W Bezeichnung Symbol Wert Einheit Maximaler Volumenstrom 18,34 m³/min Ventilator-Leistungsaufnahme 98,26 Leistungsverhältnis 0,19 (m³/min)W Ventilator-Schallleistungspegel 63,27 dB(A) Maximale Luftgeschwindigkeit 3,09 Verbrauch im Standby 0,18 Kontaktadressen für weitere Schuss Home Electronic GmbH Informationen und Serviceline: Scheringgasse 3, A-1140 Wien Tel: +43 (1) 97 0 21 –...
-
Page 8: Garantie
Mit diesem Qualitätsprodukt von BE COOL haben Sie eine Entscheidung für Innovation, Langlebigkeit und Zuverlässigkeit getroffen. Für dieses BE COOL Gerät gewähren wir eine Garantiezeit von 2 Jahren ab Kaufdatum gültig in Österreich! Sollten in diesem Zeitraum wider Erwarten dennoch Servicearbeiten an Ihrem Gerät notwendig sein, garantieren wir Ihnen hiermit eine kostenlose Reparatur (Ersatzteile und Arbeitszeit) oder (nach Ermessen der Firma Schuss) das Produkt auszutauschen. - Page 9 PLEASE READ THIS INSTRUCTION MANUAL CAREFULLY BEFORE STARTING INSTALLATION, OPERATION OR MAINTENANCE. PROTECT YOURSELF AND OTHERS BY FOLLOWING THE SAFETY INSTRUCTIONS. FAILURE TO FOLLOW THE INSTRUCTIONS MAY LEAD TO INJURY OR DAMAGE TO PERSONS AND/OR PROPERTY AND/OR INVALIDATE THE WARRANTY! IMPORTANT INFORMATION ON SAFETY, LOCATION AND ELETRICAL CONNECTION.
-
Page 10: Declaration Of Conformity
Never cover the device. Never put fingers, pens or other items into the device and make sure that air in- and outlets are never blocked. ● Always switch the device off before pulling the power plug. Do not pull on the power cable to unplug the device. Always pull on the plug to unplug the device. -
Page 11: Part Designations
PART DESIGNATIONS Remote Receiver Control Panel Back side Front cover Fan blades Casing Base STARTUP Place the device on a level and dry surface (do not use in damp rooms) and plug it into a standard 220~240V outlet. You can adjust the fan’s functions directly on the device or using the remote control: OPERATING PANEL ON THE DEVICE REMOTE CONTROL 1. - Page 12 2. SPEED SETTING: The device is equipped with three fan heads. You can adjust every one of them individually. To set the desired speed for each fan head proceed as follows: 4. Press “FAN1”, “FAN2” and/or “FAN3”, depending on which fan head you wish to adjust.
-
Page 13: Cleaning Instructions
5. OSC Press this button to make the fan heads move from left to right and back. This yields horizontal air distribution throughout the room. Press the button again to lock the fan in the current position. CLEANING INSTRUCTIONS Caution! Let the device come to a full stop before cleaning and disconnect it from the outlet. - Page 14 Technical information Input voltage 220-240 V~ Frequency 50/-60 Hz Rated input power 105W Name Symbol Value Unit Maximum volume flow 18.34 m³/min Fan power consumption 98.26 Service value 0.19 (m³/min)W Fan sound power level 63.27 dB(A) Maximum air velocity 3.09 Consumption at standby 0.18 Contact address for further...
-
Page 15: Warranty
By purchasing a BE COOL quality product you have acquired an innovative, long lasting and reliable item. For this BE COOL device we grant a warranty of 2 years from the date of purchase, valid in Austria only. In the unlikely event that service work is required on your device in this period we warrant free repair (spare parts and labour) or (subject to Schuss’s decision) to replace the product.
Need help?
Do you have a question about the BC100TU2001F and is the answer not in the manual?
Questions and answers