Table of Contents
Advertisement
Available languages
Available languages
Quick Links
Istruzioni per l'uso
i-PAD CU-SP2
Le informazioni riportate nelle presenti Istruzioni per l'uso si applicano all'i-PAD CU-SP2.
Queste istruzioni sono soggette a variazioni. Per informazioni sulle revisioni, contattare CU
Medical Systems, Inc. o i suoi rappresentanti autorizzati.
Storico Revisioni
Edizione 3.1
Data di pubblicazione: lunedì 2 aprile 2018
N. di documento: SP2-OPM-I-03
Pubblicato da: CU Medical Systems, Inc.
Stampato nella Repubblica di Corea
Copyright
© 2018 CU Medical Systems, Inc.
È vietato riprodurre qualsiasi parte delle presenti Istruzioni per l'uso senza previa autorizzazione
di CU Medical Systems, Inc.
Direttiva sui dispositivi medici
i-PAD CU-SP2 è conforme ai requisiti previsti dalla Direttiva sui dispositivi medici 93/42/CEE e
successive revisioni.
Importante:
In caso di arresto cardiaco improvviso, è necessaria una defibrillazione veloce. Dal momento
che le possibilità di esito positivo si riducono del 7% - 10% per ogni minuto di attesa per la
defibrillazione, la defibrillazione deve essere effettuata immediatamente.
Tuttavia, la defibrillazione potrebbe non essere efficace su alcuni soggetti, anche se effettuata
immediatamente, in virtù di cause fondamentali di arresto cardiaco.
1
Advertisement
Chapters
Table of Contents

Related Manuals for CU Medical Systems i-PAD CU-SP2


Summary of Contents for CU Medical Systems i-PAD CU-SP2
- Page 1 È vietato riprodurre qualsiasi parte delle presenti Istruzioni per l’uso senza previa autorizzazione di CU Medical Systems, Inc. Direttiva sui dispositivi medici i-PAD CU-SP2 è conforme ai requisiti previsti dalla Direttiva sui dispositivi medici 93/42/CEE e successive revisioni. Importante: In caso di arresto cardiaco improvviso, è necessaria una defibrillazione veloce. Dal momento che le possibilità...
- Page 2 CU-SP2 è prodotto da: CU Medical Systems, Inc. 130-1, Donghwagongdan-ro, Munmak-eup, Wonju-si, Gangwon-do, 220-801 Repubblica di Corea Rappresentante UE autorizzato Medical Device Safety Service Schiffgraben 41, 30175 Hannover, Germania Contatti Richieste su prodotti e ordini Team internazionale CU Medical Systems, Inc.
-
Page 4: Table Of Contents
Preparazione per l’uso ......................13 3.1 Contenuto della confezione standard ....................13 3.2 Accessori chiave ............................. 14 3.3 Preparazione per l’uso ..........................15 Come utilizzare i-PAD CU-SP2 .................... 17 4.1 Schermo LCD ..............................17 4.2 Tasti funzione ..............................20 4.3 Cambio Modalità ............................. 22 4.4 Procedure di utilizzo del dispositivo ....................... - Page 5 Caricare il dispositivo ed eseguire il trattamento mediante scarica elettrica ..... 41 4.11.2 Utilizzo di Sinc_R ..........................42 4.11.3 Dopo l’utilizzo di i-PAD CU-SP2 ..................44 5.1 Manutenzione dopo ogni utilizzo ......................44 5.2 Salvataggio e trasferimento dei dati dei trattamenti ................ 45 Utilizzo del dispositivo ........................45 5.2.1...
- Page 6 Appendice ............................78 Componenti e accessori ...................... 78 A.1 Accessori standard ............................78 A.2 Accessori opzionali ............................78 Descrizione dei simboli ......................79 B.1 Defibrillatore CU-SP2 ............................79 B.2 Imballo CU-SP2 ..............................80 B.3 Accessori ................................81 B.3.1 Gruppo batterie ricaricabili ........................81 B.3.2 Gruppo batterie monouso(CUSA1103BB) ..................
-
Page 7: Introduzione
Qui di seguito, "Dispositivo" fa riferimento a [CU-SP2], "Noi" si riferisce a CU Medical Systems, Inc., "Piastre" indica le piastre a elettrodi monouso per la defibrillazione a uso pediatrico o per adulti e "Gruppo batterie"... -
Page 8: Panoramica
Panoramica Grazie per avere acquistato i-PAD CU-SP2. Il presente dispositivo può essere utilizzato in modo efficiente e sicuro per un lungo periodo di tempo dopo avere letto e acquisito familiarità con le istruzioni, gli avvisi, le precauzioni e le note riportate nelle presenti Istruzioni per l’uso prima di utilizzare il dispositivo. -
Page 9: Informazioni Sul Prodotto
In modalità manuale, l'operatore decide se il paziente necessita di una defibrillazione o meno. 1.2 Utilizzo previsto ① Modalità Semi-automatica i-PAD CU-SP2 è indicato per l’utilizzo su pazienti che mostrano sintomi di arresto cardiaco improvviso (SCA) con tutti i seguenti sintomi: Assenza di movimento e risposta se scossi ... -
Page 10: Operatori Previsti
② Modalità Manuale In questa modalità, l'utilizzo di i-PAD CU-SP2 è consentito solo a professionisti del settore medico o personale addetto al pronto soccorso adeguatamente formati in supporto vitale avanzato al soccorso cardiaco. -
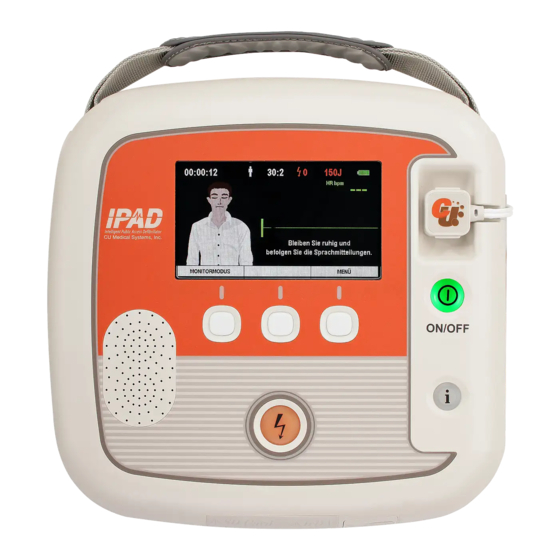
Page 11: Funzioni Del Dispositivo
2. Funzioni del dispositivo LCD grafico Connettore piastre defibrillatore Vano di immagazzinamento delle piastre i-Pulsante Pulsante Alimentazione Tasti funzione Porta IrDA Porta scheda SD Gruppo batterie Pulsante Scarica... - Page 12 Pulsante Accende o spegne il dispositivo. (Quando il dispositivo è Alimentazione acceso, è acceso un LED verde) Fornisce le informazioni seguenti attraverso una voce e uno i-Pulsante schermo LCD • Riporta l’utilizzo del dispositivo (ore totali dell’ultimo utilizzo e numero di scariche) •...
-
Page 13: Preparazione Per L'uso
3. Preparazione per l’uso 3.1 Contenuto della confezione standard Di seguito sono riportati i componenti contenuti nella confezione standard del presente dispositivo. Istruzioni per l’uso Defibrillatore esterno manuale/semi-automatico CU-SP2 1 Gruppo batterie (monouso) 1 Confezione di piastre per adulti (monouso) -
Page 14: Accessori Chiave
3.2 Accessori chiave 1 Confezione di piastre pediatriche Adattatore IrDA Scheda SD 1 Gruppo batterie (ricaricabili) CU-EM1 (Dispositivo di trasmissione ECG) Stampante Dock carica della batteria Caricabatteria... -
Page 15: Preparazione Per L'uso
Si raccomanda di tenere ricambi di gruppi batterie e piastre a portata di mano in modo da rispondere immediatamente a eventuali situazioni d'urgenza. 3.3 Preparazione per l’uso Per configurare i-PAD CU-SP2, procedere come segue. ① Aprire la confezione e verificare che contenga tutti i componenti elencati nell’elenco della confezione. - Page 16 L’utilizzo di accessori o cavi diversi da quelli indicati nelle presenti Istruzioni per l’uso potrebbe aumentare il livello di radiazioni elettromagnetiche dal dispositivo oppure ridurre l’immunità elettromagnetica dello stesso. Per i-PAD CU-SP2, utilizzare esclusivamente gli accessori e i cavi autorizzati dal produttore.
-
Page 17: Come Utilizzare I-Pad Cu-Sp2
4. Come utilizzare i-PAD CU-SP2 4.1 Schermo LCD Si illustra qui di seguito la configurazione dello schermo LCD grafico. La configurazione dello schermo può essere modificata con 'Istruzioni Grafiche'. Per maggiori dettagli su come configurare 'Istruzioni Grafiche', consultare la [Sezione 5.4: Configurazione del sistema] delle presenti Istruzioni per l’uso. - Page 18 Guida l'operatore durante l'utilizzo del dispositivo. Guida immagini Indica il tempo effettivo di utilizzo del dispositivo. Tempo di utilizzo Visualizzato quando si usa la Stampante / CU-EM1. Stampante / CU-EM1 Stampante: Stato connessione CU-EM1: Modalità Cambia a seconda della Modalità Adulto / Pediatrico del dispositivo. ...
- Page 19 Lo schermo LCD grafico illustrato nelle presenti Istruzioni per l'uso potrebbe non corrispondere allo schermo effettivamente utilizzato a seconda delle impostazioni del dispositivo. La Stampante e CU-EM1 non sono inclusi nella confezione standard. Per acquistarli, contattare il produttore mediante le indicazioni riportate in [Appendice A: Componenti e accessori] delle presenti Istruzioni per l’uso.
-
Page 20: Tasti Funzione
4.2 Tasti funzione Sono disponibili tre tasti funzione al centro di i-PAD CU-SP2, che servono ad azionare il dispositivo e la modalità menu. I tasti funzione operano in due modalità: Modalità funzionamento e Modalità menu. Se in modalità funzionamento, le funzioni dei tasti funzione sono modificate con 'Override Manuale'. - Page 21 (La 'x' fa riferimento al 'N. di respirazioni artificiali' nelle impostazioni CPR). Se premuto, il dispositivo passa in Modalità Menu. Per maggiori informazioni sulla Modalità Menu, consultare la Pulsante 3 MENU [Sezione 5.4: Configurazione del sistema] delle presenti Istruzioni per l’uso. ※...
-
Page 22: Cambio Modalità
Il pulsante 2 si attiva solo quando il dispositivo è impostato su Modalità Pediatrico. Quando 'Override manuale' è impostato su 'OFF', i tasti funzione 1 e 3 saranno disattivati dopo aver applicato le piastre al paziente. 4.3 Cambio Modalità Il cambio modalità... -
Page 23: Procedure Di Utilizzo Del Dispositivo
(ad esempio, contattare il 118 o il servizio di zona corrispondente). 2. CPR iniziale - Eseguire una rianimazione cardio-polmonare. 3. Defibrillazione iniziale – Utilizzare questo dispositivo (i-PAD CU-SP2). L’utilizzo del dispositivo può essere riassunto in 3 passaggi: Dopo avere premuto il pulsante Alimentazione, Fase 1: applicare le piastre al paziente. -
Page 24: Preparazione Alla Defibrillazione
4.5 Preparazione alla defibrillazione ① Accendere il dispositivo premendo il pulsante Alimentazione. Quando l’alimentazione passa a ON, si verificano in sequenza, i seguenti casi: Indicatore acustico: l'indicatore acustico emetterà un segnale per 1 secondo. Si avvia un'auto-verifica. Il dispositivo fornirà istruzioni vocali per chiamare i servizi medici d'emergenza e attivare la 'Modalità... - Page 25 ② Rimuovere l’abbigliamento dal torace del paziente. In caso di arresto cardiaco, il tempo è fondamentale per il paziente. Cercare, quindi, di rimuovere l'abbigliamento quanto più velocemente possibile. Strappare o tagliare l'abbigliamento per applicare le piastre immediatamente, se la rimozione dello stesso richiede troppo tempo.
- Page 26 ⑤ Facendo riferimento alle figure su entrambe le piastre, identificare attentamente i punti in cui vanno applicate le piastre. Piastre per adulti Piastre pediatriche Il materiale adesivo sulle piastre inizia a seccarsi non appena viene aperta la confezione. Utilizzare le piastre immediatamente dopo l’apertura della confezione. ...
-
Page 27: Defibrillazione In Modalità Adulto
4.6 Defibrillazione in Modalità Adulto Fase 1: applicare le piastre al paziente. ① Rimuovere la piastra 1 dalla guaina singola e applicare la piastra nella zona in alto a destra del torace sotto la clavicola del paziente, come mostrato di seguito. ②... -
Page 28: Fase 2: Premere Il Pulsante Scarica Al Momento In Cui Si Riceve L'istruzione
Fase 2: premere il Pulsante Scarica al momento in cui si riceve l’istruzione. Il dispositivo acquisisce e analizza l’ECG del paziente immediatamente dopo il collegamento. A seconda delle impostazioni del dispositivo, l'analisi automatica diventa possibile, con ANALIZZA e CARICA. Se il dispositivo è impostato su analisi automatica, lo stesso comincia automaticamente ad analizzare l'ECG non appena le piastre sono applicate al paziente. - Page 29 Se il paziente non necessita di defibrillazione, il dispositivo procederà nell’ordine seguente: il dispositivo comunica che il paziente non necessita di scarica di defibrillazione e che l’operatore può toccare il paziente. Quindi, iniziano le istruzioni vocali per la CPR. Durante la defibrillazione, non posizionare il paziente su fluidi conduttivi. Se la pelle del paziente è...
-
Page 30: Fase 3: Eseguire Una Cpr
Fase 3: eseguire una CPR. L'operatore deve immediatamente eseguire una CPR mentre viene sospeso temporaneamente il trattamento d'urgenza sul paziente. In questa fase, il dispositivo fornirà istruzioni vocali per il periodo di pausa. In caso di necessità delle istruzioni vocali per la CPR, premere i-Pulsante blu lampeggiante entro 15 secondi. - Page 31 4. Metodo di respirazione artificiale Tappare il naso del paziente come mostrato nell’immagine di seguito, appoggiare la propria bocca sulla bocca del paziente e fornire al paziente abbastanza aria da far sollevare significativamente il torace. Dopo la guida CPR, il dispositivo inizia automaticamente a rianalizzare l'ECG del paziente, secondo le impostazioni del dispositivo, oppure l'operatore può...
-
Page 32: Defibrillazione In Modalità Pediatrico
• Quando si effettua il primo soccorso durante un arresto cardiaco pediatrico, chiedere agli altri presenti di chiamare il pronto soccorso e di portare i-PAD CU-SP2 mentre si effettua la CPR pediatrica. • Poiché la maggior parte degli arresti cardiaci pediatrici sono causati da soffocamento piuttosto che da problemi cardiaci, se non è... -
Page 33: Stampante
Le stampanti non raccomandate dal produttore non sono compatibili con i-PAD CU-SP2. Accendere la stampante prima di utilizzarla. La stampante può essere collegata e utilizzata fino a 10 m di distanza da i-PAD CU-SP2. La stampante non è inclusa nella confezione standard. Per acquistarla, contattare il produttore mediante le indicazioni riportate in [Appendice A: Componenti e accessori] delle presenti Istruzioni per l’uso. -
Page 34: Modalità Monitor
La Modalità Monitor è utilizzata con il CU-EM1 (dispositivo di trasmissione ECG). In Modalità Monitor, i-PAD CU-SP2 utilizza il Bluetooth per ricevere i dati dell'ECG dal CU-EM1 e li visualizza sullo schermo LCD. In Modalità Monitor, le piastre non possono essere utilizzate e non può... - Page 35 CU-SP2. Accendere il CU-EM1 prima di utilizzarlo. Il CU-EM1 può essere collegato e utilizzato fino a 10 m di distanza da i-PAD CU-SP2. Il CU-EM1 non è incluso nella confezione standard. Per acquistarlo, contattare il produttore mediante le indicazioni riportate in [Appendice A: Componenti e accessori] delle presenti Istruzioni per l’uso.
-
Page 36: Cu-Em1 (Dispositivo Di Trasmissione Ecg)
4.10 CU-EM1 (Dispositivo di trasmissione ECG) 4.10.1 Funzioni del dispositivo Cavo di misura ECG a 3 derivazioni Indicatore livello carica batteria BASSO Indicatore alimentazione e connessione Indicatore derivazione guasta Pulsante Alimentazione Gancio per la cintura Coperchio batteria... -
Page 37: Pulsante E Indicatori
4.10.2 Pulsante e Indicatori Indicatore Descrizione Pulsante Alimentazione Questo pulsante serve per accendere e spegnere il CU-EM1. Indicatore livello carica batteria BASSO L'indicatore rosso si accende quando la batteria restante del CU-EM1 è inferiore al 10%. È necessario ricaricare la batteria quando è acceso l'indicatore livello carica batteria BASSO. -
Page 38: Come Utilizzare Il Cu-Em1
4.10.4 Come utilizzare il CU-EM1 ① Accendere il dispositivo premendo il pulsante Alimentazione. Quando l’alimentazione del CU-EM1 passa a ON, si verificano in sequenza, i seguenti casi: Indicatore acustico: L'indicatore acustico emetterà un segnale per 0,5 secondi. Indicatore di connessione: Si accende l'indicatore blu. ②... - Page 39 Per maggiori informazioni sulla carica della batteria del CU-EM1, consultare la [Sezione 6.2: Manutenzione] delle presenti Istruzioni per l’uso. Per disattivare il CU-EM1 dopo l’utilizzo, premere il pulsante Alimentazione per almeno 1 secondo. Il CU-EM1 è a prova di defibrillazione. Non deve essere scollegato dal paziente durante la defibrillazione.
-
Page 40: Modalità Manuale (Opzionale)
4.11 Modalità Manuale (opzionale) Questa funzione è installata di default se la modalità manuale è stata aggiunta al momento dell'acquisto del CU-SP2. Per utilizzare la modalità manuale, impostare la modalità del dispositivo su Modalità manuale. Per maggiori informazioni sulla configurazione della modalità manuale, consultare la [Sezione 5.4: Configurazione del sistema] delle presenti Istruzioni per l’uso. -
Page 41: Caricare Il Dispositivo Ed Eseguire Il Trattamento Mediante Scarica Elettrica
2J, 3J, 5J, 7J, 10J, 20J, 30J, 50J 4.11.2 Caricare il dispositivo ed eseguire il trattamento mediante scarica elettrica In modalità manuale, l'operatore, a propria discrezione, può caricare i-PAD CU-SP2 ed effettuare la defibrillazione. Dopo aver applicato le piastre al paziente, premere ‘CARICA’ utilizzando il tasto funzione 3 se l'ECG del paziente è... -
Page 42: Utilizzo Di Sinc_R
Se si vuole interrompere la carica, premere il pulsante 'DISARMO' utilizzando il tasto funzione 3. Se premuto, il dispositivo interrompe la carica e libera internamente l'energia di scarica. Se armato, il pulsante Scarica lampeggia in arancione per segnalare che il dispositivo è pronto per la defibrillazione. - Page 43 L'autorizzazione di utilizzo differisce da modalità a modalità del dispositivo. Modalità Manuale: questa modalità può essere utilizzata esclusivamente da professionisti del settore medico. Modalità DAE • ANALIZZA: questa modalità può essere utilizzata esclusivamente da professionisti del settore medico o personale addetto al pronto soccorso. •...
-
Page 44: Dopo L'utilizzo Di I-Pad Cu-Sp2
Eseguire un'autoverifica sulla batteria, facendo riferimento alla [Sezione 7.1: Autoverifiche] delle presenti Istruzioni per l’uso. Se il dispositivo si spegne normalmente dopo aver eseguito un'autoverifica sulla batteria, lo stato del dispositivo è normale. i-PAD CU-SP2 utilizza piastre monouso. Smaltire le piastre utilizzate e sostituirle con delle piastre nuove dopo averne controllato la data di scadenza. -
Page 45: Salvataggio E Trasferimento Dei Dati Dei Trattamenti
i-PAD CU-SP2 salva i 3 trattamenti più recenti ed è in grado di salvare fino a 17 ore per ogni evento. Se si registrano dati ECG per oltre 17 ore per ogni evento, quelli oltre le 17 ore non verranno registrati. - Page 46 ③ Quando viene premuto i-Pulsante per oltre 1 secondo in modalità standby, la modalità passa ad Amministratore fornendo istruzioni sia mediante la voce guida che sullo schermo LCD. ④ Quindi, il dispositivo fornisce un riepilogo (ore totali dell’ultimo utilizzo del dispositivo e numero di scariche di defibrillazione emesse) dell'utilizzo del dispositivo sullo schermo LCD.
- Page 47 2. Trasferimento dei dati mediante IrDA I dati possono essere trasferiti sul PC tramite l'apposito software (CU Expert Ver.3.70 o superiore), fornito dal produttore. [CU Expert] è un software per PC comprendente funzioni di revisione e stampa dell'ECG. ① Posizionare l’adattatore IrDA di fronte alla porta IrDA sul dispositivo, come mostrato nella figura seguente.
- Page 48 ② Sono disponibili al massimo i dati di 3 trattamenti. I dati del primo trattamento sono i più recenti. ③ Premere il pulsante Scarica per modificare l'ordine di trasferimento dei dati come segue: dati 1° trattamento dati 2° trattamento dati 3° trattamento dati 1° trattamento .. ④...
-
Page 49: Revisione Dati
5.3 Revisione dati Se non è stato inserito il connettore delle piastre del defibrillatore o se le piastre non sono state ancora applicate al paziente, è possibile premere il tasto funzione 3 sul dispositivo per passare alla Modalità Menu. In Modalità Menu, è possibile controllare facilmente le impostazioni del dispositivo e i dati dei trattamenti salvati nel dispositivo. -
Page 50: Revisione Evento
⑤ Selezionare il metodo di revisione. Le opzioni sono 'Revisione Evento', 'ECG', 'Stampa Segmento' e 'Stampa Tutto'. • Revisione Evento: visualizza la lista di eventi salvati sul dispositivo. • ECG: visualizza i dati ECG salvati sul dispositivo. • Stampa Segmento: l'operatore seleziona e stampa il segmento da rivedere. •... -
Page 51: Ecg
5.3.2 ECG È possibile controllare gli ECG salvati nella memoria interna del dispositivo. Selezionare 'ECG' per riprodurre gli ECG salvati. È possibile premere il pulsante pausa al centro per interrompere la riproduzione. Una volta interrotta, è possibile passare alla pagina successiva o precedente, servendosi dei tasti freccia sinistra/destra. -
Page 52: Stampa Tutto
Una volta collegata, la stampante stamperà la lista eventi e l'ECG del segmento selezionato. Premere i-Pulsante per interrompere la stampa. 5.3.4 Stampa Tutto Selezionare 'Stampa Tutto' per collegarsi direttamente alla stampante. Una volta collegato, il dispositivo stamperà tutti gli eventi salvati e gli ECG. Premere i-Pulsante per interrompere la stampa. -
Page 53: Configurazione Del Sistema
5.4 Configurazione del sistema In i-PAD CU-SP2, è possibile impostare il funzionamento del dispositivo e la guida CPR in Modalità Menu. Se non è stato inserito il connettore delle piastre del defibrillatore o se le piastre non sono state ancora applicate al paziente, è possibile premere il tasto funzione 3 sul dispositivo per passare alla Modalità... -
Page 54: Impostare Il Funzionamento Del Dispositivo
La seconda scheda visualizza i dati dei trattamenti salvati sul dispositivo. Per maggiori informazioni su 'REVISIONE DATI' nella seconda scheda, consultare la [Sezione 5.3: Revisione Dati] delle presenti Istruzioni per l’uso. La terza scheda serve a uscire dalla Modalità Menu. ... - Page 55 La configurazione di Modalità Dispositivo è un'opzione aggiuntiva. Questa funzione non è installata di default se la modalità manuale non è stata aggiunta al momento dell'acquisto del CU-SP2. Per acquistare l'opzione Modalità Dispositivo, contattare il produttore mediante le indicazioni riportate in [Appendice A.3: Centro Assistenza] delle presenti Istruzioni per l’uso. ...
- Page 56 Modalità Adulto/Pediatrico • Adulto: Il dispositivo funziona in Modalità Adulto. In caso di paziente pediatrico, collegando il dispositivo al connettore delle piastre pediatriche, il dispositivo passa automaticamente in Modalità Pediatrico. • Pediatrico: Il dispositivo funziona in Modalità Pediatrico. Se impostato su Modalità Pediatrico, il dispositivo manterrà...
- Page 57 Data e Ora • imposta la data e l'ora del CU-SP2. Dispositivo Esterno Questa impostazione associa il CU-SP2 alla stampante e al CU-EM1 (dispositivo di trasmissione ECG). ③Selezionando 'Dispositivo Esterno' si visualizza 'Stampante' e 'CU-EM1' sul lato sinistro dello schermo. I numeri di serie dei dispositivi al momento collegati al CU-SP2 sono visualizzati a destra.
- Page 58 Se non viene trovato nessun dispositivo, il CU-SP2 visualizzerà il seguente messaggio per 3 secondi e ritornerà alla pagina precedente. Controllare e selezionare un dispositivo dalla lista da associare al CU-SP2. Una volta selezionato, il CU-SP2 proverà la connessione con il dispositivo selezionato. Al termine di questa prova, il CU-SP2 salverà...
- Page 59 Il CU-SP2 può comunicare solo con i dispositivi raccomandati dal produttore. Prima di associare il CU-SP2 a un dispositivo esterno (Stampante, CU-EM1), accendere il dispositivo da collegare. Quando il CU-SP2 è associato a un dispositivo esterno, quest'ultimo funzionerà come segue: •...
- Page 60 ② Nuova Password ③ Conferma Password Impostazione della modalità di sicurezza (ON/OFF)
- Page 61 [Config. sistema] Opzione Predefinita Valore impostato Predefinito Modalità DAE Modalità Dispositivo Modalità DAE Modalità Manuale Analizza Override manuale Carica Adulto, Modalità Adulto/Pediatrico Adulto Pediatrico Fissa 150J, Fissa 200J, Energia Scarica In aumento (150J-200J), Fissa 150J In aumento (150 - 150 - 200 5mm/mV, 10mm/mV, Guadagno ECG...
-
Page 62: Configurare La Guida Cpr
5.4.3 Configurare la Guida CPR Il CU-SP2 è conforme alle linee guida emesse dalla Corea nel 2011 in materia di CPR raccomandate dalla Korean Association of Cardiopulmonary Resuscitation (KACPR) e alle lineeguida 2010 in materia di CPR raccomandate dalla American Heart Association (AHA). La CPR di default è... - Page 63 Il CP-SP2 non fornisce la Guida Dettagliata sulla compressione toracica e la respirazione artificiale durante la CPR di default. Per ricevere la Guida Dettagliata, impostare Guida Dettagliata su 'ON'. Una volta impostato Guida Dettagliata su 'ON', il dispositivo fornisce istruzioni vocali dettagliati sulla CPR.
-
Page 64: Manutenzione
6. Manutenzione 6.1 Immagazzinamento del dispositivo Consultare le precauzioni fornite qui di seguito per l'immagazzinamento del dispositivo. Non conservare il dispositivo in aree sottoposte a forti sbalzi di temperatura. • Ambiente di immagazzinamento Il dispositivo è collegato alle piastre e al gruppo batteria ed è pronto per essere immediatamente utilizzato in caso di emergenza. -
Page 65: Manutenzione
6.2 Manutenzione 6.2.1 Ispezione del dispositivo Il dispositivo è in grado di eseguire un'autoverifica. Il dispositivo effettua tale autoverifica non appena viene inserita la batteria, si disattiva automaticamente al termine della stessa e si riattiva regolarmente per eseguire l'autoverifica. Se l'operatore intende avviare l'autoverifica, deve rimuovere la batteria e reinserirla. - Page 66 Come sostituire il gruppo batterie 1. Rimuovere il gruppo batterie esausto estraendolo premendo contemporaneamente il blocco alla base del dispositivo. Consultare l’immagine seguente. 2. Inserire un nuovo gruppo batterie nella direzione della freccia con l’etichetta rivolta verso l’alto, come illustrato nell’immagine seguente. 3.
- Page 67 Come ricaricare il gruppo batterie Le batterie ricaricabili con un livello basso di carica possono essere riutilizzate dopo la ricarica. È possibile ricaricare la batteria utilizzando caricabatterie e la base di ricarica forniti dal produttore. Leggere attentamente il manuale del caricabatteria prima di utilizzarlo. ...
- Page 68 ③ Carica della batteria del CU-EM1 Le batterie ricaricabili con un livello basso di carica possono essere riutilizzate dopo la ricarica. È possibile ricaricare la batteria utilizzando caricabatterie e la base di ricarica forniti dal produttore. Il LED rosso si accende sul caricabatteria durante la carica e il LED verde si accende quando la carica è...
- Page 69 Precauzioni sull'utilizzo del gruppo batterie • Non sottoporre a forti urti, non smontare né danneggiare il dispositivo. • Non conservare il dispositivo vicino oggetti caldi come gli apparecchi di riscaldamento. • Non tenere il gruppo batterie vicino a oggetti metallici. Si potrebbe verificare un cortocircuito. •...
-
Page 70: Sostituzione Delle Piastre
6.2.3 Sostituzione delle piastre È vietato utilizzare piastre scadute. Controllare che la confezione delle piastre non presenti danni. Utilizzare esclusivamente le piastre fornite dal produttore. Come sostituire le piastre 1. Controllare la data di scadenza delle piastre. Consultare l’immagine seguente per verificare la data di scadenza. -
Page 71: Pulizia Di I-Pad Cu-Sp2
Consultare l’immagine seguente. 6.2.4 Pulizia di i-PAD CU-SP2 Pulire sempre il dispositivo e gli accessori con un panno morbido. Per pulire la parte esterna del dispositivo, è possibile utilizzare i seguenti detergenti: •... -
Page 72: Risoluzione Dei Problemi
7. Risoluzione dei problemi 7.1 Autoverifiche Sono disponibili vari tipi di autoverifica. Ogni autoverifica esamina diverse voci. Per maggiori dettagli, consultare la tabella di seguito. Tipo di Descrizione autoverifica Eseguire l'autoverifica della batteria da inserire nel gruppo batterie nei seguenti casi: •... - Page 73 In caso di autoverifica non riuscita e se la defibrillazione non può essere effettuata, il dispositivo indicherà all’operatore di utilizzare un defibrillatore sostitutivo e avvierà le istruzioni vocali per la CPR. Per saperne di più sull’errore, premere innanzitutto il pulsante Alimentazione per spegnere il dispositivo.
-
Page 74: Stato Del Dispositivo
7.2 Stato del dispositivo Il dispositivo indica all'operatore il proprio stato nei seguenti modi: Indicatore Descrizione Osservazioni Il dispositivo ha rilevato un errore (ad es. i-Pulsante: luce rossa livello di carica basso). Premere i-Pulsante per individuare lampeggiante l'errore. Il dispositivo è pronto per somministrare Pulsante Scarica: una scarica elettrica. -
Page 75: Risoluzione Dei Problemi
7.3 Risoluzione dei problemi Il dispositivo indica il proprio stato corrente o la presenza di problemi mediante indicatori di stato, segnalazioni acustiche e/o istruzioni vocali. Per maggiori dettagli, consultare di seguito: Sintomo/Istruzioni Vocali Causa Risoluzione Avviso vocale: “Livello della batteria basso”, Sostituire la batteria con Livello batteria basso. -
Page 76: Assistenza Per Il Dispositivo
Distributore Persona incaricata Il presente dispositivo è garantito da CU Medical Systems, Inc. da difetti di materiali e manodopera per cinque anni completi a partire dalla data di acquisto originale. Durante il periodo di garanzia, il produttore riparerà o, a propria scelta, sostituirà, senza alcun addebito,... - Page 77 L'assistenza su i-PAD CU-SP2 deve essere effettuata solo da personale autorizzato. i-PAD CU-SP2 verrà sottoposto ad assistenza gratuita durante il periodo di garanzia. Dopo la scadenza del periodo di garanzia, il costo del materiale e della manodopera sarà a carico dell’utente.
-
Page 78: Appendice
Appendice A. Componenti e accessori Per ordinare componenti e accessori di ricambio, indicare il componente e i numeri d’ordine forniti nella tabella seguente. A.1 Accessori standard Numero d’ordine Nome Numero componente Piastre di defibrillazione per adulti CUA1007S (monouso) Gruppo batterie monouso (lunga CUSA1103BB durata) Istruzioni per l’uso... -
Page 79: Descrizione Dei Simboli
B. Descrizione dei simboli B.1 Defibrillatore CU-SP2 Simbolo Descrizione Pulsante Alimentazione (ON/OFF) i-Pulsante Pulsante Scarica Attenzione: consultare i documenti pertinenti. Protetto contro la polvere, ingresso limitato (nessun deposito nocivo) Protetto contro getti d'acqua a bassa pressione da tutte le direzioni - ingresso limitato Tipo BF, attrezzatura a prova di defibrillazione Consultare il manuale/libretto di istruzioni Marchio CE: soddisfa i requisiti della Direttiva europea di... -
Page 80: Imballo Cu-Sp2
B.2 Imballo CU-SP2 Simbolo Descrizione N. pila (fino a 6) Carico verso l'alto Evitare luoghi umidi Fragile Non sollevare mediante ganci Limiti di temperatura: Immagazzinare a una temperatura compresa tra 0℃ e 43℃. Riciclabile Rappresentante UE autorizzato Marchio CE: soddisfa i requisiti della Direttiva europea di pertinenza Numero di Serie Data di fabbricazione Produttore... -
Page 81: Accessori
B.3 Accessori B.3.1 Gruppo batterie ricaricabili Simbolo Descrizione Batteria agli ioni di litio Numero di LOTTO Data di fabbricazione Produttore Non distruggere né esercitare pressione sulla batteria. Non smaltire la batteria in maniera indiscriminata. Smaltirla conformemente alle normative locali. Consultare i documenti pertinenti. Avvertenze generali Avvertenze;... - Page 82 B.3.2 Gruppo batterie monouso(CUSA1103BB) Simbolo Descrizione Batteria al litio biossido di manganese Numero di LOTTO Data di fabbricazione Produttore Non distruggere né esercitare pressione sulla batteria. Non smaltire la batteria in maniera indiscriminata. Smaltirla conformemente alle normative locali. Consultare i documenti pertinenti. Avvertenze generali Avvertenze;...
-
Page 83: Piastre
B.3.3 Piastre Simbolo Descrizione Limiti di temperatura: Immagazzinare a una temperatura compresa tra 0℃ e 43℃. Numero di LOTTO Data di scadenza Numero d’ordine di riferimento Monouso (non riutilizzarle) Non piegare né distruggere il prodotto. Non contiene lattice Data di scadenza Attenzione: consultare i documenti pertinenti. -
Page 84: Glossario
C. Glossario 1 CPR 1 CPR si compone di 5 cicli. (quando il dispositivo è impostato su 5 cicli in modo predefinito). 1 Ciclo Si riferisce a 30 compressioni toraciche seguite da 2 respirazioni durante la CPR. (quando il dispositivo è impostato in modo predefinito su [30:2]). - Page 85 Paziente con Paziente con sintomi di arresto cardiaco. Il presente dispositivo arresto cardiaco deve essere utilizzato su pazienti che presentino i seguenti sintomi: nessuna risposta, nessun movimento e respirazione anomala. Porta di Porta che invia e riceve i dati tra il dispositivo e il PC. comunicazione L’umidità...
- Page 86 Scaricamento i-PAD CU-SP2 scarica la carica nel relativo capacitore di interno (disarmo) defibrillazione in una carica interna se non si preme il pulsante Scarica o se il dispositivo stabilisce che il paziente non necessita di scosse elettriche in quanto il suo ECG è...
- Page 87 Piastra 1 Piastra posizionata sotto la clavicola destra. Consultare l’immagine sulla piastra. (la posizione potrebbe essere scambiata con la piastra 2). Piastra 2 Piastra posizionata sulle costole, nella parte inferiore sinistra del torace del paziente, sotto l'ascella. Fare riferimento all’immagine sulle piastre (la posizione potrebbe essere cambiata con la piastra 1).
- Page 88 Modalità Standby La modalità in cui l'alimentazione del dispositivo è OFF ma il dispositivo esegue autoverifiche periodiche per garantire che il dispositivo sia sempre pronto se dovessero verificarsi delle emergenze. Fa riferimento a CU Medical Systems, Inc.
-
Page 89: Specifiche Del Dispositivo
D. Specifiche del dispositivo Nome modello: CU-SP2 Parte esterna del prodotto Categoria Specifiche generali 260 ㎜ x 256 ㎜ x 69,5 ㎜ (larghezza x lunghezza x altezza) Dimensioni 2,4 ㎏ (incluso il gruppo batterie e le piastre) Peso Condizioni ambientali Categoria Specifiche generali Ambiente di utilizzo (Il dispositivo può... - Page 90 Defibrillatore Categoria Specifiche generali Tipo di Defibrillatore esterno a duplice modalità (manuale/semi-automatica) funzionamento Tipo di output e-cube bifasico (tipo esponenziale troncato) Modalità DAE Energia in uscita • 150J±4J, 200J±6J di carico per adulti (50 Ω) • 50J±2J di carica per bambini (50 Ω) ...
- Page 91 ° impostato sull'output di energia massimo, 16 scarica secondi, tipica di scossa elettrica da un gruppo batterie nuovo completamente carico Istruzioni vocali (Premere il pulsante arancione che lampeggia). Indicatore di Pulsante Scarica lampeggiante armamento: Indicatore acustico Almeno 6 secondi dal completamento della CPR all’emissione della Tempo dalla fine della CPR alla trasmissione scossa...
- Page 92 tempo(ms) Tipo esponenziale troncato bifasico La forma della forma d'onda è regolata automaticamente in base all’impedenza di defibrillazione del paziente. Nel grafico, A è la durata della prima fase della forma d'onda, B è la durata della seconda fase, C è l'intervallo tra le fasi (500μs) e D è la corrente di picco. Forma d’onda in uscita per adulti (200 Joule) Intervallo Intervallo...
- Page 93 Forma d’onda in uscita per adulti (150 Joule) Intervallo Intervallo Impedenza Corrente Energia Precisione prima fase seconda fase del paziente di picco Scarica energia (millisecondi, (millisecondi, (Ohm, Ω) (Joule, J) (Joule, J) 64,5 147,8 150 (±15%) 32,7 149,7 150 (±15%) 22,5 151,5 150 (±15%)
- Page 94 Precisione ECG Categoria Specifiche generali Percorso di Lead II acquisizione ECG Frequenza di risposta 1 Hz ~ 30 Hz Sistema di analisi ECG Categoria Specifiche generali Funzione Analizza se i ritmi di impedenza del paziente e l'ECG richiedono una defibrillazione 25Ω...
- Page 95 Sistema di analisi dell’ECG - Verifica del database dell’ECG Limite di Dimens Decisione Classe Dimensione affidabilità Scopo della ione Decision di non Prestazione di ritmo Ritmi campione inferiore prestazione campio e scarica applicare osservata test minimo unilaterale del ne test la scarica 97,26% Sensibilità...
- Page 96 Dispositivi di controllo, Indicatori, Istruzioni vocali Categoria Specifiche generali Dispositivi di Pulsante Alimentazione, i-Pulsante, Pulsante Scarica, 3 Tasti controllo funzione LCD grafico Visualizza lo stato di funzionamento del dispositivo e le istruzioni Pulsante Scarica: lampeggia in arancione quando il defibrillatore è Indicatori carico ed è...
- Page 97 Durata in standby (dopo Se immagazzinamento e gestione sono effettuati l’inserimento della batteria) conformemente alle istruzioni contenute nel documento: Almeno 2 anni dalla data di installazione in i-PAD CU-SP2 Ambiente di utilizzo Intervalli di temperatura per immagazzinamento e Temperatura: 0°C ~ 40°C ...
- Page 98 Piastre per la defibrillazione per adulti Categoria Specifiche generali Tipo Adulto Dimensioni piastra 110 cm ± 10% 120cm ± 5cm Lunghezza del cavo Durata a magazzino delle Al massimo 36 mesi dalla data di produzione piastre Il materiale di contatto del paziente rispetta gli standard ISO Biocompatibilità...
- Page 99 dispositivo attraverso il software per PC (CU-Expert). Bluetooth Bluethooth 2.1 + EDR, modulo classe 2 Intervallo della frequenza di funzionamento: 2402 – 2480 Modulazione: GFSK, π/4 DQPSK, 8DPSK Utilizza il Bluetooth per comunicare con la Stampante o il CU-EM1 (dispositivo di trasmissione ECG) Velocità...
- Page 100 Durata in standby (dopo Se immagazzinamento e gestione sono effettuati l’inserimento della batteria) conformemente alle istruzioni contenute nel documento: almeno 6 mesi dalla data di installazione in i-PAD CU-SP2 Ambiente di utilizzo Intervalli di temperatura per immagazzinamento e Temperatura:0°C ~ 40°C ...
-
Page 101: Compatibilità Elettromagnetica
E. Compatibilità elettromagnetica Guida e dichiarazione del produttore - emissioni elettromagnetiche i-PAD CU-SP2 è previsto per l’uso nell’ambiente elettromagnetico di seguito specificato. L’acquirente o l’utente di i-PAD CU-SP2 deve accertarsi che venga usato in tale ambiente. Standard di base EMC o Fenomeno Livello di conformità... - Page 102 Immunità Non utilizzare i-PAD CU-SP2 in posizione adiacente o accatastato con altre apparecchiature. Se l’utilizzo in posizione adiacente o accatastata è necessario, sarà necessario tenere sotto controllo i-PAD CU-SP2 per verificarne il normale funzionamento nella configurazione in cui verrà utilizzato.
- Page 103 Instructions for Use i-PAD CU-SP2 The information in these Instructions for Use applies to the i-PAD CU-SP2. This information is subject to change. Please contact CU Medical Systems, Inc. or its authorized representatives for information on revisions. Revision History Edition 3.1 Publication Date: April 2, 2018 Document No.: SP2-OPM-E-03...
- Page 104 The i-PAD CU-SP2 is manufactured by: CU Medical Systems, Inc. 130-1, Donghwagongdan-ro, Munmak-eup, Wonju-si, Gangwon-do, 220-801 Republic of Korea Authorized EU Representative Medical Device Safety Service Schiffgraben 41, 30175 Hannover, Germany Contact Us Product and Order Inquiries Overseas Sales Team CU Medical Systems, Inc.
- Page 106 3.1 S TANDARD ACKAGE ONTENTS ............................14 3.2 K CCESSORIES ........................... 15 3.3 P REPARATION FOR HOW TO USE THE I-PAD CU-SP2 ..................17 ..............................17 4.1 LCD S CREEN ................................. 20 4.2 S ..............................22 4.3 M HANGE ......................23 4.4 P...
- Page 107 4.11.1 Changing the Energy Value ....... 41 4.11.2 Charging the Device and Administering Electric Shock Treatment ............................42 4.11.3 Using R-Sync AFTER USING THE I-PAD CU-SP2 ..................44 ......................... 44 5.1 M AINTENANCE FTER ..................45 5.2 S AVING AND...
- Page 108 ..........................78 A.1 S TANDARD CCESSORIES ........................... 78 A.2 O PTIONAL CCESSORIES DESCRIPTION OF SYMBOLS ....................79 ........................... 79 B.1 CU-SP2 D EFIBRILLATOR ............................80 B.2 CU-SP2 P ACKAGING ............................... 81 B.3 A CCESSORIES ........................81 B.3.1 Rechargeable Battery Pack ..................
-
Page 109: Introduction
The company or its authorized distributor is not responsible for any injury incurred by the user or patient due to any apparent negligence or improper use by the user. Hereinafter, "Device" refers to [CU-SP2], "We" or “Us" refers to CU Medical Systems, Inc., "Pads" refers to disposable defibrillation electrode pads for adult or pediatric modes, and "Battery Pack"... -
Page 110: Overview
Overview Thank you for purchasing the i-PAD CU-SP2. This device can be effectively and safely used for a long period if you familiarize yourself with the instructions, warnings, precautions, and notices contained in these Instructions for Use prior to its use. -
Page 111: Product Information
In manual mode, the user determines whether the patient needs a defibrillation shock or not. 1.2 Indicated Use ① Semi-Automated Mode The i-PAD CU-SP2 is indicated for use on patients that are exhibiting the symptoms of sudden cardiac arrest (SCA) with all of the following signs: No movement and no response when shaken ... -
Page 112: Intended Users
CPR or the use of the defibrillator for quick and systematic emergency treatment. ② Manual Mode In this mode, the i-PAD CU-SP2 is intended for use by health care professionals and emergency rescue personnel who have been trained in advanced cardiac life support. 1.4 Additional Information Please contact CU Medical Systems, Inc. -
Page 113: Device Features
2. Device Features Graphic LCD Defibrillator Pads Connector Pads Storage Compartment i-Button Power Button Soft Keys IrDA Port SD Card Port Battery Pack Shock Button... - Page 114 Turns the device on or off. (When the device is on, a green Power Button LED backlight is lit.) Provides the following information by voice and LCD screen i-Button • Reports device usage (the total hours of the last usage and number of shocks) •...
-
Page 115: Preparation For Use
3. Preparation for Use 3.1 Standard Package Contents The following are the standard package contents of this device. CU-SP2 Semi-automated / Manual Instructions for Use External Defibrillator 1 Pack of Adult Pads (Disposable) 1 Battery Pack (Disposable) -
Page 116: Key Accessories
3.2 Key Accessories 1 Pack of Pediatric Pads IrDA Adapter SD Card 1 Battery Pack (Rechargeable) CU-EM1 (ECG Transmission Device) Printer Battery Charge Dock Battery Charger... -
Page 117: Preparation For Use
Please keep spare pads and battery packs handy to quickly respond to emergency situations. 3.3 Preparation for Use Do the following to set up the i-PAD CU-SP2. ① Open the package and verify that it contains all the items listed in the packing list. - Page 118 Only accessories and cables that are authorized by the manufacturer should be used with the i-PAD CU-SP2. When the product is used for asynchronous defibrillation treatment in Manual mode, do not use it on patients who show any of the following symptoms: - responsiveness, normal movement, normal breathing and detectable pulse.
-
Page 119: How To Use The I-Pad Cu-Sp2
4. How to Use the i-PAD CU-SP2 4.1 LCD Screen The configuration of the Graphic LCD Screen is as shown below. The screen configuration can be changed according to the 'Graphic Instruction'. For detailed instructions on setting the 'Graphic Instruction', please refer to [Section 5.4: Device Setup] of these Instructions for Use. - Page 120 Guides the user in operating the device. Image Guide Operation Time Displays the actual operation time of the device. Printer / CU-EM1 Displayed when using the Printer / CU-EM1. Printer: Connection Status CU-EM1: Adult / Pediatric Mode Changes based on the Adult / Pediatric Mode of the device. ...
- Page 121 The Graphic LCD Screen illustrated in these Instructions for Use may not match the actual screen during operation depending on the device settings. The Printer and CU-EM1 are not a part of the standard package contents. If you want to purchase them, please contact us by referring to [Appendix A: Parts and Accessories] of these Instructions for Use.
-
Page 122: Soft Keys
4.2 Soft Keys There are three Soft Keys in the center of the i-PAD CU-SP2, which operate the device and the menu mode. The Soft Keys operate in two modes: Operation Mode and Menu Mode. When in Operation Mode, the functions of the Soft Keys are changed according to the 'Manual Override'. - Page 123 (The 'x' refers to the 'No. of Artificial Respirations' under the CPR setting.) When pressed, the device will enter the Menu Mode. Button 3 MENU For further details on the Menu Mode, please refer to [Section 5.4: Device Setup] in these Instructions for Use. ※...
-
Page 124: Mode Change
Button 2 is activated only when the device is set to Pediatric Mode. When 'Manual Override' is set to 'OFF', Soft Keys 1 and 3 will be deactivated after attaching the pads on the patient. 4.3 Mode Change The operation mode change is accomplished by pressing the i-button while the device is on. -
Page 125: Procedure For Using The Device
(e.g. call 911 or the equivalent service in your locality). 2. Early CPR – Perform CPR. 3. Early defibrillation – Use this device (i-PAD CU-SP2). Using this device can be summarized in 3 steps: After pressing the Power Button, Step 1: Place pads on the patient. -
Page 126: Reparation For Efibrillation
4.5 Preparation for Defibrillation ① Turn the device on by pressing the Power Button. When the power turns ON the following occurs in sequence: Beeper: The beeper will beep for 1 second. A self-test will be initiated. The device will give voice instructions to call emergency medical services and on the 'Adult / Pediatric Mode'. - Page 127 ② Remove clothes from patient's chest. Time is essential for the cardiac arrest patient. Thus, time should not be wasted in completely removing their clothes. Tear or cut clothes to attach the pads as soon as possible, if removing them will take too much time.
- Page 128 ⑤ Refer to the pictures on both pads and accurately identify the locations where the pads will be attached. Adult Pads Pediatric Pads The adhesive material on the pads starts to dry out as soon as the package is opened. Use immediately after opening.
-
Page 129: Efibrillation In Dult Ode
4.6 Defibrillation in Adult Mode Step 1: Place pads on the patient. ① Remove pad 1 from the single liner and stick the pad to the patient’s upper right chest below the collarbone as shown below. ② Remove pad 2 from the single liner and stick the pad to the patient's left side torso in line with the armpit as shown below. -
Page 130: Step 2: Press The Shock Button When Instructed
Step 2: Press the Shock Button when instructed. The device acquires and analyzes the patient's ECG immediately after being connected. According to the device settings, automatic analysis will become available, along with ANALYZE and CHARGE. If the device is set to automatic analysis, the device will automatically start analyzing the ECG as soon as the pads are attached to the patient. - Page 131 If the patient does not need defibrillation, the device will do the following in sequence: The device announces that the patient does not need a defibrillating shock and that you may touch the patient. Then the voice instruction for CPR starts. ...
-
Page 132: Step 3: Perform Cpr
Step 3: Perform CPR. The user must immediately perform CPR while temporarily suspending emergency treatment on the patient. During this step, the device will give voice instructions for the pause period. When voice instruction for CPR is needed, press the flashing blue i-Button within 15 seconds. For further details on CPR, please refer to the [CPR Method] below. - Page 133 4. Artificial Respiration Method Pinch the patient's nose as shown in the figure below, place your mouth over the patient’s mouth, and blow in sufficient air to make the chest rise significantly. After the CPR Guidance, the device automatically starts reanalysis of the patient's ECG according to the device settings, or the user can press 'ANALYZE' button to start the reanalysis.
-
Page 134: Defibrillation In Pediatric Mode
• When giving first aid during a pediatric cardiac arrest, ask others to call the emergency medical center and to bring an i-PAD CU-SP2 while you are performing pediatric CPR. • Since most pediatric cardiac arrests are caused by suffocation rather than heart failure, when there is no one else around, perform CPR for 1 to 2 minutes, call the emergency medical services, and then get an i-PAD CU-SP2. -
Page 135: Printer
When a paired printer is turned on while administering defibrillation on the patient, ECG and event analysis from the point of the ECG analysis to the defibrillation will be printed. Printers not designated by the manufacturer are not compatible with the i-PAD CU-SP2. Turn on the printer prior to use. -
Page 136: Monitor Mode
Monitor Mode is used in connection with the CU-EM1 (ECG transmission device). In Monitor Mode, the i-PAD CU-SP2 uses Bluetooth to receive ECG data from the CU-EM1 and displays it on the LCD Screen. When using Monitor Mode, the pads cannot be used and defibrillation cannot be performed. - Page 137 The CU-EM1 can be connected and used with up to 10m of open space between the CU-EM1 and the i-PAD CU-SP2. The CU-EM1 is not a part of the standard package contents. If you want to purchase the CU- EM1, please contact us by referring to [Appendix A: Parts and Accessories] of these Instructions for Use.
-
Page 138: Cu-Em1
4.10 CU-EM1 (ECG Transmission Device) 4.10.1 Device Features 3-Lead ECG Measurement Cable LOW Battery Indicator Power and Connection Indicator Lead-Fault Indicator Power Button Belt Clip Battery Cover... -
Page 139: Button And Indicators
4.10.2 Button and Indicators Indicator Description Power Button This button turns the CU-EM1 on and off. LOW Battery Indicator The red indicator will light when the remaining battery of the CU-EM1 falls below 10%. You need to recharge the battery when the LOW Battery Indicator is on. Power and Connection Indicator The blue indicator will light when the CU-EM1 is turned on. -
Page 140: How To Use The Cu-Em1
4.10.4 How to Use the CU-EM1 ① Turn the device on by pressing the Power Button. When the power of the CU-EM1 is turned ON, the following occurs in sequence: Beeper: The beeper will beep for 0.5 seconds. Connection Indicator: The blue indicator will light. ②... - Page 141 For further details on charging the battery of the CU-EM1, please refer to [Section 6.2: Maintenance] of these Instructions for Use. In order to turn the CU-EM1 off after use, press the Power Button for at least 1 second. ...
-
Page 142: Manual Mode
4.11 Manual Mode (Optional) This function will be installed by default if manual mode has been optionally added upon purchasing the CU-SP2. To use the manual mode, you must set the device mode to Manual Mode. For further details on setting the manual mode, please refer to [Section 5.4: Device Setup] in these Instructions for Use. -
Page 143: Charging The Device And Administering Electric Shock Treatment
2J, 3J, 5J, 7J, 10J, 20J, 30J, 50J 4.11.2 Charging the Device and Administering Electric Shock Treatment In manual mode, the user may, in his/her own discretion, charge the i-PAD CU-SP2 and administer defibrillation. After attaching the pads on the patient, press ‘CHARGE’ using Soft Key 3 if the patient’s ECG is shockable. -
Page 144: Using R-Sync
If you want to stop charging, press the 'DISARM' button using Soft Key 3. When pressed, the device will cease charging and dump the shock energy internally. When armed, the Shock Button will flash in orange to signal readiness for defibrillation. At this time, you can administer defibrillation by pressing the Shock Button. - Page 145 The usage authority differs for each device mode. Manual Mode: Only medical professionals may use this mode. AED Mode • ANALYZE: Only licensed emergency medical technicians or medical professionals may use this mode. • CHARGE: Only medical professionals may use this mode. •...
-
Page 146: After Using The I-Pad Cu-Sp2
Use. If the device shuts down normally after running a self-test on the battery, the device status is normal. The i-PAD CU-SP2 uses disposable pads. Dispose of the used pads and replace them with new pads after checking their expiration date. For further details on replacing the pads, please refer to [Section 6.2.2: Replacing the Pads] in these Instructions for Use. -
Page 147: Saving And Transferring Treatment Data
(PC) and is not erased even if the device is turned off. The i-PAD CU-SP2 saves the 3 most recent treatments and is able to save up to 17 hours for each event. If more than 17 hours of ECG data are recorded for one event, any ECG data over 17 hours will not be recorded. - Page 148 ③ If the i-Button is pressed for more than 1 second in standby mode, the device will switch to Administration Mode and give instructions by voice and LCD Screen. ④ The device displays the summary (the total hours of the last device usage and the number of defibrillation shocks delivered) of the device usage on the LCD Screen.
- Page 149 2. Transferring Data via IrDA The data may be transferred to the PC by using the PC software (CU Expert Ver.3.70 or higher), which is provided by the manufacturer. [CU Expert] is a PC software that includes ECG review and printing functions. ①...
- Page 150 ② There are at most 3 treatment data. The first treatment data is the most recent. ③ Press the Shock Button to change the transfer order of the treatment data as follows: 1st treatment data 2nd treatment data 3rd treatment data 1st treatment data .. ④...
-
Page 151: Data Review
5.3 Data Review If the Defibrillator Pads Connector has not been inserted or the pads have not yet been attached to the patient, you can press Soft Key 3 on the device to enter Menu Mode. In Menu Mode, you can easily check the device setup and the treatment data saved on the device. ①... -
Page 152: Event Review
⑤ Select the review method. The options are 'Event Review', 'ECG', 'Partial Print', and 'Print All'. • Event Review: Displays the list of events saved on the device. • ECG: Displays the ECG data saved on the device. • Partial Print: The user selects and prints the segment to review. •... -
Page 153: Ecg
5.3.2 ECG You can check the ECG saved in the internal memory of the device. Select 'ECG' to play the saved ECG. You can press the pause button in the center to stop playing. After stopping, you can move to the next or previous page by using the Left/Right arrow buttons. Press the i-Button to exit 'ECG'. -
Page 154: Print All
Once connected, the printer will print the ECG and event list of the selected segment. Press the i-Button to stop printing. 5.3.4 Print All Select 'Print All' to directly connect to the printer. When connected, the device will print all saved events and ECGs. -
Page 155: Device Setup
5.4 Device Setup In i-PAD CU-SP2, you can set the operation of the device and the CPR Guidance under Menu Mode. If the Defibrillator Pads Connector has not been inserted or the pads have not yet been attached to the patient, you can press Soft Key 3 on the device to enter Menu Mode. -
Page 156: Setting The Operation Of The Device
The second tab displays the treatment data saved on the device. For further details on 'DATA REVIEW' on the second tab, please refer to [Section 5.3: Data Review] in these Instructions for Use. The third tab is for exiting Menu Mode. ... - Page 157 The Device Mode setup is an additional option. This function will not be installed by default if Manual Mode has not been optionally added upon purchasing the CU-SP2. If you want to purchase the Device Mode option, please contact us by referring to [Appendix A.3: Service Center] of these Instructions for Use.
- Page 158 Adult / Pediatric Mode • Adult: The device will operate in Adult Mode. In the case of a pediatric patient, connecting the device with the pediatric pads connector will automatically switch the device to Pediatric Mode. • Pediatric: The device will operate in Pediatric Mode. When set to Pediatric Mode, the device will maintain the mode even if it is connected to the adult pads connector.
- Page 159 Date & Time • Set the date and time of the CU-SP2. External Device This setting pairs the CU-SP2 with the printer and CU-EM1 (ECG transmission device). Selecting 'External Device' displays 'Printer' and 'CU-EM1' on the left side of the screen. The model numbers of devices currently connected to the CU-SP2 are displayed on the right.
- Page 160 If no device is found, the CU-SP2 will display the following message for 3 seconds and return to the previous page. Check and select a device from the list to pair with the CU-SP2. After selecting, the CU-SP2 will test connection with the selected device. After testing, the CU-SP2 will save the connection information and return to the previous page.
- Page 161 The CU-SP2 can only communicate with the devices designated by the manufacturer. Before pairing the CU-SP2 with an external device (Printer, CU-EM1), turn on the power of the device to be connected. When the CU-SP2 is paired with an external device, the external device will operate as follows: •...
- Page 162 New Password Confirm Password Security Mode Setting (ON/OFF)
- Page 163 [Device Setup] Setup Option Set Value Default AED Mode Device Mode AED Mode Manual Mode Analyze, Manual Override Charge, Adult, Adult / Pediatric Mode Adult Pediatric Fixed 150J, Fixed 200J, Shock Energy Fixed 150J Escalating (150J-200J), Escalating (150J-150J -200J) 5mm/mV, 10mm/mV, ECG Gain 10mm/mV...
-
Page 164: Setting The Cpr Guide
5.4.3 Setting the CPR Guide The CU-SP2 complies with the 2011 Korea Guidelines for CPR recommended by the Korean Association of Cardiopulmonary Resuscitation (KACPR) and the 2010 Guidelines for CPR recommended by the American Heart Association (AHA). The default CPR is set to 5 cycles of 30 chest compressions followed by 2 artificial respirations. - Page 165 The CU-SP2 does not provide Detailed Guide on chest compression and artificial respiration during CPR by default. To receive Detailed Guide, change the Detailed Guide setting to 'ON'. Once Detailed Guide is set to 'ON', the device will provide detailed voice instructions on CPR. ...
-
Page 166: Maintenance
6. Maintenance 6.1 Device Storage Please refer to the precautions below when storing the device. Do not store in an environment with large fluctuations in temperature. • Storage Environment The device is connected to the pads and battery pack, and is ready for immediate use in case of an emergency. -
Page 167: Aintenance
6.2 Maintenance 6.2.1 Device Inspection This device provides a self-test. The device performs a self-test as soon as the battery is inserted, automatically turns off after the test is completed, and regularly turns on to perform the self-test. If the user wants to initiate the self-test, remove the battery and then reinsert. For further details on self-tests, please refer to [Section 7.1: Self-Tests] in these Instructions for Use. - Page 168 How to replace the battery pack 1. Remove the spent battery pack by pulling it out while pressing the locking mechanism on the bottom of the device. Refer to the figure below. 2. Insert a new battery pack in the direction of the arrow with the label facing upward as shown in the figure below.
- Page 169 How to recharge the battery pack Rechargeable batteries that are low can be reused after recharging. You can recharge the battery by using the Battery Charger and Battery Charge Dock provided by the manufacturer. Familiarize yourself with the Battery Charger manual before use. ...
- Page 170 ③ Charging the CU-EM1 Battery Rechargeable batteries that are low can be reused after recharging. You can recharge the battery by using the Battery Charger and Battery Charge Dock provided by the manufacturer. The red LED lights up on the Battery Charger when charging, and the green LED lights up when charging is complete.
- Page 171 Precautions for using the battery pack • Do not subject to impact, disassemble or damage the device. • Do not place the device near hot objects such as heating appliances. • Do not keep the battery pack near metal objects. This may cause a short-circuit. •...
-
Page 172: Replacing The Pads
6.2.3 Replacing the Pads You cannot use expired pads. Check if the pads package is damaged. You should use only the pads provided by the manufacturer. How to replace pads 1. Check the expiration date of the pad. Refer to the figure below for checking the expiration date. -
Page 173: Cleaning The I-Pad Cu-Sp2
3. Insert the pads connector of the new pads into the Pads Connector Insert, and then put the Pads Package in the Pads Storage Compartment. Refer to the figure below. 6.2.4 Cleaning the i-PAD CU-SP2 Always clean the device and accessories with a soft cloth. The following detergents may be used to clean the exterior surface of the device: •... -
Page 174: Troubleshooting
7. Troubleshooting 7.1 Self-Tests There are several types of self- test. Each self-test examines different contents. Refer to the table below for details. Self-Test Description Type Perform the battery self-test of inserting the battery pack in the following events: • When initially purchasing the device •... - Page 175 If the self-test fails during operation and defibrillation cannot be administered, the device will instruct you to get a replacement defibrillator and will guide CPR by voice. To learn more about the error, first press the Power Button to turn off the device. Press and hold down the i-Button, and the device will notify the error by voice and LCD Screen, and then automatically shut down.
-
Page 176: Device Status
7.2 Device Status The device notifies the user of its status in the following ways: Indicator Description Remarks The device detected an error (e.g., low i-Button: Flashing in red battery). Press the i-Button to identify the error. The device is ready to deliver an electric Shock Button: Flashing in shock. -
Page 177: Roubleshooting
7.3 Troubleshooting The device informs you of its current status or of problems via status indicators, beeps, and/or voice instruction. Refer to the following for details: Symptom/Voice Instruction Cause Resolution Voice Prompt : “Low battery”, Replace the battery with a The battery is low. -
Page 178: Device Service
Distributor Person in Charge This device is warranted by CU Medical Systems, Inc. against defects in materials and workmanship for five full years from the date of original purchase. During the warranty period, we will repair or, at our option, replace at no charge a device that proves to be defective, provided you return the device, shipping prepaid, to us or to our authorized representative. - Page 179 The i-PAD CU-SP2 must be serviced only by authorized personnel. The i-PAD CU-SP2 will be serviced free of charge during the warranty period. After the warranty period, the cost of material and service shall be shouldered by the user.
-
Page 180: Appendix
Appendix A. Parts and Accessories To order replacement parts and accessories, cite the part and ordering numbers given in the following table. A.1 Standard Accessories Name Part Number Ordering Number Adult Defibrillation Pads CUA1007S (disposable) Disposable Battery Pack(Long-life) CUSA1103BB Instructions for Use SP2-OPM-E-03 A.2 Optional Accessories Carrying Case... -
Page 181: Description Of Symbols
B. Description of Symbols B.1 CU-SP2 Defibrillator Symbol Description Power Button (ON/OFF) i-Button Shock Button Caution: Refer to related documents. Protected against dust limited ingress(no harmful deposit) Protected against low pressure jets of water from all directions – limited ingress BF Type, defibrillation-proof equipment Refer to instruction manual/booklet CE Mark;... -
Page 182: Cu-Sp2 Packaging
B.2 CU-SP2 Packaging Symbol Description Stacking No. (Up to 6) Load Upwards Avoid Moisture Fragile No Hooking Temperature Limit: Store at a temperature between 0℃ ~ 43℃. Recyclable EU Representative CE Mark; meets the requirements of the European Medical Device Directive 2007/47/EC and its revisions. Manufactured Date Manufacturer Serial Number... -
Page 183: Accessories
B.3 Accessories B.3.1 Rechargeable Battery Pack Symbol Description Lithium Ion Battery LOT Number Manufactured Date Manufacturer Do not break or apply pressure on the battery. Do not discard the battery indiscriminately. Discard in accordance with local regulations. Refer to instruction manual/booklet General warning sign Warning;... -
Page 184: Disposable Battery Pack(Cusa1103Bb)
B.3.2 Disposable Battery Pack(CUSA1103BB) Symbol Description Lithium Manganese Dioxide Battery LOT Number Manufactured Date Manufacturer Do not break or apply pressure on the battery. Do not discard the battery indiscriminately. Discard in accordance with local regulations. Refer to instruction manual/booklet General warning sign Warning;... -
Page 185: Pads
B.3.3 Pads Symbol Description Temperature Limit: Store at a temperature between 0℃ ~ 40℃. LOT Number Expiration Date Reference Order Number Disposable (Do Not Reuse) Do not fold or crush this product. Contains no Latex Expiration Date Caution: Refer to related documents. CE Mark;... -
Page 186: Glossary
C. Glossary 1 CPR 1 CPR consists of 5 cycles. (When the device is set to 5 cycles as default) Refers to 30 chest compressions followed by 2 breaths during 1 Cycle CPR. (When the device is set to the default setting [30:2]) If you specify the number of compression and number of breath, the cycle is performed in accordance with the specified protocol. - Page 187 A patient with cardiac arrest symptoms. This device should be Cardiac Arrest Patient used for the patient with the following symptoms: No response, no movement and no normal breathing. Communication A port that sends and receives data between the device and PC. Port Condensation Moisture has an adverse effect on the device when condensation...
- Page 188 The button for checking the most recent device usage, displaying error messages, transferring ECG and event data, etc. Internal discharge The i-PAD CU-SP2 dumps the charge in its defibrillating capacitor into an internal load If you do not press the Shock Button or if the (disarm) device determines that the patient does not need an electric shock due to the change in the patient's ECG.
- Page 189 (the position may be switched with pad 1). Pads Connector The connector on the pads that is used to connect the pads with the i-PAD CU-SP2. Pairing The process of connecting the Device with an external Bluetooth device for communication.
- Page 190 Standby Mode The mode where the power of the device is OFF but the device executes periodic self-tests to ensure that the device is always ready for use in emergency situations. Refers to CU Medical Systems Inc.
-
Page 191: Device Specifications
D. Device Specifications Model Name: CU-SP2 Product Exterior Category General Specifications Dimensions 260㎜ x 256㎜ x 69.5㎜ (Width x Length x Height) Weight 2.4㎏ (Including the battery pack and pads) Environmental Conditions Category General Specifications Operating Environment (The device can be used immediately in case of an emergency.) Temperature: 0°C ~ 40°C (32°F ~ 104°F) Humidity: 5% ~ 95% (a location with no condensation) Storage Environment (The device has pads and a battery and is ready to be used for an... - Page 192 Defibrillator General Specifications Category Operation Type Dual Mode (semi-automated, manual) External Defibrillator Output Type e-cube biphasic (Truncated exponential type) AED Mode Output Energy • 150J±4J, 200J±6J at 50Ω load for adults • 50J±2J at 50Ω load for children Manual Mode (Optional) •...
- Page 193 Voice instruction (Press the flashing orange button.) Arming Indicator Flashing Shock Button Beeper Time from End of At least 6 seconds from the completion of CPR to the shock delivery CPR to Administering Shock Disarm The device disarms the electric load under the following situations: •...
- Page 194 Biphasic Truncated Exponential Type The shape of the waveform is automatically adjusted according to the patient's defibrillation impedance. In the graph, A is the duration of the first phase of the waveform, B is the duration of the second phase, C is the delay between phases (500μs), and D is the peak current. Output Waveform for Adults (200 Joules) First Phase Second Phase...
- Page 195 Output Waveform for Adults (150 Joules) First Phase Second Phase Patient Peak Discharging Energy Interval Interval Impedance Current Energy Accuracy (milliseconds, (milliseconds, (Ohms, Ω) (Joules, J) (Joules, J) 64.5 147.8 150 (±4J) 32.7 149.7 150 (±4J) 22.5 151.5 150 (±4J) 15.9 148.1 150 (±4J)
- Page 196 ECG Accuracy General Specifications Category ECG Acquisition Route Lead II Response Frequency 1 Hz ~ 30 Hz ECG Analysis System Category General Specifications Analyzes whether the rhythms of the patient's impedance and Function ECG require a defibrillation 25Ω ~ 175Ω Measured Impedance Range ...
- Page 197 ECG Analysis System – ECG Database Test 90% One Minimum Test Performa Shock No Shock Observed Sided Lower Rhythm Rhythms test sample sample nce goal Decision Decision Performance Confidence Class size size Limit 97.26% >90% Coarse VF (213/219) sensitivity sensitivity 81.02% >75% Fast VT...
- Page 198 Control Devices, Indicators, Voice Instructions Category General Specifications Control Devices Power Button, i-Button, Shock Button, 3 Soft Keys Graphic LCD Displays the operating status of the device and instructions Shock Button: Flashes in orange when the defibrillator is charged Indicators and ready to deliver a shock.
- Page 199 CU-SP2 Battery Pack (Rechargeable) Model CUA1802RB (3INR/19/65) Battery Type 10.8VDC, 2.5Ah Li-ion, rechargeable Capacity For fully charged new batteries, at least 60 shocks or 3 hours of operation at 25°C (77°F) Charging Time with Approximately 3 hours to 100%. Approximately device off 2.8 hours to 90%.
- Page 200 Adult Defibrillation Pads Category General Specifications Type Adult Pad Size 110 cm ± 10% Cable Length 120cm ± 5cm Pad Storage Life At most 36 months from the date of manufacture Patient contacting material meets requirements of ISO Bio-Compatibility 10993-5,-10 (Biological Evaluation of Medical Device) Pediatric Defibrillation Pads Category General Specifications...
- Page 201 memory through the PC software (CU-Expert). Bluethooth 2.1 + EDR, class 2 module Bluetooth Operating Frequency Range(OFR): 2402 – 2480 MHz Modulation: GFSK, π/4 DQPSK, 8DPSK Uses Bluetooth to communicate with the Printer or the CU- EM1 (ECG transmission device) 9,600bps or higher Communication speed...
- Page 202 Battery Type 3.7V DC, 1.0Ah Li-ion, rechargeable Capacity For fully charged new batteries, at least 10 hours of operation at 25°C (77°F) Standby Life (After If stored and managed in accordance with instructions in Inserting the Battery) the document: At least 6 months from the date of installation into the i-PAD CU-SP2 ...
-
Page 203: Electromagnetic Compatibility
Guidance and manufacturer’s declaration The i-PAD CU-SP2 is intended for use in the electromagnetic environment specified below. The customer or the user of the i-PAD CU-SP2 should assure that it is used in such an environment. Basic EMC standard Phenomenon... - Page 204 The i-PAD CU-SP2 should not be used adjacent to or stacked with other equipment. If adjacent or stacked use is necessary, the i-PAD CU-SP2 should be observed to verify normal operation in the configuration in which it will be used.
Need help?
Do you have a question about the i-PAD CU-SP2 and is the answer not in the manual?
Questions and answers