Watec WAT-910BD Assembly
Hide thumbs
Also See for WAT-910BD:
- Hardware manual (65 pages) ,
- Manual (63 pages) ,
- User manual (30 pages)
Advertisement
Quick Links
1) Circuit Diagram
2) Assembly of PCB
a)Tools Required.
b) Inspect PCB
Assembly of the TACOS
WAT-910BD Housing v2
Only simple hand tools are necessary to complete the assembly of the PCB.
- Soldering Iron and solder
- Needle nose pliers
- Wire clippers/trimmers
- Maybe a multimeter to test the resistor values
- Maybe a magnifying glass to read the resistor values, see
http://www.hirophysics.com/Labsheet/resis-codes/resis-codes.html
Later you will need
- Phillips Head screwdrivers
- bottle of Super-Glue
- 1.5mm Allen key
Appendix A) Lists the Contents of the WAT-910BD-TACOS Kit
Appendix B) Photo of the contents of the WAT-910BD Carton
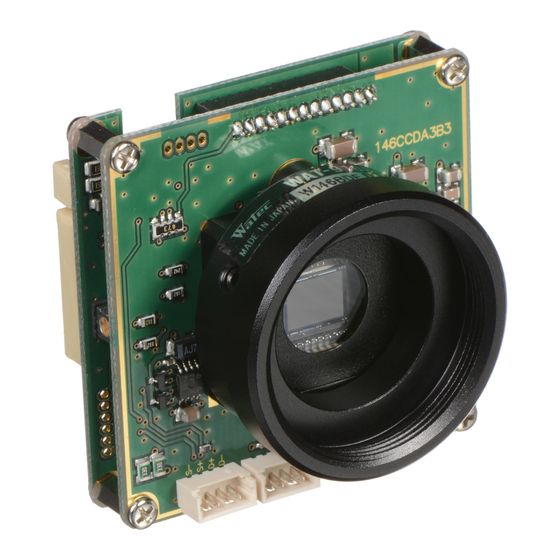
The PCB is designed and manufactured specifically for the TACOS-WAT-
910BD camera project.
It is of double sided construction and all holes are through plated to make
soldering easy. The side the Nano microcontroller is fitted has a large
ground plane.
It is designed with markings and values to help aid correct assembly.
Shown is TACOS BDvA, meaning version A - meaning the PCB design
was right first time ☺
Page 1
Advertisement

Related Manuals for Watec WAT-910BD


Summary of Contents for Watec WAT-910BD
- Page 1 - bottle of Super-Glue - 1.5mm Allen key Appendix A) Lists the Contents of the WAT-910BD-TACOS Kit Appendix B) Photo of the contents of the WAT-910BD Carton b) Inspect PCB The PCB is designed and manufactured specifically for the TACOS-WAT- 910BD camera project.
- Page 2 Assembly of the TACOS WAT-910BD Housing v2 c) Fit the Resistors 5 resistors are required. Their values are etched into the PCB in their required positions. The values are a bit hard to see in the photo, so from the top (as shown); 330R, 10k, 47R, 47R, & 2k.
- Page 3 Check for the absence of solder bridges between the track work and for dry & ugly solder work. If there are problems fix them now. If OK, then congratulations, you have now completed the assembly of the TACOS WAT-910BD PCB. Page 3...
- Page 4 Assembly of the TACOS WAT-910BD Housing v2 3) Wiring the PCB a) Camera Control Harness Included in the camera carton are small parcels containing various wiring harnesses. Locate the Camera Control Harness - with green, yellow, blue and black conductors.
- Page 5 Assembly of the TACOS WAT-910BD Housing v2 c) LEDs From the off-cuts of the Camera Control and Power harnesses, cut 80mm lengths of red, black, yellow and blue conductors. Strip, twist and solder both ends. Trim the Anode (long lead) of the Green LED to 8mm length, and solder the yellow conductor.
- Page 6 Assembly of the TACOS WAT-910BD Housing v2 d) Power Socket and the reverse polarity safety diode. This step may be omitted if you are absolutely certain that you can not possibly apply reverse polarity supply to the camera, when observing at 3am on a cold winter morning when using mittens. (been there, done that ) The socket comes with 3 terminals.
- Page 7 Assembly of the TACOS WAT-910BD Housing v2 The TACOS Housing is supplied assembled, so the Assembler (You) can see how it all fits together – by careful disassembly. Take care not to loose any screws. Orient the Camera Mount Plate as shown.
- Page 8 Assembly of the TACOS WAT-910BD Housing v2 c) Fit the Delrin Cap The Delrin Cap fits over the C-Mount barrel of the camera and is secured by four M3x10 Pan Head screws. Note: do not over tighten. Delrin is an engineering grade plastic polymer, but it’s still a plastic.
- Page 9 Assembly of the TACOS WAT-910BD Housing v2 f) Connect the Camera Control Harness and the Power Harness to the PCB sockets. The plugs have tiny keys that locate into the socket to ensure the plug is inserted correctly. Insert each plug and apply gentle pressure and you should feel the plug snap in.
-
Page 10: Appendix A) Wat-910Bd-Tacos Kit - Packing List
Using the 4x M2x6 Stainless Steel Cap Screws, fit and secure the cover. Assembly of the WAT-910BD-TACOS camera is complete. IMPORTANT : Please read the TACOS_WAT-910BD_IntroAndInstall Manual BEFORE plugging the camera into the USB port of your computer. Appendix A) WAT-910BD-TACOS Kit – Packing List Page 10... -
Page 11: Appendix B) Contents Of Wat-910Bd Camera Carton
Assembly of the TACOS WAT-910BD Housing v2 Appendix B) Contents of WAT-910BD Camera Carton END of document. Page 11...
Need help?
Do you have a question about the WAT-910BD and is the answer not in the manual?
Questions and answers