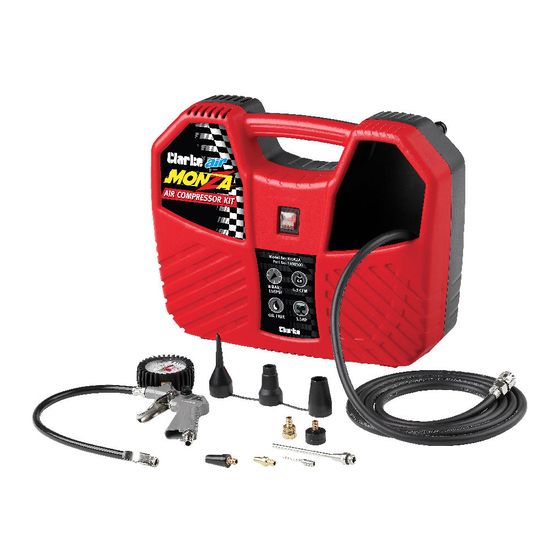
Summary of Contents for Clarke MONZA
- Page 1 AIR COMPRESSOR KIT 230V MODEL NO: MONZA PART NO: 1498500 OPERATION & MAINTENANCE INSTRUCTIONS ORIGINAL INSTRUCTIONS GC1120...
-
Page 2: Specifications
The Monza is designed to be used for compressed-air driven tools which can be driven with an air volume of up to approx 180 L/min (e.g. tyre inflator, blow gun and paint spray guns such as the CLARKE JSC spray gun etc). A suitable CLARKE male adaptor will need to be obtained. -
Page 3: General Safety Warnings
5. NEVER attempt any complex repairs yourself. If you have a technical problem contact your local CLARKE dealer. 6. ALWAYS store the compressor out of reach of children. 7. ALWAYS protect your hearing. Ear protection should be worn when operating this compressor. - Page 4 3. NEVER use this compressor if any part is damaged. Have it inspected and repaired by your CLARKE dealer. 4. NEVER attempt to modify the air compressor, fittings or attachments in any way. Doing so will invalidate the guarantee and could result in personal injury.
- Page 5 2. NEVER USE AN AIR COMPRESSOR WHICH APPEARS DEFECTIVE OR IS OPERATING ABNORMALLY: If the compressor operates unusually or makes strange noises, switch off immediately. Arrange repairs with your nearest CLARKE dealer. 3. BREATHING QUALITY AIR: This compressor should not be used to supply breathing quality air.
-
Page 6: Safety Symbols
SAFETY SYMBOLS The following safety symbols are shown on the product and/or it’s packaging. Please read all of the safety and operating instructions carefully before using this product. Read this instruction booklet carefully before positioning, operating or adjusting the compressor. Safety goggles should be worn Ear defenders should be worn. -
Page 7: Electrical Connections
ELECTRICAL CONNECTIONS WARNING: READ THESE ELECTRICAL SAFETY INSTRUCTIONS THOROUGHLY BEFORE CONNECTING THE PRODUCT TO THE MAINS SUPPLY. Before switching the product on, make sure that the voltage of your electricity supply is the same as that indicated on the rating plate. This product is designed to operate on 230VAC 50Hz. - Page 8 OVERVIEW Power cable Base for triple adaptor On/Off switch Dust blowing nozzle Carrying handle Basketball needle Air hose with quick lock coupling Bicycle tyre adaptor Compressed air pistol Balloon adaptor Pressure gauge Large adaptor Triple adaptor Parts & Service: 020 8988 7400 / E-mail: Parts@clarkeinternational.com or Service@clarkeinternational.com...
-
Page 9: Preparation For Use
PREPARATION FOR USE WARNING: BEFORE USING THE COMPRESSOR, MAKE SURE THAT YOU HAVE READ AND UNDERSTOOD THE SAFETY INSTRUCTIONS. UNPACKING After removing the compressor from its packaging, check that it has not been damaged in transit. Report any damage immediately to the dealer where the item was purchased. - Page 10 2. Connect either the tool supplied, or another power tool of your choice using the plug-in connector. Connect the desired adaptor as shown. 3. Insert the nipple of the air tool into the quick-lock coupling of the air hose. • The quick-lock sleeve will spring forward automatically connecting the accessory.
-
Page 11: Switching On And Off
OPERATING SWITCHING ON AND OFF 1. To switch the compressor on, set the rocker switch to the ON “I” position. 2. If the task is completed run the attached air tool until no compressed air remains in the hose. 3. To switch the compressor off, set the rocker switch to the OFF “O”... - Page 12 2. Connect the rubber hose of the air gun to the tyre by pressing the end of the hose onto the tyre valve while holding down the hose tab. 3. Release the valve connector. The hose will now be connected to the tyre valve. 4.
- Page 13 INFLATING OTHER ITEMS 1. The compressor kit is supplied with a variety of adaptors that can be fitted to the rubber hose. These adaptors (shown on page 8) are suitable for different valves that are often used on inflatable items. 2.
- Page 14 3. Turn the adaptor in a clockwise direction to secure it in place. BLOW GUN 1. To use the air gun as a blow gun, first unscrew and remove the rubber hose. • The blower nozzle can then be screwed into the gun.
-
Page 15: Maintenance
In the event that any of the above situations arise, requiring the dismantling and overhaul of the compressor, contact your CLARKE International Service Department on 020-8988-7400. Parts & Service: 020 8988 7400 / E-mail: Parts@clarkeinternational.com or Service@clarkeinternational.com... -
Page 16: Parts Diagram
PARTS DIAGRAM Parts & Service: 020 8988 7400 / E-mail: Parts@clarkeinternational.com or Service@clarkeinternational.com... -
Page 17: Parts List
PARTS LIST Description Description Stopper 16.10 Circlip Screw 16.11 Plain washer On/off switch 16.12 Bearing Capacitor 16.13 Bearing Lower cover 16.14 Crankshaft Cable clamp 16.15 Belt Screw 16.16 Screw Power cable and plug 16.17 Piston Terminal 16.18 Piston ring Cable gland 16.19 Connecting rod Screw... -
Page 18: Environmental Recycling Policy
GUARANTEE This CLARKE product is guaranteed against faulty manufacture for a period of 12 months from the date of purchase. Please keep your receipt as proof of purchase. This guarantee is invalid if the product is found to have been abused or tampered with in any way, or not used for the purpose for which it was intended. -
Page 19: Declaration Of Conformity
DECLARATION OF CONFORMITY Parts & Service: 020 8988 7400 / E-mail: Parts@clarkeinternational.com or Service@clarkeinternational.com...


Need help?
Do you have a question about the MONZA and is the answer not in the manual?
Questions and answers