Table of Contents
Advertisement
Quick Links
Advertisement
Table of Contents

Related Manuals for Atag VA46309AT


Summary of Contents for Atag VA46309AT
- Page 1 User Manual Dishwasher VA46309AT...
-
Page 2: Table Of Contents
CONTENTS Safety information Before first use Safety instructions Daily use Product description Hints and tips Control panel Care and cleaning Programmes Troubleshooting Settings Technical information Options Subject to change without notice. SAFETY INFORMATION Before the installation and use of the appliance, carefully read the supplied instructions. -
Page 3: Safety Instructions
by clients in hotels, motels, bed & breakfast and other – residential type environments. Do not change the specification of this appliance. • The operating water pressure (minimum and maximum) • must be between 0.5 (0.05) / 8 (0.8) bar (MPa) Obey the maximum number of 9 place settings. - Page 4 • Do not use multi-plug adapters and WARNING! Dangerous extension cables. voltage. • Make sure not to cause damage to the • If the water inlet hose is damaged, mains plug and to the mains cable. immediately close the water tap and Should the mains cable need to be disconnect the mains plug from the replaced, this must be carried out by...
-
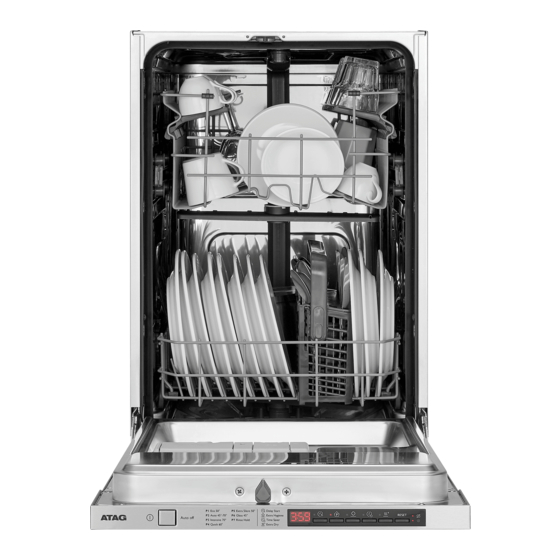
Page 5: Product Description
PRODUCT DESCRIPTION Upper spray arm Rinse aid dispenser Lower spray arm Detergent dispenser Filters Cutlery basket Rating plate Lower basket Salt container Upper basket Air vent Beam-on-Floor The Beam-on-Floor is off when the appliance is deactivated. The Beam-on-Floor is a light that is displayed on the floor below the appliance When AirDry is activated during door. -
Page 6: Control Panel
CONTROL PANEL On/off button Time Saver button Display Extra Dry button Delay button RESET button Program button Indicators Extra Hygiene button Indicators Indicator Description Rinse aid indicator. It is always off while the programme operates. Salt indicator. It is always off while the programme operates. PROGRAMMES Programme Degree of soil... - Page 7 Programme Degree of soil Programme phases Options Type of load • Normal soil • Prewash • Extra Dry Extra Silent • Crockery and • Wash 50 °C cutlery • Rinses 50° • • Normal or light • Wash 45 °C •...
-
Page 8: Settings
Water Energy Duration Programme (kWh) (min) Rinse & Hold 1) The pressure and the temperature of the water, the variations of the mains supply, the options and the quantity of dishes can change the values. Information for test institutes Write down the product number (PNC) that is on the rating plate. - Page 9 Water hardness German de‐ French de‐ mmol/l Clarke de‐ Water softener grees (°dH) grees (°fH) grees level 47 - 50 84 - 90 8.4 - 9.0 58 - 63 43 - 46 76 - 83 7.6 - 8.3 53 - 57 37 - 42 65 - 75 6.5 - 7.5...
- Page 10 • The indicator still flashes. • The display shows the current setting: = the rinse aid empty notification is activated (factory setting). 2. Press to change the setting. = the rinse aid empty notification is deactivated. 3. Press on/off to confirm the setting. Acoustic signals During the drying phase, the Acoustic signals sound when a...
-
Page 11: Options
OPTIONS In the other programmes the setting of Desired options must be Extra Dry is permanent and it is activated every time before you automatically used in next cycles. This start a programme. configuration can be changed at any time. It is not possible to activate or deactivate options while a Every time Eco 50°... - Page 12 4. Open the water tap. 5. Start a programme to remove any processing residuals that can still be inside the appliance. Do not use detergent and do not load the baskets. After starting a programme, it may take up to 5 minutes for the appliance to recharge the resin in the water softener.
-
Page 13: Daily Use
1. Press the release button (D) to open 4. Close the lid. Make sure that the the lid (C). release button locks into position. 2. Pour the rinse aid in the dispenser (A) You can turn the selector of the until the liquid reaches the fill level released quantity (B) between 'max'. - Page 14 Starting a programme If the door is opened for more than 30 seconds during the 1. Keep the appliance door ajar. drying phase, the running 2. Press the on/off button to activate the programme ends. It does not appliance. Make sure that the happen if the door is opened by appliance is in programme selection AirDry function.
-
Page 15: Hints And Tips
HINTS AND TIPS General we recommend that you use the tablets with long programmes. The following hints will ensure optimal • Do not use more than the correct cleaning and drying results in daily use quantity of detergent. Refer to the and also help to protect the environment. -
Page 16: Care And Cleaning
• Put light items in the upper basket. • The programme is applicable for the Make sure that the items do not move. type of load and for the degree of soil. • Make sure that the spray arm can •... - Page 17 CAUTION! An incorrect position of the filters can cause bad washing results and damage to the appliance. Cleaning the spray arms Do not remove the spray arms. If the holes in the spray arms are clogged, remove remaining parts of soil with a thin pointed object.
-
Page 18: Troubleshooting
TROUBLESHOOTING If the appliance does not start or it stops With some problems, the display during operation, first check if you can shows an alarm code. solve the problem by yourself with the The majority of problems that can help of the information in the table or occur can be solved without the need contact an Authorised Service Centre. - Page 19 Problem and alarm code Possible cause and solution The remaining time in the • This is not a defect. The appliance is working correctly. display increases and skips nearly to the end of program time. Small leak from the appli‐ •...
- Page 20 Problem Possible cause and solution Poor drying results. • Tableware has been left for too long inside a closed ap‐ pliance. • There is no rinse aid or the dosage of rinse aid is not enough. Set the rinse aid dispenser to a higher level. •...
-
Page 21: Technical Information
Problem Possible cause and solution Limescale deposits on the ta‐ • The level of salt is low, check the refill indicator. bleware, on the tub and on the • The cap of the salt container is loose. inside of the door. •... - Page 24 When contacting the service department, have the complete type number to hand. You will find the addresses and phone numbers of the service organisation on the guarantee card. 156919240-A-232017...
Need help?
Do you have a question about the VA46309AT and is the answer not in the manual?
Questions and answers