Elmo P30 Manual
Visualiser
Hide thumbs
Also See for P30:
- Instruction manual (53 pages) ,
- Specifications (6 pages) ,
- Catalogue (4 pages)
Advertisement
Quick Links
Advertisement

Related Manuals for Elmo P30


Summary of Contents for Elmo P30
- Page 1 Elmo P30 Visualiser...
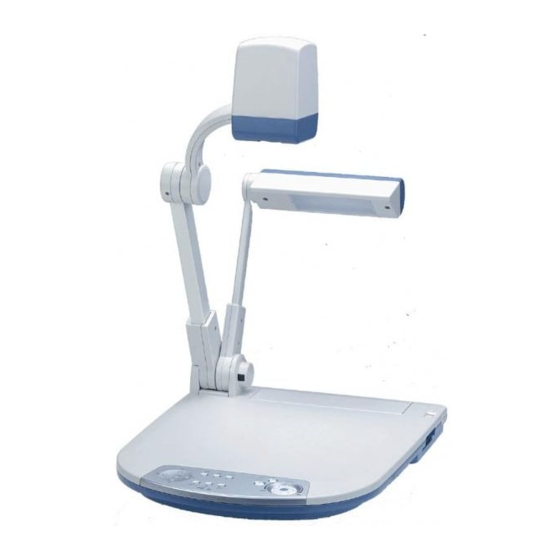
- Page 2 First Question: Is everyone familiar with exactly what a visualiser is? A visualiser is effectively a camera on an arm, usually with a shooting stage and its own lighting source. Camera head Lighting unit Shooting stage...
- Page 3 Which company invented the visualiser and why? Elmo invented the visualiser. It was a product originally developed for the scientific & medical market. Elmo themselves are based in Japan and have been one of the world’s leading manufacturing of cameras for over 80 years.
- Page 4 Moving up to date How have visualisers improved over the last few years? Better cameras • Higher resolution – older visualisers tend(ed) to have composite video outputs. New units have XGA (or even SXGA) outputs • Image capture to PC via USB connection •...
- Page 5 The second demonstrates the Image Mate software and how the image from the P30 can be used interactively (e.g. via a SMART Board). It should also touch on recording video clips and the use of the SD Card Reader.
- Page 6 Set up • Connect the computer’s VGA output cable into the RGB input on the P30. • N.B. This may require you to disconnect an existing cable from wall plate or splitter. 15 pin VGA cable from PC into visualiser...
- Page 7 Set up • Connecting the VGA output cable (supplied) will now drive projector and PC monitor. 15 pin VGA cable from visualiser into wall point (or splitter) Connect power supply...
- Page 8 Set up • Connected in this way the visualiser will act as a switcher for the incoming PC signal. • Switching from ‘Camera’ mode to ‘PC’ mode to ‘SD Card Reader’ may be carried out from either the front panel or R/C. Button to switch mode...
- Page 9 Set up • Check P30 is set to correct USB mode. (Factory default is ‘Mass Storage’). • Using on-screen ‘Menu’, change setting to ‘Application’. This only has to be done once. N.B. Units shipping in the New Year are likely to be set to this mode as standard in the factory.
- Page 10 Set up • Install Image Mate software on to a PC – preferably your own, as it is often difficult to get administrators rights to install software on school PC’s. • First step is to load CD, double click ‘Set Up’ and follow on-screen instructions.
- Page 11 Demonstration Part 1 - Camera Show A3 Shooting Area – Open an A4 text book an demonstrate the P30’s ability to display both pages simultaneously. Most visualisers will crop an A3 image by around ½” either side. Show the difference ‘Text’ mode makes to contrast. It is particularly useful in education as projectors are often low output.
- Page 12 Zoom • Elmo P30 has a 15x Optical Zoom. The zoom function is operable either by a unique and highly responsive dial system or via R/C. • It has 60x Digital Zoom. An on-screen display will show ‘Digital Tele’ if zooming in and ‘Digital Wide’ if zooming out. Lens will be silent.
- Page 13 Focus • The P30 has a one-touch Auto Focus button in the centre of the ‘zoom’ dial. • Manual focus is accessed via the Remote Control. It is often necessary to use this with 3D objects. Manual Focus Auto Focus...
- Page 14 Example of Manual Focus Manual Focus ‘Near’ Manual Focus ‘Far’...
- Page 15 Unique multi-angle camera arm • Most visualisers have a camera arm that locks into place for viewing objects from above, folding flat for storage. • The P30 is different! It allows one to view 3D objects from the side!
- Page 16 Viewing distant objects or those too large to place on the shooting stage • Unclip close up lens to allow camera to focus on large documents e.g. maps, or demonstrations taking place in front or behind the visualiser. It is a good idea to point camera at attendees to demonstrate the effect.
- Page 17 Image Mate Software • The second stage of the demonstration involves displaying the P30 image via the USB cable, into a PC. • Image Mate software consists of two halves. Image Mate for Presentation (blue icon) and Image Mate for Movie Creation (orange icon).
- Page 18 Click on ‘Tools’, ‘Live Monitor’ and select option 3 from the drop down list (i.e. 1024 x 768.) This ensures the output resolution of the P30 matches that of the projector and PC. Click ‘Play’ icon. Live image from P30 should appear in window.
- Page 19 Image Mate for Presentation • With Live P30 image running in a window on the PC, select SMART ‘Floating Tools’ (or equivalent). SMART ‘Floating Tools’...
- Page 20 Image Mate for Presentation • Select ‘Full Screen’ icon in Image Mate software Full Screen mode The result is a full screen image from the P30 with ‘Floating Tools’ overlaid on the top...
- Page 21 Image Mate for Presentation / IWB Software • Picking up a pen from the tray ‘freezes’ the P30 image and facilitates annotation.
- Page 22 Image Mate for Presentation / IWB Software • If required annotated image may be captured in full, in part or using ‘freehand’ cut-out tool. Once captured it automatically drops into SMART Notebook (or equivalent). N.B. Annotations are now embedded into original image.
- Page 23 Image Mate for Presentation / IWB Software • Alternatively capture image first into Notebook then annotate. Background and annotations will then remain seperate...
- Page 24 ‘floating tools’ and touch the screen. • Should one wish to exit the full screen P30 image at any time, simply touch the screen a second time to return to PC desktop.
- Page 25 Image Mate for Movie Creation • This half of the Image Mate software is used for capturing Video Clips e.g. demonstrations. N.B. Image Mate for Presentation and Image Mate for Movie Creation cannot be open simultaneously. • To begin click ‘Live Monitor’ then ‘Start’. A live image will then appear in the window.
- Page 26 Image Mate for Movie Creation • Next step: bring up R/C on screen by clicking on ‘Remote Control’ icon. All functions of the visualiser may now be controlled from the IWB. ‘Remote Control’ icon...
- Page 27 Image Mate for Movie Creation • Next step: To set recording levels to create a balance between image quality and file size. This only has to be done once. • Click ‘Tools’, then ‘Recording Settings’. • Select the following:...
- Page 28 Image Mate for Movie Creation • Simply click the red ‘Record’ icon’ to begin recording. • Use the on screen R/C to operate the visualiser as required. • Once complete press ‘Stop’. • To play back video clip click ‘Movie’, then ‘Open’. •...
- Page 29 SD Card Reader • Another unique feature of the P30! • Allows one to capture images onto a removable data storage card without the need for a PC. • Images may be shared with other visualisers and compatible digital cameras and may also be downloaded to PC.
- Page 30 SD Card Reader • To capture images onto SD Card, the visualiser must be in ‘Camera’ mode – this will be displayed in top right corner of projected image. • Insert card and when ready to capture simply press the ‘Camera’ icon on either the R/C or base panel.
- Page 31 SD Card Reader • To access images press ‘SD’ icon on R/C or press ‘mode’ button on base panel twice ‘SD’ icon ‘Mode’ button...
- Page 32 SD Card Reader • Images from card can be displayed as either 1x1, 3x3 or 4x4. • It is possible to navigate through images using cursor arrows on R/C or base panel to move red ‘highlighter’ box. cursor arrows to move red...
- Page 33 SD Card Reader • Click ‘enter’ to view image full screen. • Use zoom buttons on R/C or dial on base panel to enlarge image, then use cursor arrows to move image around electronically on screen.
- Page 34 SD Card Reader • To play images back automatically in sequence click ‘Slide Show’ on R/C. • Slide Show settings (e.g. transition time, wipe etc.) may be accessed via on screen SD menu. Click ‘menu’ button on R/C or base panel at any time Slide Show function...
Need help?
Do you have a question about the P30 and is the answer not in the manual?
Questions and answers
How do I unlock the camera arm on this model p30