Bradley WF2613 Installation Manual
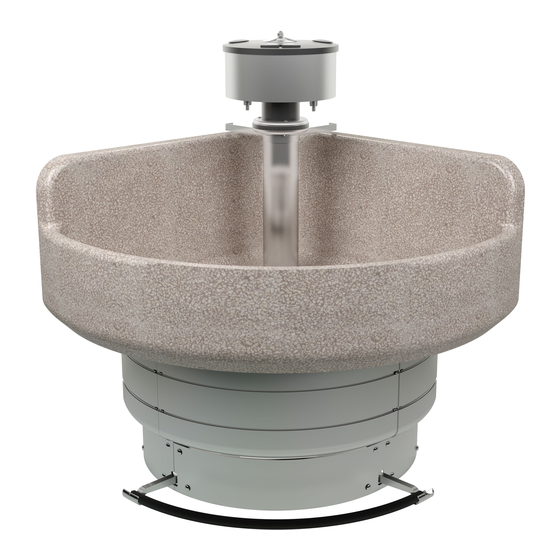
Terrazzo 54" classic corner washfountain with infrared control
Hide thumbs
Also See for WF2613:
- Installation instructions manual (110 pages) ,
- Installation manual (27 pages) ,
- Installation manual (24 pages)
Table of Contents
Advertisement
Quick Links
215-1451 Rev. F; ECN 13-00-001
© 2013 Bradley
Page 1 of 22
3/5/2013
Installation
WF2613
Terrazzo
54" Classic Corner Washfountain
®
with Infrared Control
Table of Contents
Pre-Installation Information . . . . . . . . . . . . . . . . . . . . . . . . 2
Corner Washfountain Dimensions . . . . . . . . . . . . . . . . . . . 3
Rough-In Specifications. . . . . . . . . . . . . . . . . . . . . . . . 4-5
Installing the Drain. . . . . . . . . . . . . . . . . . . . . . . . . . . . . . . 6
Assembling Pedestal . . . . . . . . . . . . . . . . . . . . . . . . . . . . . 6
Anchoring Pedestal . . . . . . . . . . . . . . . . . . . . . . . . . . . . . . 7
Installing Drain Spud in Bowl. . . . . . . . . . . . . . . . . . . . . . . 7
Installing Supplies w/ Optional Soap Dispenser . . . . . . 8-9
Valve Connections for Infrared . . . . . . . . . . . . . . . . . . . . 10
Electrical Connections for Infrared . . . . . . . . . . . . . . . . . 11
Adjust the Temperature . . . . . . . . . . . . . . . . . . . . . . . . . . 12
Cleaning and Maintenance . . . . . . . . . . . . . . . . . . . . . . . 13
Soap Valve Parts List and Maintenance . . . . . . . . . . 14-15
Sprayhead Parts List and Troubleshooting . . . . . . . . . . . 16
Infrared Troubleshooting . . . . . . . . . . . . . . . . . . . . . . . . . 17
Solenoid Valve Troubleshooting. . . . . . . . . . . . . . . . . . . . 18
Stop, Strainer and Check Valve Parts List. . . . . . . . . . . . 19
Check Valve Troubleshooting. . . . . . . . . . . . . . . . . . . . . . 19
Valve Assembly Parts . . . . . . . . . . . . . . . . . . . . . . . . 20-21
Thermostatic Mixing Valve Troubleshooting. . . . . . . . . . . 22
P.O. Box 309, Menomonee Falls, WI USA 53052-0309
PHONE 800.BRADLEY (800.272.3539) FAX 262.251.5817
bradleycorp.com
Advertisement
Table of Contents
Troubleshooting

Related Manuals for Bradley WF2613


Summary of Contents for Bradley WF2613
-
Page 1: Table Of Contents
Thermostatic Mixing Valve Troubleshooting... 22 215-1451 Rev. F; ECN 13-00-001 P.O. Box 309, Menomonee Falls, WI USA 53052-0309 © 2013 Bradley PHONE 800.BRADLEY (800.272.3539) FAX 262.251.5817 Page 1 of 22 3/5/2013 bradleycorp.com... -
Page 2: Pre-Installation Information
• 1-1/2" vent pipe on types vented through washfountain column • 110 VAC GFI power source for 110/24 VAC UL Class II transformer supplied • OPTIONAL: Bradley recommends installing an electrical cut-off switch to the unit. This feature prevents accidental water delivery during regular maintenance and service. -
Page 3: Corner Washfountain Dimensions
Drain must be connected with 2" schedule 40 welded wrought iron pipe, minimum, to provide lower support for this installation. Vent or support pipe must be of the same material in 1-1/2". Bradley • 215-1451 Rev. F; ECN 13-00-001 3/5/2013... -
Page 4: Rough-In Specifications
Rough-In Specifications Notes For All Models: • All pipes and fittings not furnished by Bradley are shown in broken lines. • Supply lines for one to two washfountains should be 1"; for three washfountains 1-1/4"; for more than three washfountains, pipe sizes should be increased proportionately. - Page 5 Rough-In Specifications Notes For All Models: • All pipes and fittings not furnished by Bradley are shown in broken lines. • Supply lines for one to two washfountains should be 1"; for three washfountains 1-1/4"; for more than three washfountains, pipe sizes should be increased proportionately.
-
Page 6: Installing The Drain
(161-040) Bolt (160-104) (194-043A Std. Ht. ) Joint Lower Support (194-041) Frame 5/16" Carriage Bolt Scuff Base (160-060A) (185-015A) Scuff Base End (185-023 ALH - Left Hand) (185-023 ARH - Right Hand) Bradley • 215-1451 Rev. F; ECN 13-00-001 3/5/2013... -
Page 7: Anchoring Pedestal
Tighten the spud and lock nut against bowl. Drain Pre-Pack (S45-273) Bowl Secure the strainer to drain spud with screws Washer provided. (142-068) Locknut (161-021) Connect spud (or B Trap or Tie Pipe Bracket) to drain. Bradley • 215-1451 Rev. F; ECN 13-00-001 3/5/2013... -
Page 8: Installing Supplies W/ Optional Soap Dispenser
Tie Rod Hex Nut (110-064) Set Screw (160-208) Valve FOR UNITS WITHOUT SOAP OPTION: Assembly Secure infrared module cover and dispenser cover with acorn nut and socket head set screw. Cold Bradley • 215-1451 Rev. F; ECN 13-00-001 3/5/2013... - Page 9 Slide the dispenser cover over 1-1/2" vent pipe (111-024) and secure with the two cap screws included with the tie bar. Valve Assembly Connect vent pipe to vent through ceiling with pipe union. Bradley • 215-1451 Rev. F; ECN 13-00-001 3/5/2013...
-
Page 10: Valve Connections For Infrared
Stop/Strainer/Check Nut (110-005) Valve (S60-003) Supply Tubing Tailpiece (129-007) Solenoid Washer Valve (124-001A) Assembly (S08-055) Optional Thermostatic Mixing Valve (S01-525) Manual Mixing Valve (S01-038) Distance to Finished Floor (Refer to Table Above) Bradley • 215-1451 Rev. F; ECN 13-00-001 3/5/2013... -
Page 11: Electrical Connections For Infrared
24 VAC Transformer (S83-134) Transformer Wires with Femal Connectors Volume Control Stop/Strainer/Check Valve (S02-045) Valve (S60-003) Solenoid Valve Assembly (S08-055) Optional Thermostatic Mixing Valve (S01-525) Manual Mixing Valve (S01-038) Bradley • 215-1451 Rev. F; ECN 13-00-001 3/5/2013... -
Page 12: Adjust The Temperature
• Once desired temperature has been reached, tighten lock nut to prevent change in temperature. Temperature Adjustment Stem Temperature Locking Bradley • 215-1451 Rev. F; ECN 13-00-001 3/5/2013... -
Page 13: Cleaning And Maintenance
Clean terrazzo washfountain bowls daily or as often as conditions require with any standard household detergent, hot water and soft cloth. Bradley terrazzo bowls may be refurbished by cleaning with tri-sodium phosphate, two pounds per gallon, and a scrub brush. Stubborn spots may be removed with emery cloth. After bowl is thoroughly cleaned and dried, Epoxy resin or a good quality polyurethane finish should be applied. -
Page 14: Soap Valve Parts List And Maintenance
Valve Attaching Assembly Parts S09-057 S09-057S Item Part No. Description 124-001D Washer — 110-057 — 125-001AN Stopper — 159-114 Reinforcing Plate — 124-001AT Washer — 160-176 Screw — S09-040 Valve S53-045 Adaptor Bradley • 215-1451 Rev. F; ECN 13-00-001 3/5/2013... - Page 15 Soap thickness is determined by a measurement called viscosity. Soap viscosity should be between 100 cps (centerpoise) and 2500 cps for all Bradley soap dispensers. Thinner soaps are perceived by the users as being “watered down” so users tend to take more than they need, resulting in waste.
-
Page 16: Sprayhead Parts List And Troubleshooting
The sprayhead shown above includes a perforated neoprene spray ring grommet that is self-cleaning. The water pressure flexes the spray holes which slows accumulation of foreign matter and tends to “break loose” any such deposits that may have accumulated. Bradley • 215-1451 Rev. F; ECN 13-00-001 3/5/2013... -
Page 17: Infrared Troubleshooting
If you need further assistance, please call your local Bradley representative. Please call us at 1-800-Bradley if you need the name and telephone number of your local Bradley representative. Bradley • 215-1451 Rev. F; ECN 13-00-001... -
Page 18: Solenoid Valve Troubleshooting
• If the solenoid valve does not turn on, check the wiring for proper connections. If it still fails to turn on, the problem may be in the sensor. Refer to the Troubleshooting Infrared instructions on page 15 and follow the sensor troubleshooting procedure outlined there. Bradley • 215-1451 Rev. F; ECN 13-00-001 3/5/2013... -
Page 19: Stop, Strainer And Check Valve Parts List
2. Inspect check valves for proper installation. 3. Open the stops and clean the strainers, if necessary. 4. Inspect mixing valve for proper installation (see Vernatherm valve on page 25). Bradley • 215-1451 Rev. F; ECN 13-00-001 3/5/2013... -
Page 20: Valve Assembly Parts
S45-198 Item Part No. Description Qty. 125-001BC O-Ring 152-038 Roll Pin 121-016 Bonnet 121-016A Bonnet — — 124-001BD Fiber Washer 119-060 Valve Core 118-033 Valve Body — 118-033B Valve Body — — Bradley • 215-1451 Rev. F; ECN 13-00-001 3/5/2013... - Page 21 Vernatherm Thermostatic Mixing Valve (S01-525) Parts List — Repair Kit S65-259 Nut 3/8-24 Hex Jam Item Part No. Qty. Description S39-413 Thermostat 125-001BX O-Ring 125-157 O-Ring O-Ring O-Ring Stem Thermostat Piston Spring Seal Cup Valve Body Bradley • 215-1451 Rev. F; ECN 13-00-001 3/5/2013...
-
Page 22: Thermostatic Mixing Valve Troubleshooting
Solution External leaks. Damaged O-rings. Replace O-rings where necessary. For replacement of the O-rings, contact your Bradley representative and ask for Repair Kit (part number S65-259). Improper water Thermostat is slowly failing or Check the thermostat for proper operation. temperature or not working at all.
Need help?
Do you have a question about the WF2613 and is the answer not in the manual?
Questions and answers