
Related Manuals for KVM-TEC MASTERflex


Summary of Contents for KVM-TEC MASTERflex
- Page 1 MANUAL 6012 MASTERflex Single copper 6022 MASTERflex Dual copper 6013 Masterflex Single Fiber 6023 Masterflex Dual Fiber Check out www.kvm-tec.com our Installation Channel:...
-
Page 2: Table Of Contents
1.4 About your MASTERflex single copper 1.5 About your MASTERflex dual copper 1.6 About your MASTERflex extender dual in fiber 1.7 Product elements - MASTERflex extender single in fiber 1.8 Product elements - MASTERflex extender dual fiber 1.9 About your MASTERflex backpanel 1.10 About the status LED... - Page 3 3.8.1 Firmware update with Switching Manager 3.5.1 DDC Main (single) 3.8.2 Firmware update with USB stick 3.5.2 DDC Second (dual) 3.9 Unlock an upgrade 3.6 Extender Settings 3.9.1 Enable or Disable USB Memory upgrade 4 | kvm-tec kvm-tec | 5...
- Page 4 4.6 IP Management 5. troubleshooting & first aid 6.Maintance & care 6.1 Extender care 6.2. Disposal 7. Warranty 7.1. Standard warranty 7.2 Extended warranty 8. cable requirements 8.1 Requirements for CAT5e/6/7 cables 8.2 Requirements fiber cables 6 | kvm-tec kvm-tec | 7...
-
Page 5: Introduction
MASTERflex MV/MV-F KVM Extender will bring you joy for many Please ensure that everyone who uses the product has read and followed these warnings years to come. -
Page 6: Technical Specifications
KVM Extender (local unit and remote unit) • In particular, ensure to avoid damage to the mains adapter. Model: MASTERflex single and dual copper • Use the product with a suitable, properly installed and easily accessible mains power MASTERflex single and dual fiber socket. -
Page 7: About Your Masterflex Single Copper
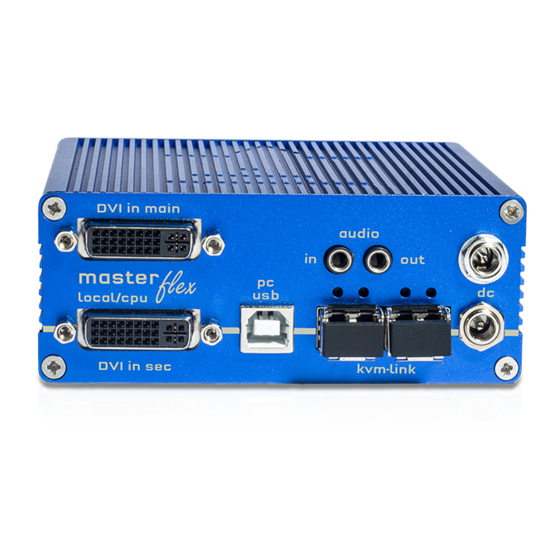
1. introduction 1. introduction 1.4 AbouT YouR MASTERFlEx SinglE CoPPER Remote Extender (Con) local Extender (CPu) name function name function DVI out DVi to monitor . dvi-in DVI connection to PC USB from keyboard and mause dvi-in DVI connection fromPC audio in Audio in from microfon etc. -
Page 8: About Your Masterflex Dual Copper
1. introduction 1. introduction 1.5 AbouT YouR MASTERFlEx duAl CoPPER Remote Extender (Con) local Extender (CPu) name function name function dvi-in DVI in 2 from PC DVI to Monitor 2 dvi-main DVI connection to PC DVI to Monitor 1 USB to PC... -
Page 9: About Your Masterflex Extender Dual In Fiber
1. introduction 1. introduction 1.6 aboUt YoUR MaSteRflex extendeR dUal In fIbeR local Extender (CPu) Remote Extender (Con) name function dvi-in DVI in 2 from PC dvi-main DVI connection from PC name function USB to PC DVI out DVI to Monitor . -
Page 10: Product Elements - Masterflex Extender Single In Fiber
1. introduction 1. introduction 1.7 PRoduCT ElEMEnTS - MASTERFlEx ExTEndER SinglE In fIbeR local Extender (CPu) Remote Extender (Con) name function dvi-out DVI connection to monitor name function dvi-in DVI in from PC DVI-out DVI to Monitor. USB to PC... -
Page 11: Product Elements - Masterflex Extender Dual Fiber
1. introduction 1. introduction 1.8 PRoduCT ElEMEnTS - MASTERFlEx ExTEndER duAl fIbeR local Extender (CPu) Remote Extender (Con) name function dvi-in DVI 2 connecition from PC dvi-main DVI to PC name function USB from PC dvi out DVI to Monitor 2... -
Page 12: About Your Masterflex Backpanel
1. introduction 1. introduction 1.9 AbouT YouR MASTERFlEx bACKPAnEl 1.10 aboUt tHe StatUS led The Status LED (8/15) can light red, orange or green. Table 1 shows the meaning of each colour. Also see chapter Troubleshooting. bACKSidE SMARTflex Single & SMARTflex dual... -
Page 13: Installation Of The Extender
2.1 unPACKing And ChECKing ThE ConTEnTS Make sure that the packaging contains the following content: MASTERflex single fiber Before using the product for the first time it should be checked for damage. In case of Delivery content - Local (CPU) damage due to transport inform the carrier immediately. -
Page 14: Mounting Options
Rack mounting kit RMK- FLEX- FN - T Part-Nr. 6233 RMK- FLEX-FN The rack mounting kit RMK-FN is for assembling kvm-tec MASTERflex extenders. - 4 single or 4 dual Extender. It consists of 19“ Rack Shelf, an alu-faceplate and a power supply. -
Page 15: Quickinstallation Masterflex Single Copper
2. INSTALLATION Of The exTeNder 2. INSTALLATION Of The exTeNder 2.4 QuiCKinSTAllATion MASTERFlEx SinglE CoPPER 2.5 QuiCKinSTAllATion MASTERFlEx duAl in CoPPER Power plug 12V 1A Power plug Power plug 12V 1A (redundant) 12V 1A Power plug 12V 1A (redundant) Network cable CAT5e/6/7/ up to 150m/492ft main link... -
Page 16: Quickinstallation Masterflex Single In Fiber
2. INSTALLATION Of The exTeNder 2. INSTALLATION Of The exTeNder 2.6 QUIcKInStallatIon MaSteRflex SInGle In fIbeR 2.7 QUIcKInStallatIon MaSteRflex dUal In fIbeR Power plug Power plug 12V 1A 12V 1A Power plug Power plug 12V 1A (redundant) 12V 1A (redundant) -
Page 17: Start Up
2. Pull the metal latch of the SFP module forwards until it is at a right angle. 3. Replace the SFP module with the other module. Put the metal latch back in position. Only 2.11 ReMoVInG a fIbeR cable use SFP modules from kvm-tec, or recommended by kvm-tec. To remove a fiber cable: •... -
Page 18: Best Practice For Windows 10
2. INSTALLATION Of The exTeNder 2. INSTALLATION Of The exTeNder 2.12 bEST PRACTiCE FoR WindoWS 10 disable USb energy Savings in Windows 10 34 | kvm-tec kvm-tec | 35... -
Page 19: Extender Settings
Features Overview Overview all Features D DDC Option DDC Option Fixe Setting 1020 x 1080 Local Settings Setting Local Overview Remote Settings Setting Remote Overview About Overview Overview all Upgrades Q Exit Close the OSD 36 | kvm-tec kvm-tec | 37... -
Page 20: System Status
(mass storage usable) Disabled/Enabled data is currently able to be transmitted. Freeze last Image (Disabled)Disabled/Enabled Video and USb show if data is currently being transmitted. USB Emulation Mode (Disabled ) Disabled/Enabled Power Redundance Alert Link Redundance Alert 38 | kvm-tec kvm-tec | 39... -
Page 21: Point To Point
By pressing the „M“ button you can switch the Matrix Switching Mode off and on 3.4.3 USb SaVe featURe The kvm-tec feature „USB save“ prevents the intrusion of viruses via the USB interface by deacti- vating mass storage devices. By pressing the key „S“ you can switch the USB save feature on and off... -
Page 22: Usb Emulation Mode
3.4.6 PoWER REdundAnCE AlERT And linK REdundAnCE aleRt Our Masterflex and Maxflex single devices are redundant. Should one port fail, the other port immediately takes over. In such a case you will receive an alarm and can see which port has failed. -
Page 23: Ddc Menu
The test can be ended at any time by pressing the “Enter” or “→” key. If no error has occurred, the status reports: “Test OK! If errors occurred during the test, the status displays the sum of all errors that occurred. 44 | kvm-tec kvm-tec | 45... -
Page 24: Ddc Main (Single)
3. EXTENDER sETTiNgs 3. EXTENDER sETTiNgs 3.5.1 ddC MAin (SinglE) 3.5.2 ddC SECond (duAl) 46 | kvm-tec kvm-tec | 47... -
Page 25: Local Settings
2.Press the L button. The Local Settings menu is displayed. 3.Press the R button. The Remote Settings menu is displayed USB Compatibility Mode Disabled/Enabled USB Remote Wakeup Disabled/Enabled Compatibility with Linux Disabled/Enabled Bandwidth Reduction VGA Parameters VGA-1 Parameters 48 | kvm-tec kvm-tec | 49... -
Page 26: Usb Compatibility Mode
To enable / disable the USB compatibility mode 1. From the Extender Settings menu, press the L key: The LOCAL SETTINGS menu appears 2. Press the U key to enable or disable the USB compatibility mode 50 | kvm-tec kvm-tec | 51... -
Page 27: Compatibility With Linux
- Press S to save the settings and exit the menu. - Press Q to exit without saving. Here the bandwidth can be reduced. The basic setting is 0! You can change the bandwidth with +/- or u/d. VGA Parameters 52 | kvm-tec kvm-tec | 53... -
Page 28: Remote Settings
• Press e to select English (EN) • Press d to select German (DE) • Press f to select French (FR) VGA-1 Parameters 3.7 ReMote SettInGS • Press the R button to display the Remote Setting menu. 54 | kvm-tec kvm-tec | 55... -
Page 29: Editing Keyboard Shortcuts
Press arrow left / right to change volume Press arrow up / down to set direction Press a single key. Edit the frequency with left and right arrows. OR - Press a key combination dual single 56 | kvm-tec kvm-tec | 57... -
Page 30: Usb Share Any Key
To reactivate the monitor, press any key on the keyboard or connect to a partner. If the function is deactivated, this works with the predefined hotkeys (see 3.7.2.) Enable and disable power save mode on the remote screen. In the main menu, press G > R. 58 | kvm-tec kvm-tec | 59... -
Page 31: Hiding System Status Menu
This will remove the status screen and the image remains black. For most keyboards, use the 0 setting. When using USB, some mice act like a keyboard. In this case, select fallback mode 1 or 2. 60 | kvm-tec kvm-tec | 61... -
Page 32: Lock Menu
The frame start of the monitor is synchronized with the graphic card. Some monitors are very sensible regarding frequency changes. Therefore the changes should be done slow and the synchronization takes a bit more time The monitor sync strength can be adjusted between 0-3. 62 | kvm-tec kvm-tec | 63... -
Page 33: Update
It takes about 2 minutes until the firmware is loaded into the extender. The bar on the right in the column the main window fills blue dual 2. is the update. attentIon Only if the bar is grey, the update is finished. 64 | kvm-tec kvm-tec | 65... -
Page 34: Firmware Update With Usb Stick
4. the USB stick must be formatted with FAT-32 6. The extender will automatically restart. 7. To confirm the upgrade has been unlocked return to the Options Overview menu and check that the relevant upgrade is now displayed in green 66 | kvm-tec kvm-tec | 67... -
Page 35: Enable Or Disable Usb Memory Upgrade
3.9.3 EnAblE oR diSAblE VgA uPgRAdE This upgrade enables the use of VGA analog signals on the local unit. For a description on how to enable or disable the sound upgrade, see in Chapter 3.9 “Unlock an upgrade. 68 | kvm-tec kvm-tec | 69... -
Page 36: About This Device
Switching Manager software and all functions are described in the Switching Manager 2000 upgrades. You can also see the current firmware version here. manual. You can download the manual from our website. www. kvm-tec.com single dual... -
Page 37: Display Switching List
Available devices that the user can connect to are displayed here. Display of all extenders that can be shared. The current image of the workstation can be shared with other remote units via this list 72 | kvm-tec kvm-tec | 73... -
Page 38: Favorite List
If you are not connected through a network switch, you can connect directly to an encoder with point-to-point mode. In the main menu, press P. After logging in, the user receives his personalized lists (Devices, Favorites List). 74 | kvm-tec kvm-tec | 75... -
Page 39: Searchbox-Function
4.6 iP MAnAgEMEnT In the list view you can search for the different extenders The KVM extenders from kvm-tec support three different addressing methods. The IP Manage- ment menu is only accessible in the active “Matrix Switching Mode” under Features. - Page 40 If all four IP addresses are overwritten, “Save/send settings” must be used to transmit the new values to the extenders. The KVM extenders from kvm-tec support the DHCP protocol (Dynamic Host Configuration Protocol). This allows the assignment of network addresses by a DHCP server.
-
Page 41: Troubleshooting & First Aid
Check if other units have ther Unit display the same behaviour led is blinking Different firmware Please contact the kvm-tec support team via e-mail: green or USB is not support@kvm-tec.com or by phone: +43 2253 81912 30 compatible Contact kvm-tec Contact kvm-tec... -
Page 42: Maintance & Care
7. WaRRantY 6.MaIntance & caRe 6.MaIntance and caRe 7.1. StandaRd WaRRantY 6.1 extendeR caRe The warranty period is 24 months from the date of purchase. The warranty expires in case of: • External effort caution! Do not use solvent-containing cleaners. Do not use wipes, alcohols (e.g. spiritus) or •... -
Page 43: Cable Requirements
Requires dedicated fiber connection: cable type Singlemode with LC connector color Wavelength ( ) of 850 nm in multi-mode or 1310 nm TX -1550 nm RX in single-mode orange/White orange Green/White blue blue/White Green brown/White brown 84 | kvm-tec kvm-tec | 85... - Page 44 9.1 RecoMMended SWItcHeS Find our newest updates and FAQs on our homepage: http://www.kvm-tec.com/support A list of kvm-tec tested and recommended switches can be found on our website at kvm-tec Inc. USA Sales p+1 213 631 3663 & +43 225381912-22 www.kvm-tec.com email: officeusa@kvm-tec.com...
- Page 45 11. noteS 88 | kvm-tec...
Need help?
Do you have a question about the MASTERflex and is the answer not in the manual?
Questions and answers