
Related Manuals for Pedigo 500


Summary of Contents for Pedigo 500
- Page 1 Installation & Operation Manual Pediatric Crib Stretchers Part Number: 504-0062-00 Revised: 11/2020...
-
Page 2: Table Of Contents
Contents Owner’s Product Identification . . . . . . . . . . . . . . . . . . . . . . . . . . . . . . . . . . . . . . . . . . . . . 2 Explanation of Safety Signals . -
Page 3: Owner's Product Identification
Information that you will need to provide for servicing - key information is highlighted. Date of Purchase Serial Number Name of Owner / Facility / Department Weight Capacity Name of Authorized Pedigo Dealer Telephone # of Authorized Pedigo Dealer Address of Authorized Pedigo Dealer Weight Capacity Close-up Product ID Close-up... - Page 4 This manual covers complete instructions for the installation, operation, and normal care of the Model 500 Pediatric Crib Stretcher. It is intended that this manual be used by any medical personnel responsible for operating the stretcher while transporting a patient, while performing a medical examination or procedure, or while performing operator-level maintenance.
-
Page 5: Explanation Of Safety Signals
SAFETY INSTRUCTIONS Explanation of Safety Symbols and Notes Indicates a hazardous situation, that, if not avoided, will result in death or serious injury . This signal word is limited to the most extreme situations . Indicates a hazardous situation, that, if not avoided, could result in death or serious injury . -
Page 6: Installation
INSTALLATION Unpacking The 500 stretcher weighs approximately 220 lbs (100 kgs) . Get an assistant if necessary and use proper lifting techniques . Failure to do so could result in serious back injury or other injury . To avoid damaging the stretcher’s upholstered mattress or other components, do not use a knife or other sharp object to open the stretcher’s... -
Page 7: Inspection
Inspection Inspect the stretcher for any shipping damage . Report any damage to the shipping company and fill out a concealed damage report. General items to inspect for shipping damage are: 1) Stretcher does not roll when the brakes are engaged, see page 12. 2) Steering works properly - see page 11. -
Page 8: Checklist: Install Options &Authorized Accessories
Checklist: Installed Options & Authorized Accessories The options and accessories that are authorized for use with the stretcher are listed below . Check all the options and accessories installed or shipped with your stretcher. Option Name Item Number Utility Shelf 5103001 ... -
Page 9: Description
Description Introduction The 500 Crib is a fixed height stretcher which is primarily used to support and transport patients in any treatment or procedures environment, and may be used for general examinations and procedures. The patient surface is adjustable from a full horizontal surface to an upright sitting position using the fowler back rest. -
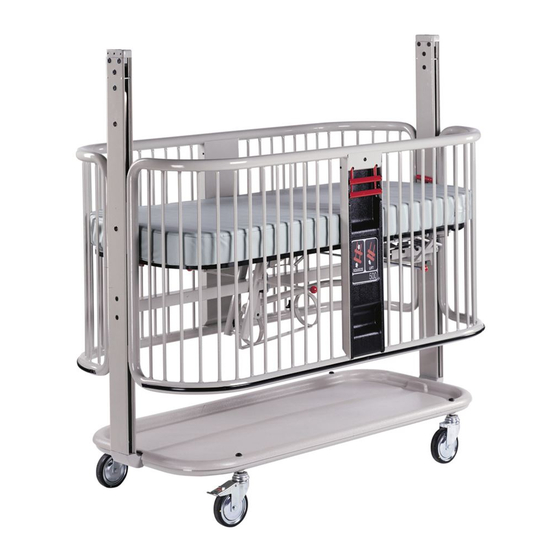
Page 10: Components Overview
Components Overview The stretcher’s major components locations and names are shown below. Description of Components Side rails Casters Mattress Fowler Control Litter Top Side rail Release Handle Uprights Fowler Section Skid Guard Base Trendelenburg Control... -
Page 11: Controls & Indicators
Controls and Indicators The illustrations below shows the location of the stretcher’s controls and indicators. The table below describes their function Reference / Control Function Fowler Handles (red) Releases the Fowler allowing the Fowler (back) section to be raised or lowered. Trendelenburg Release Handles (red) Releases the Trendelenburg, allowing the litter top to be moved into the Trendelenburg or Reverse Trendelenburg posi tion. -
Page 12: Stretcher Operation
Stretcher Operation STEERING CASTER OPERATION Steering controls the steering functions using the pedal on the caster. Engage steering by pressing down on the dark grey pedal and then swiveling the caster at the patient’s right foot-end. Caster will lock in the trailing position with an audible click. The other three casters will swivel freely. -
Page 13: Brake Caster Operation
Stretcher Operation BRAKE CASTER OPERATION Engage the brakes by pressing down on the red pedal on at least one caster on each side of the stretcher. This locks the casters so they cannot roll or swivel and the stretcher cannot be moved. Disengage the brakes by lifting up on the red pedal located on each brake caster. -
Page 14: Fowler Operation
Stretcher Operation FOWLER POSITION OPERATION Fully engage the fowler bail in one of three positions . Failure to do so could result in injury to the patient or the caregiver . Raise the Fowler Section 1 . Lift the red Litter Strap (A, Figure 4), the Fowler bail (B) will slide along the Catch Plate (D) and drop into detents for set Fowler angles . -
Page 15: Trendelenburg Operation
Stretcher Operation TRENDELENBURG OPERATION Fully engage litter catch in desired position . Failure to do so could result in injury to the patient or the caregiver . Litter Straps when raising or lowering litter top . Failure to do so could result in injury to the patient or the caregiver . -
Page 16: Options
90° I.V. Pole • Option Install I.V. Pole into socket and secure with included knob. Locating Sockets for I.V. Poles There are four sockets for mounting I.V. poles on each stretcher; two sockets are located on each end of the stretcher. -
Page 17: Oxygen Bottle Holder
Oxygen Bottle Holder Option • With the side rail fully raised, stand at the head end, patient right side, of the stretcher to guide an O bottle in or out of the O holder. Always push the O holder into the latch position before lowering the side rail . -
Page 18: Utility Shelf
Utility Shelf • Option With the side rail fully or partially raised, the utility shelf can be accessed from either side of the stretcher. Ensure any objects on the shelf are fully within the shelf . Anything outside of the shelf may cause injury to the patient, caregiver or equipment, when the side rails are lowered . -
Page 19: Crib Top
Crib Top Options • Install either crib top onto the crib by aligning the mounting tubes with the sockets on top of the crib uprights and sliding them into place. Secure in position using the tethered pins on each side. Security Top Croupette Top It is recommended that the installation of the security top be conducted... -
Page 20: Infusion Pump Adaptor
Infusion Pump Adaptor Option • The Infusion Pump Adaptor can be installed at the head or foot end of the Crib Stretcher. Once mounted to the Crib Stretcher, an infusion pump can be attached to the Crib Stretcher. Ensure the adaptor is securely fastened before attaching an infusion pump . -
Page 21: Maintenance
Maintenance Cleaning Mattress Cover Regular care should be maintained by daily wiping with a damp cloth or sponge, and periodic cleaning with a mild soap and water solution. The mattress cover material is resistant to most medicinal-type stains, but may be damaged by solvents and dyes . Remove any fluids which are spilled on the upholstery immediately . - Page 22 Lubricant will allow free movement of sliding parts and reduce the possibility of noise. Mattress Specifications and Replacement: The Model 500 Crib mattress has the following specifications: Width: 26” (66.0 cm); Length: 56 ¼”(142.9 cm); Thickness: 3½ inches (8.9 cm); Radii on Corners: 7½...
-
Page 23: Preventative Maintenance
Preventive Maintenance Use the following daily inspection table to assure quiet, smooth, and dependable operation. Have your authorized dealer inspect your stretcher every six months. Inspection or Service Action* Upholstery Condition of upholstery should be maintained with a clean, damp cloth or sponge . A mild soap and water solution should be used for hard-to-clean areas and stained areas . -
Page 24: Calling For Service
Calling for Service If you are having a problem or have a question, refer to the inside front cover of this manual and call Technical Support at the number below. Make sure that you have the information that is highlighted on the inside front cover of this manual available. -
Page 25: Brochure
SPECIFICATIONS STANDARD FEATURES Model Number 500 stretcher/crib • 200 lbs. weight capacity rating Patient Surface 26" x 56¼" (66 x 143 cm) • Three 5" Total Lock casters and one Steer caster for increased maneuverability Overall Length 60" (152 cm) Overall Width 30¼"... -
Page 26: Limited Warranty
Pedigo’s obligation under this warranty is limited to the repair or replacement, at Pedigo’s option, of the parts or the products the defects of which are reported to Pedigo within the applicable warranty period and which, upon examination by Pedigo, prove to be defective. - Page 27 Installation & Operation Manual 500 Pediatric Crib Stretcher 4000 SE Columbia Way Vancouver, Washington 98661 USA www.pedigo-usa.com • 800.822.3501 • 360.696.1700 Proudly © Pedigo Products, Inc. 2020 Printed in the U.S.A. U SA...
Need help?
Do you have a question about the 500 and is the answer not in the manual?
Questions and answers
Good day. I would like to order a new caster for my Pedigo 500 crib