Table of Contents
Advertisement
Available languages
Available languages
Quick Links
B
B
© Copyright LOTRONIC 2016
4
x
8
W
B
A
R
L
4
x
8
W
B
A
R
L
A
R
R
E
L
E
D
4
x
8
W
A
R
R
E
L
E
D
4
x
8
W
FREEBARQUAD-BL
FREEBARQUAD-WH
GB - INSTRUCTION MANUAL
F - MANUEL D'UTILISATION
E
D
W
I
R
E
L
E
S
S
B
E
D
W
I
R
E
L
E
S
S
B
S
A
N
S
F
I
L
S
U
S
A
N
S
F
I
L
S
U
FREEBARQUAD
A
T
T
E
R
Y
A
T
T
E
R
Y
R
B
A
T
T
E
R
I
E
R
B
A
T
T
E
R
I
E
(15-1822)
(
15-1821)
Page 1
Advertisement
Table of Contents

Related Manuals for afx light FREEBARQUAD-BL


Summary of Contents for afx light FREEBARQUAD-BL
- Page 1 FREEBARQUAD-BL (15-1822) FREEBARQUAD-WH 15-1821) GB - INSTRUCTION MANUAL F - MANUEL D’UTILISATION © Copyright LOTRONIC 2016 FREEBARQUAD Page 1...
- Page 2 Thank you for having chosen our AFX LED WIRELESS BATTERY LIGHT. For your own safety, please read this user manual carefully before installing the device. SAFETY INTRODUCTION “AC INPUT” is the charging interface. When charging, the fixture must be “Turn OFF”. Lease do not work in the AC unless it’s under emergency If it works in the AC for a long time, the charger and battery of the fixture will overwork, Bring out a lot of heat and cause a risk of explosion.
- Page 3 MOUNTING Orientation This fixture may be mounted in any position, provided there is adequate room for ventilation When selecting installation location, take into consideration lamp replacement access and routine maintenance. Safety cables must always be used. Never mount in places where the fixture will be exposed to rain, high humidity, extreme temperature changes or restricted ventilation. If the external flexible cable or cord of this light is damaged, it shall be exclusively replaced by the manufacturer or his service agent or a similar qualified person in order to avoid a hazard.
-
Page 4: Power Supply Connection
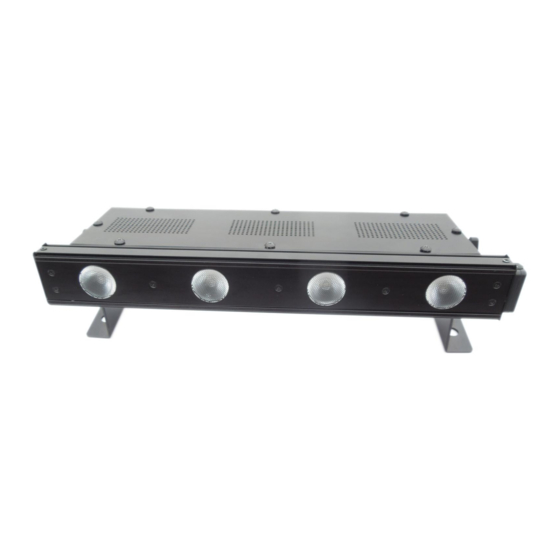
1. DESCRIPTION 1. LEDs 6. Power switch / Battery recharge 2. Bluetooth indicator 7. DMX signal input 3. Hanging bracket 8. DMX signal output 4. Battery life indicator 9. Power output 5. Control panel 10. Power input 2. POWER SUPPLY CONNECTION The product has a socket with power in and power out. -
Page 5: Functions For Control Panel
FUNCTIONS FOR CONTROL PANEL SOUND ACTIVED / AUTOMATIC Set the control panel to A024, the units will run automatic, running speed can be adjusted by the digital menu. Setting to A025, the unit will run in sound mode. The unit run with music, when whitout music, the unit will run automatically. MASTER/ SLAVE MODE Connect the products as bellow and the power on all connected at the same time, the control panel of the master displays current saved mode, slaves follow the actions of the master. - Page 6 BATTERY LIFE INDICATOR / BATTERY MAINTENANCE The battery life indicator located on the products displays the remaining amount of internal battery life. Use the chart below to find out how much battery life remains per charge cycle. The light to the far right flashes during charging. The units come with a replaceable lithium-ion battery for cable-free operation.
- Page 7 DMX channel assignments and values - 5 DMX channel - 7 DMX channel © Copyright LOTRONIC 2016 FREEBARQUAD Page 7...
-
Page 8: Technical Specifications
5. AC POWER / BATTERY CHARGE The produce has a 3 selector power switch for select the power to supply the units or recharge the lithium-ion Battery . The functions of power switch are shown as below Press the switch to “ ”, When the units is connect to AC power outlet , the units are supplyed with AC power , without AC power, the units will auto switch to Lithium-ion Battery power . - Page 9 © Copyright LOTRONIC 2016 FREEBARQUAD Page 9...
-
Page 10: Regles Generales
Nous vous remercions pour l’achat de cette BARRE A LED DMX AFX LIGHT. Pour votre sécurité, lisez attentivement ce manuel avant d’installer l’appareil. CONSIGNES DE SECURITE ET D’UTILISATION Si l’appareil a été exposé à des changements de température, ne le mettez pas immédiatement sous tension. -
Page 11: Montage
MONTAGE Orientation Vous pouvez installer cet appareil dans n’importe quelle position pourvu qu’il y ait suffisamment d’espace pour assurer une ventilation suffisante. Lorsque vous installez l’appareil, choisissez un emplacement qui permet d’accéder facilement à l’appareil afin d’effectuer l’entretien de routine. Utilisez toujours des câbles de sécurité. -
Page 12: Branchement De L'alimentation
1. DESCRIPTION 1. LEDs 6. Bouton ON/OFF/Recharge batterie 2. Voyant Bluetooth 7. Entrée DMX 3. Support 8. Sortie DMX 4. Indicateurs état de la batterie 9. Sortie secteur 5. Panneau de contrôle 10. Entrée secteur 2. BRANCHEMENT DE L’ALIMENTATION Cet appareil est équipé d’une prise entrée et sortie alimentation secteur. 3. -
Page 13: Mode Master/ Slave
FONCTIONS DU PANNEAU DE CONTROLE ACTIVATION MODE AUDIO/ MODE AUTOMATIQUE Sélectionner le menu « ACT » puis la valeur A024 sur le panneau de contrôle, le projecteur fonctionnera de manière automatique, la vitesse peut également être régler. Sélectionner la valeur A025, et la barre fonctionnera avec la musique, quand il n’y a pas de musique il fonctionnera automatiquement. - Page 14 INDICATEUR DE CHARGE DE LA BATTERIE / MAINTENANCE DE LA BATTERIE L’indicateur de charge de la batterie figurant sur l’appareil indique l’état de la batterie interne, reportez vous au tableau ci-dessous voir la correspondance de l’état de charge. Le voyant complètement à droite clignote pendant la charge de la batterie. Les barres sont livrées équipées d’une batterie lithium-ion amovible, pour une utilisation sans câble.
- Page 15 Assignation des canaux DMX et des différentes valeurs - 5 canaux DMX - 7 canaux DMX © Copyright LOTRONIC 2016 FREEBARQUAD Page 15...
-
Page 16: Caracteristiques Techniques
5. ALIMENTATION AC POWER / CHARGE DE LA BATTERIE Le produit a un bouton à 3 positions pour mettre en marche la barre LED ou en charge les batteries lithium-ion. Ci-dessous les différentes positions : Placer le bouton sur la position “ ”... - Page 17 © Copyright LOTRONIC 2016 FREEBARQUAD Page 17...
Need help?
Do you have a question about the FREEBARQUAD-BL and is the answer not in the manual?
Questions and answers