Table of Contents
Advertisement
Quick Links
Advertisement
Table of Contents

Related Manuals for Bpt FUTURA IP


Summary of Contents for Bpt FUTURA IP
- Page 1 VIDEO ENTRY SYSTEM INTERNAL RECEIVER FB00295-EN USER MANUAL FUTURA IP...
-
Page 2: Use Of Device
USE OF DEVICE Maintenance and precautions for use of the Terminal • Do not expose the LCD screen to direct sunlight. • To clean the screen without accidentally pushing the buttons, press button for at least 3 seconds; the side LEDs go off and the handset LED comes on;... -
Page 3: Standard Functions
STANDARD FUNCTIONS Answering a call When there is a call the device screen displays the image of the caller (if available); the audio to and from the caller is not on. Press the button next to icon to refuse the call and go back to the home page. - Page 4 Record audio and video of a conversation Press the button next to icon to open the drop-down menu, press the button next to icon Call to start recording. Note: Recording cannot be interrupted. It lasts Record 10 seconds and is stored with the voicemail messages.
- Page 5 CONTACTS To access the contacts directory, select icon Contacts Contact Search on the home page and press the button next to icon Dial Number Luisa Rossi The directory contains the list of all the devices Mario Rossi on the network that can be contacted. Set Favourite Pietro Rossi Types of contact...
-
Page 6: Adding A Contact To Favourites
Calling a contact using a short number Press the button next to icon and, with the Contacts help of the side arrows, dial the short number assigned to the contact (see "Contact Details”). Dial Number Once the number has been entered, select button ①... - Page 7 FAVOURITES This window brings together all the contacts that Rossi house Favourites Mario Rossi have been listed as "Favourites". Rossi house Pietro Rossi To access one, select icon on the home page Main Call and press the button next to icon Rossi house To start the call, once the desired contact is Main Call...
- Page 8 Removing an entry panel from Favourites Press the button next to icon , to open the Entry Panels EAST ENTRANCE sub-menu to remove favourite entry panels/ surveillance cameras. WEST ENTRANCE Remove Press the button next to icon , select the NORTH ENTRANCE element that you want to delete from the list and press the button next to icon...
-
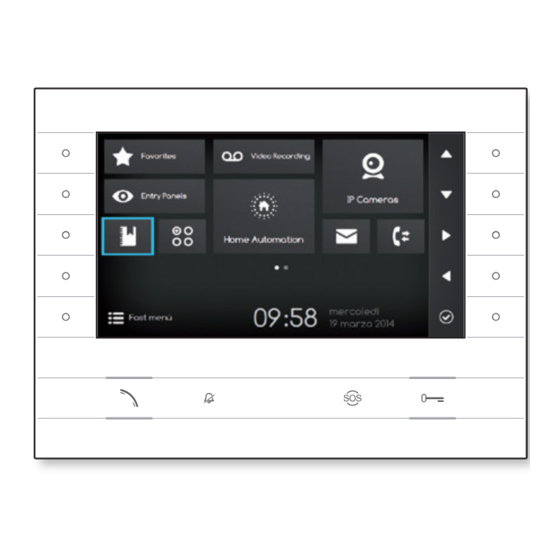
Page 9: Video Recording
VIDEO RECORDING Favourites Messages Enabling/disabling the video recording Entry Panels IP Cameras On the home page select icon , press and hold down the button next to icon until the Call Register Video Recording icon turns blue. When the function is on (blue icon), if an incoming call isn't answered within a pre-set Wednesday time, the call is automatically accepted and the... -
Page 10: Text Messages
TEXT MESSAGES It is possible to receive text messages from other Favourites Messages connected devices that have been enabled; for example the Concierge can send an alert by text Entry Panels IP Cameras message to all the Users connected. The presence of messages not yet viewed, and Call Register Video Recording how many of them there are, is shown in a red... - Page 11 IP CAMERAS The window shows a list of IP surveillance IP Cameras PI Camera Garden cameras connected to the network, which can PI Camera Parking be viewed. PI Camera Gate View images from IP surveillance camera On the home page select icon , briefly press the button next to icon to access the list of...
-
Page 12: Call Register
CALL REGISTER To access the call register, select icon on the Favourites Messages home page and press the button next to icon The window contains the list and the outcome Entry Panels IP Cameras of calls passing through the device, followed by date and time of the event. -
Page 13: System Info
SETTINGS Use the buttons on the side of the receiver to Settings move the selection until you get to page 2 of the home page. On the home page select icon , press the button next to icon to access the list of the device's options that can be set or consulted. -
Page 14: Date And Time
Date and Time This window lets you set the date and time of the terminal. MODE Date and Time Manual Manual mode NTP SERVER Choose the “Manual” mode and press the button next to icon DATE Friday 26 May 2014 TIME Back 2nd April 2014... - Page 15 192.168.1.3 the name that you want to give to the device. Back SERVER: In this space enter the server's IP address. Default IP addresses of Bpt servers: ETI/MiniSER Xip - 192.168.0.3 (port 0) - 192.168.1.3 (port 1) ETI/SER Xip, 192.168.1.1...
-
Page 16: Call Settings
SERVER TYPE: Choose the type of server the device is connected to from: XIP Server: Bpt server PASSWORD Generic: non-Bpt server None: if no server is present Save DISPLAY NAME Once all the necessary data have been entered, save the setting by pressing the button next to icon. -
Page 17: Video Voicemail
Video voicemail This window lets you set the voicemail activation delay, record a courtesy message and decide if RESPONSE DELAY (0...15s) Video Recording it should be played when the voicemail is on. ① ENABLE COURTESY MESSAGE ④ Select area ① and press the button next to COURTESY MESSAGE icon. - Page 18 IP Cameras This window lets you populate the list of IP cameras (page 11). IP Cameras Press the button next to icon to open the sub-menu and then the button next to icon to add a new camera. Remove 2nd April 2014 Select field ①...
-
Page 19: Aux Configuration
AUX Configuration This window lets you populate the list of auxiliary commands (page 8). Gate AUX List Entry panel B.2 Press the button next to icon to open the sub-menu and then the button next to icon to add a new auxiliary command. Remove 2nd April 2014 Select field ①... - Page 20 Fast Menu This window lets you populate the 9 boxes for the fast commands available, with the contacts Fast Menu or auxiliary (AUX) commands you want (page 4). Empty Empty Select one of the boxes that represent the Empty Empty fast menu buttons and press the button next to icon Empty...
-
Page 21: Display Brightness
Display Brightness This window lets you set preferences for dis- play brightness during use ① or in stand-by BRIGHTNESS Display mode ②. Using the buttons next to the arrows, ① ② select the video mode you want and use the buttons next to the arrows to adjust the video brightness. -
Page 22: Access To Web Interface
DEVICE SETTINGS VIA WEB INTERFACE Futura IP Access to web interface SETTINGS To access the settings web pages, enter the IP address of the device you want to configure into the address bar of your browser (Chrome, Firefox, MODALITÀ LOGIN LOG-IN MODE Safari). -
Page 23: Maintenance
SERVER: In this space enter the server's IP address. Voicemail Default IP addresses of Bpt servers: DISPLAY NAME ETI/MiniSER Xip - 192.168.0.3 (port 0) - 192.168.1.3 (port 1) Maintenance ETI/SER Xip, 192.168.1.1... - Page 24 Diagnostics Diagnostics Help Exit STATISTICS System Info STATISTICS LOG FILES This section brings together statistical data on the operation of the device. Date and Time LOG FILES LOG LEVEL This section lets you generate files containing data of use to technical Network Error service in identifying the causes of any possible problems.
Need help?
Do you have a question about the FUTURA IP and is the answer not in the manual?
Questions and answers