
Subscribe to Our Youtube Channel
Related Manuals for Humanware Victor Reader Classic +


Summary of Contents for Humanware Victor Reader Classic +
-
Page 1: Table Of Contents
Victor Reader Classic + with Recording User's Guide TABLE OF CONTENTS Getting Started session About Victor Reader Classic + with Recording 1. Overview of Victor Reader Classic + with Recording 1.1. Unpacking the Unit 1.2. Physical Description of Victor Reader Classic + with Recording 1.2.1. - Page 2 4.9.1. Card or CD DAISY book 4.9.2. Card or Internal Notes Book 4.9.3. Other Audio (mp3 CD, MP3 card, and CD-DA) 4.10. Key Describer Mode 5. Advanced Playback Functions 5.1. Go-to-Page 5.2. Listening to a Music or MP3 CD 5.2.1. Functions 6.
- Page 3 9.7.3. Categories 9.7.4. SD Card Label 9.7.5. Other 9.8. Memory Full 10. Technical Specifications 10.1. General 10.2. SD or MMC Memory Card 11. Troubleshooting 11.1. Book Navigation 11.1.1. Why does Victor not always announce the same DAISY levels when I press the 2 and 8 keys? 11.1.2.
- Page 4 selected for quick notes" when I eject the flash card? 11.5.3. Why is there sometimes a long delay after I end a recording before I hear the message that the note has been saved? 11.5.4. Why do I have a category named, DEFAULT,? 11.5.5.
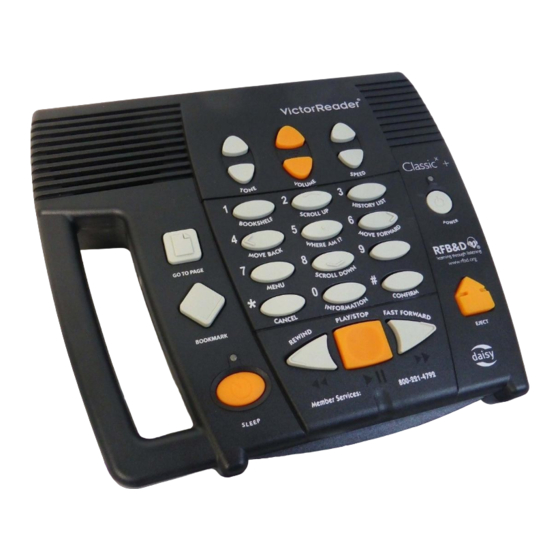
- Page 5 continue the session, simply press the Play/Stop key again. We are now ready to start the session. Back to Table of contents. 1.1. Physical description First, here is a physical description of Victor Reader Classic + with Recording. Have the unit positioned in front of you so that you can explore it. A large carrying handle, for easy transport, is located on the left side.
- Page 6 Back to Table of contents. 1.2. To insert and play a new book 1. Turn on Victor Reader by pressing and holding the power key, which is located above the eject key on the front of the unit. You'll hear a beep and a Welcome message.
-
Page 7: About Victor Reader Classic + With Recording
after a few seconds the motorized mechanism will gently slide the CD out of the drive. Back to Table of contents. 1.7. Conclusion And that's it! Now you know the basics of using Victor Reader. To learn about all the features in detail, please refer to the following User's Guide. This will enable you to use the talking book player to its full potential. -
Page 8: Overview Of Victor Reader Classic + With Recording
For additional information, please contact VisuAide: Telephone: (819) 471-4818 Toll-free (Canada & USA): 1 (888) 723-7273 Fax: (819) 471-4828 E-mail: info@visuaide.com Internet: www.visuaide.com VisuAide Inc. 1030 René-Lévesque Blvd. Drummondville, Québec, J2C 5W4 Canada Head office 841 Jean-Paul Vincent Blvd. Longueuil, Québec, J4G 1R3 Canada Back to Table of contents. -
Page 9: Physical Description Of Victor Reader Classic + With Recording
E-Mail: info@visuaide.com Web site: www.visuaide.com Back to Table of contents. 1.2. Physical Description of Victor Reader Classic + with Recording 1.2.1. The Front of the Unit front of the unit On the upper left corner of the front of the unit is the built-in speaker. The speaker provides high quality sound. -
Page 10: The Left Side Of The Unit
Back to Table of contents. 1.2.2. The Left Side of the Unit On the left side of the unit you'll find the built-in handle. Back to Table of contents. 1.2.3. The Right Side of the Unit On the right side of the unit, from top to bottom, you will find the power input used to connect the unit to a power outlet (identified by three lines), a line-out jack (identified by two lines), and a remote jack (identified by a single line). -
Page 11: Inserting Or Ejecting A Cd
Powering on Victor Reader is simple: 1. To turn the unit on, press and hold the Power key, which is the slightly inward curving button to the right of the twelve Numeric keys. You'll hear a beep and a welcome message. 2. -
Page 12: Rewind And Fast Forward
To start playing a book, press the Play/Stop key. To stop playing a book, press the Play/Stop key again. Back to Table of contents. 2.2. Rewind and Fast Forward These keys allow you to go backward or forward quickly. You'll then hear the recording at a faster rate of speed. -
Page 13: Adjust The Volume
indicated by a click sound. If you stop playback then the tone control positions will be spoken. Back to Table of contents. 3.2. Adjust the Volume To raise or lower the volume, press the Volume Up key or Volume Down key. The upper or lower range of the volume control is indicated by a click sound. -
Page 14: Navigation: Keys 2, 4, 6, And
4: Back 5: Where am I? 6: Forward Row three: 7: Menu 8: Navigation Element 9: Sleep Row four: *: Cancel 0: Info #: Confirm Back to Table of contents. 4.2. Navigation: Keys 2, 4, 6, and 8 navigation keys The 2, 4, 6 and 8 keys operate the navigation functions of Victor Reader. -
Page 15: Element Back Or Element Forward: Keys 4 And
To hear the list of navigation elements, use the 2 and 8 keys. Back to Table of contents. 4.2.2. Element Back or Element Forward: Keys 4 and 6 Keys 4 and 6 allow you to move forward or backward relative to the current element. -
Page 16: Where Am I?: Key
The history is erased when you change the book, or when you turn the unit off. To access the history, do the following: a) Press the History Key, Key 3 of the numeric keypad. b) Press Key 4 or Key 6 to move from one element to the next. Each time you press the key, you'll hear the history level and page number and play will begin. -
Page 17: Confirm And Cancel: The # And * Keys
up to a maximum total of 60 minutes. After that, pressing the Sleep Mode Key starts the cycle over. Note: If you wait more than 10 seconds before pressing the 9 Key, Victor Reader automatically returns to the start of the cycle. Back to Table of contents. -
Page 18: Other Audio (Mp3 Cd, Mp3 Card, And Cd-Da)
The available Info key items are: Number of Notes and Number of Categories. Percentage of Card Memory used or percentage of Internal Memory used. Recording Time remaining in hours and minutes. Selected Recording compression. Total number of Bookmarks placed. Current date and time. Power status, including whether the unit is operating on battery power or adapter, and if the battery is being recharged. -
Page 19: Listening To A Music Or Mp3 Cd
a) Press the Go-to-Page Key, the upper one in the left column. b) Enter a page number on the numeric keypad. c) Press the # Key. Victor Reader will announce the number of the page reached. Alternately, press the Play key to start playing from the selected page automatically. -
Page 20: Create A New Category
category first, you will create what is called a Quick Note in the last referenced category. Back to Table of contents. 6.1. Create a New Category Audio Notes are saved in categories so you should first create at least one category on your card or in the internal Audio Note book. -
Page 21: Create A Quick Note
The last audio note played or recorded is always saved as the current audio note position. Back to Table of contents. 6.3. Create a Quick Note If you do not wish to switch to an Audio Note book to create a note, you can use the Quick Note feature. -
Page 22: Delete An Audio Note
c) Use the 4 and 6 keys to position at the category where your note is saved. d) Use the 2 and 8 keys to select note level. e) Use the 4 and 6 keys to position at the audio note you wish to move. f) Press the Go-to-Page key three times. -
Page 23: Delete A Category
6.8. Delete a Category To delete a category, do the following: a) Use the Bookshelf key, Key 1, to select Internal Note Book or Card Note Book. b) Use the 2 and 8 keys to select category level. c) Use the 4 and 6 keys to position at the category to be deleted. d) Press the Go-to-Page key twice to remove the category. -
Page 24: Insert A Simple Bookmark
7.2. Insert a Simple Bookmark To insert a simple bookmark, do the following: a) Press the Bookmark Key, the second key in the left column, twice or until you hear 'insert bookmark'. b) On the numeric keypad, enter the number you wish to assign to the Bookmark. -
Page 25: Remove A Bookmark
time you press the key, you will hear the number of the previous or next bookmark and the book will play from the bookmarked position. Note that the bookmark list is ordered by their position in the book not by the bookmark number. -
Page 26: Memory Management
There are two items in this menu: low and high. High compression is GSM at 13 kbps. Low compression is 64kbps MP3. Select the recording compression using the 4 and 6 keys, then confirm your choice using the Pound or Play keys. -
Page 27: Backup
8.2.4. Backup Select this item to backup all your simple bookmarks, audio bookmarks and audio notes that you have saved in internal memory to the reserved backup folder on the SD Card. The backup folder name is $VR_Backup_yyyy-mm-dd_hhmm, where yyyy- mm-dd_hhmm is the date and time of the backup. -
Page 28: Select Year, Month, Day Format
Select this item to set the date and time. First, enter the 6 digit date in the current date format. Then, enter the 4 digit time in the current time format. In the AM/PM time format, you must also select between AM and PM. Back to Table of contents. -
Page 29: Memory
Back to Table of contents. 9.1. Memory There are two types of memory: internal and external. Internal memory is onboard flash. External memory refers to the removable SD (Secure Digital) type memory card, which can be purchased separately from various vendors. The removable external SD card is used to store and save the following types of files: Audio notes you record with the microphone or from the line-in source... -
Page 30: Recording Sources
High compression uses the GSM codec at 13 kilobits per second. It is a very good compression for voice recording and is recommended for all your audio notes. High compression requires only about 1 megabyte for each 10 minutes of recording. Low compression is 64 kilobits per second MP3. -
Page 31: Stereo Music
microphone sources are enhanced with auto gain control to automatically adjust the recording level. Back to Table of contents. 9.4.2. Stereo Music Note that music recorded through the line-in will be recorded in mono. Victor Reader Classic + With Recording does not record in stereo. If you monitor a line-in stereo source with headphones, you will hear the input in stereo but it will be converted to mono when recorded. -
Page 32: File Structure And File Names
the Victor Reader Bookshelf as an Other Audio book. Back to Table of contents. 9.7. File Structure and File Names This section describes the file structure and naming conventions used for Victor Reader Classic + With Recording. This information can be useful when you transfer files between Victor Reader and your PC via the SD card. -
Page 33: Sd Card Label
Back to Table of contents. 9.7.4. SD Card Label The SD Card Label file is a reserved file called $VR_CardLabel.MP3 (or .wav if recorded in high compression GSM), which is created in the root of the SD flash. This file contains the audio label that you recorded for the SD card. Back to Table of contents. -
Page 34: Sd Or Mmc Memory Card
Power Source Range: 100-240 V AC, 50-60 Hz Coding Algorithms: PCM, ADPCM, MPEG Back to Table of contents. 10.2. SD or MMC Memory Card Internal Flash Memory: 21MB, partitioned into 9mb for audio bookmarks (90 minutes at GSM high compression) and 12mb for audio notes (120 minutes at GSM high compression). -
Page 35: How Do I Know What Daisy Navigation Levels Are Available In My Book
11.1.2. How do I know what DAISY navigation levels are available in my book? The 2 and 8 keys will cycle through the levels of navigation available in the book. Many book producers include a section at the beginning of the book that describes what the DAISY levels correspond to in that book. -
Page 36: Can I Damage My Victor If I Accidentally Insert The Ac/Dc Power Adapter Plug Into The Wrong Hole
Back to Table of contents. 11.2.3. Can I damage my Victor if I accidentally insert the AC/DC power adapter plug into the wrong hole? Back to Table of contents. 11.2.4. How can I confirm that I have connected the AC/DC adapter correctly? When you place the player in front of you with the handle on the left, the hole for the AC/DC adapter plug is the hole farthest from you on the right edge of... -
Page 37: What Should I Do If My Cd Is Stuck And Will Not Eject
The batteries are rated for 500 charge/discharge cycles. After that they will still recharge but their capacity to retain a charge will decrease. When the battery no longer maintains a charge it should be replaced. Back to Table of contents. 11.3. -
Page 38: May I Attach A Braille Or Other Label To The Cd
Back to Table of contents. 11.3.6. May I attach a Braille or other label to the CD? No. The label can adversely affect the balance of the CD as it spins at high speed. Also, if the label should come loose inside the player it could damage the CD-ROM drive. -
Page 39: Why Do Some Mp3 Cd's That I Create On My Computer Not Play On Victor
11.3.12. Why do some MP3 CD's that I create on my computer not play on Victor? Victor will play only MP3 files. It will not play MP2 or MP4 files. Not all MP3 encoders on the market have been tested so it may also be possible that the type of MP3 encoder used by your computer's CD burning software may be incompatible. -
Page 40: Recording
11.5. Recording 11.5.1. For my Classic + With Recording, what happens if I accidentally remove the flash card without pressing eject. Victor will issue the message, "Card unsafely removed. Please press Eject before removing.". If the player was not accessing the card when you removed it, it should be okay but it is possible to lose some recorded data if the flash card is removed without pressing EJECT. - Page 41 11.5.6. When I insert my flash card, why does Victor sometimes say "Disk bad"? Try removing the card and re-inserting it several times. If the card has worked before, it may be in an invalid internal state and re-inserting the card will reset the communication with the device.
Need help?
Do you have a question about the Victor Reader Classic + and is the answer not in the manual?
Questions and answers