Table of Contents
Advertisement
Available languages
Available languages
Quick Links
Advertisement
Chapters
Table of Contents

Related Manuals for MartinLogan Statement 40XW


Summary of Contents for MartinLogan Statement 40XW
- Page 1 D r i v e r A s s e m b l y M a n u a l ®...
-
Page 2: Table Of Contents
Electronic Equipment) directive effective August 13, from whom you purchased this product, email 2005, we would like to notify you that this product info@martinlogan.com or visit the distributor locator at may contain regulated materials which upon disposal, www.martinlogan.com. according to the WEEE directive, requires special reuse Please note, only this product itself falls under the and recycling processing. -
Page 3: Content Check List
Content Check List A complete Statement 40XW is shipped in 3 boxes. This manual refers to box 3 of 3 which is the Driver Assembly. The Statement 40XW Driver Assembly contains the following items. Should you require assistance, please call our service department at (785) 749-0133. -
Page 4: Connection
See pg . 11 for additional details on making this connection . WARNING! Turn your amplifier off before making or breaking any signal connections! The amplifier is connected to the Statement 40XW through the binding posts located on the top or bottom of the in wall back box. -
Page 5: Painting The Speaker Grille
ainting the Peaker rille IMPORTANT! Before painting, remove the grille from speakers 2. Paint the grille, being careful not to plug the holes. and remove the cloth scrim attached inside the grille. The Allow the paint to dry completely before proceeding. IMPORTANT! For best results use a spray rather than a speaker includes an extra scrim. -
Page 6: Pre-Installation Checklist
nstallation heCklist NOTE: This is the second part of the Installation process . Do not proceed until all steps in the “In-wall Back Box Manual” have been completed . If using the Statement On-Wall Enclosure you may pro- ceed from Step 17 . Required Tools: -3/32 Hex Bit (Not Included) -5/32 Hex Bit (Not Included) -
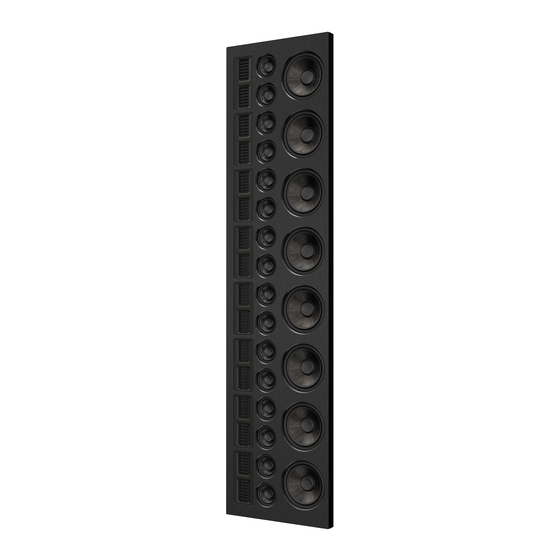
Page 7: Part Identification
dentifiCation 1 Driver Assembly 2 Baffle Protector 3 Handles 4 Trim Baffle 5 End Trim 6 Side Trim 7 Grille... -
Page 8: Installation
Peaker nstallation STEP 16: DRIVER ASSEMBLY INSTALLATION PREPARATION 16a To prepare the back box for the driver assembly installation, first remove the positioning brackets, 2 corner brackets, and 4 side brackets using a Phillips screwdriver. These brackets are held in place with 2 screws each. -
Page 9: Attach Trim Pieces
STEP 17: ATTACH TRIM PIECES 17a Before applying the trim pieces, check the interior metal edge of the install board opening. Sand away any sheet rock mud buildup so the trim will sit flush with the surface. 17b Using #2 Phillips screwdriver. apply the top and bottom trim pieces first, using the supplied machine screws. -
Page 10: Mounting The Driver Assembly
STEP 18: MOUNTING THE DRIVER ASSEMBLY THIS STEP REQUIRES 2 PEOPLE TO COMPLETE SAFELY 18a With 2 people, lift the driver assembly from its packaging using the attached handles. 18b With 2 people, carefully seat the driver assembly into the back box by guiding the driver assembly alignment pins into the mating holes on the back box. -
Page 11: Securing The Driver Assembly
19c The binding posts located on the front of the Driver STEP 19: SECURING THE DRIVER ASSEMBLY Assembly should only be used for temporary/ 19a After removing the handles and baffle protector, secure troubleshooting purposes and are not intended to be the remaining (27 total) included machine screws. -
Page 12: Attach The Front Baffle Trim
STEP 20: ATTACH THE FRONT BAFFLE TRIM 20a Carefully align the front baffle trim over the drivers and press firmly in place to secure. -
Page 13: (Optional) Apply The Logo Badge
STEP 21 (OPTIONAL): APPLY THE LOGO BADGE 21a Using the included badge application template, attach the logo to the front baffle trim. This step is optional. -
Page 14: (Optional) Apply The Speaker Grille
For those wanting to display the drivers of the Statement 40XW, the grille can remain off. For installations behind an acoustically transparent screen it is recommended that the grille remain off. -
Page 15: Dimension Drawing
DIMENSIONS 404.45mm 15.92in 3.18mm 0.13in 353.65mm 13.92in 350.00mm 13.78in DETAIL B 25.80mm 1.02in 407.06mm 16.03in DETAIL C... -
Page 16: Specifications
PeCifiCations Frequency Response:.........48–25,000 Hz ± 3 dB Tweeter Dispersion (horizontal x vertical)..80° x 52-inch line source Sensitivity..........95 dB @ 2.83 volts/ meter Impedance..........4 ohms. Compatible with 4, 6, or 8 ohm rated amps Crossover Frequencies......300, 2700 Hz High-Frequency Drivers......Sixteen Folded Motion XT Obsidian Tweeters Mid-Frequency Drivers......Sixteen 3.5-inch (8.9 cm) unidirectional carbon fiber multi-section cone with Nomex®... - Page 17 M a n u e l d e l ’ e n s e m b l e d u h a u t - p a r l e u r...
- Page 18 électriques et le revendeur auprès duquel vous avez acheté ce produit, électroniques (DEEE) en vigueur depuis le 13 août 2005, envoyer un courriel à info@martinlogan.com ou nous souhaitons vous informer que ce produit peut consulter le localisateur de distributeurs à...
-
Page 19: Check List Du Contenu
Check List du contenu Le Statement 40XW complet est expédié dans 3 boîtes. Ce manuel concerne la boîte 3 sur 3 qui est l’ensemble du haut- parleur. L’ensemble du haut-parleur Statement 40XW contient les éléments suivants. Si vous avez besoin de notre assistance, veuillez appeler notre service au (785) 749-0133. -
Page 20: Raccordement
The amplifier is connected to the Statement 40XW Voir p . 11 pour plus de détails sur comment établir cette AVERTISSEMENT ! Éteignez votre amplificateur through the binding posts located on the top or connexion . avant d’établir ou d’interrompre toute bottom of the in wall back box. -
Page 21: Peindre La Grille Du Haut-Parleur
Peindre la grille du haut-parleur 2. Peindre la grille, en faisant attention à ne pas obstruer les trous. Laissez la peinture sécher complètement avant de continuer. IMPORTANT ! Pour obtenir de meilleurs IMPORTANT ! Avant de peindre, retirez la grille des haut- résultats, utilisez un spray plutôt qu’un pinceau ou un parleurs et retirez la grille en tissu fixée à... -
Page 22: Pré-Installation De La Check-List
ré installation de la CheCk list NOTE : Cette étape constitue la deuxième partie du proces- sus d’installation . Ne procédez pas avant d’avoir terminé toutes les étapes du “Manuel du boîtier mural arrière” . Si vous utilisez le boitier au mur Statement , vous pouvez passer à... -
Page 23: Identification Des Composants
dentifiCation des ComPosants 1 Ensemble haut-parleur 2 Protecteur de baffle 3 Poignées 4 Paroi de protection 5 Paroi d’extrémité 6 Paroi latérale 7 Grille... -
Page 24: Installation
’ ’ installation de l ensemBle du haut Parleur ÉTAPE 16: PRÉPARATION DE L’INSTALLATION DE L’ENSEMBLE DU HAUT-PARLEUR 16a Afin de préparer le boîtier arrière pour l’installation de l’ensemble du haut-parleur, il faut d’abord retirer les supports de positionnement, 2 supports d’angle et 4 supports latéraux à... -
Page 25: Attacher Les Pièces De Garniture/Bordure
ÉTAPE 17: ATTACHEZ LES PIÈCES DE LA PAROI NOTE : Si vous utilisez le boîtier au mur optionnel au lieu 17a Avant d’appliquer les pièces de la paroi, vérifiez le de la méthode d’installation à l’intérieur du mur, veuillez bord métallique intérieur de l’ouverture du panneau ignorer toute référence à... -
Page 26: Du Haut-Parleur
STEP 18: MONTAGE DE L’ENSEMBLE DU HAUT-PARLEUR NOTE : L’orientation du canal de gauche est indiquée ici . Le canal de droite sera reproduit en miroir . CETTE ÉTAPE NÉCESSITE 2 PERSONNES POUR LA RÉALISER EN TOUTE SÉCURITÉ 18a Avec 2 personnes, soulevez l’ensemble du haut-parleur de son emballage en utilisant les poignées attachées. -
Page 27: Fixez L'ensemble Du Haut-Parleur
STEP 19: FIXEZ L’ENSEMBLE DU HAUT-PARLEUR NOTE : Le haut-parleur ne fonctionnera pas si ces vis ne sont pas installées . . 19a Après avoir enlevé les poignées et le protecteur du baffle, fixez les autres (27 au total) vis à machine 19c Les bornes de fixation situées à... -
Page 28: Attachez La Paroi Avant Du Baffle
ÉTAPE 20 : ATTACHEZ LA PAROI AVANT DU BAFFLE 20a Alignez soigneusement la paroi du baffle avant sur les haut-parleurs et appuyez fermement en place pour la fixer. -
Page 29: (Facultatif) Appliquez Le Badge Du Logo
ÉTAPE 21 (FACULTATIF) APPLIQUEZ LE BADGE DU LOGO 21a À l’aide du modèle de badge fourni, fixez le logo sur la paroi avant du baffle. Cette étape est facultative. -
Page 30: (Facultatif) Appliquez La Grille Du Haut-Parleur
être retirée à tout moment, si nécessaire. Pour ceux qui souhaitent afficher les haut-parleurs du Statement 40XW, la grille peut rester éteinte. Pour les installations derrière un écran acoustiquement transparent, il est recommandé... -
Page 31: Dessin Dimensionnel
DESSIN DIMENSIONNEL 404.45mm 15.92in 3.18mm 0.13in 353.65mm 13.92in 350.00mm 13.78in DETAIL B 25.80mm 1.02in 407.06mm 16.03in DETAIL C... -
Page 32: Specifications
PéCifiCations Fréquence de réponse: ......48–25,000 Hz ± 3 dB Dispersion des haut-parleurs d’aigus (horizontal x vertical) ..80° x 52-inch ligne source Sensibilité... - Page 33 otes...
- Page 34 E.I. du Pont de Nemours and Company. ® DuPont et Nomex sont des marques commerciales ou des marques déposées de E.I. du Pont de Nemours et Compagnie. ©2020 MartinLogan Ltd. All rights reserved / Tous droits réservés.
Need help?
Do you have a question about the Statement 40XW and is the answer not in the manual?
Questions and answers