Salus Quantum SQ610 Manual
Smart thermostat
Hide thumbs
Also See for Quantum SQ610:
- Full user manual (72 pages) ,
- Manual (58 pages) ,
- Manual (10 pages)
Table of Contents
Advertisement
Available languages
Available languages
Quick Links
Advertisement
Table of Contents

Related Manuals for Salus Quantum SQ610


Summary of Contents for Salus Quantum SQ610
- Page 1 YEAR WARRANTY...
-
Page 2: Product Compliance
KL08RF wiring centre, mini TRV head, RX10RF boiler control module. In order to control SQ610 over the Internet or via the SALUS Smart Home mobile app (ONLINE mode), it must be installed together with the UGE600 Internet gateway (sold separately). From the application level, it is possible to pair SQ610 with other system elements, e.g. -
Page 3: Wiring Diagram
Before you start: Wiring diagram: Select correct thermostat location AC 230V 230V~,50Hz SQ610 Mounting: to mount thermostat you can use included accessories (mounting screws). Remove plate from the back to mount it to the wall. After that just put Symbols explanation: thermostat on the plate. -
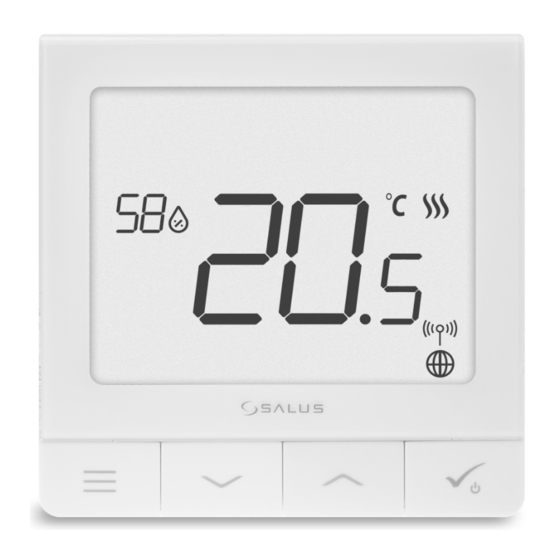
Page 4: Lcd Icon Description
LCD Icon Description Menu/Settings description + Clock Standby mode icon AM/PM Current Temperature / Setpoint Temperature Temperature unit Holiday mode Heating indicator (icon is animating when Temporary override mode there is heating demand) Settings icon Cooling indicator (icon is animating when External / Floor temp sensor indicator there is cooling demand) Schedule program number... - Page 5 Buttons Description Buttons Description Button Function 1) Menu button / Return button. 2) In the MAIN SCREEN: Press and hold for 3 sec to change the thermostat operating mode (Schedule mode / Permanent mode / Temporary override mode). 3) In the SETTINGS SCREEN: Press and hold for 3 sec to go back without saving the changes. 4) In the PAIRING SCREEN (in SYSTEM TYPE Menu): Press and hold for 3 sec to see other pairing options.
- Page 6 COMPATIBILTY WITH OTHER SALUS CONTROLS DEVICES ONLINE MODE OFFLINE MODE Universal Gateway is NOT Universal Gateway is CONNECTED TO THE INTERNET CONNECTED TO THE INTERNET You can use your devices locally You can configure and use all your without the SmartHome App.
- Page 7 YES - ONLINE, OFFLINE MODE. You can configure your thermostat with universal gateway or CO10RF coordinator. That is, add it to the Salus Smart Home system. Thermostat work as a standalone device for pump, boiler, receivers etc. That is, you...
- Page 8 After Language selection follow below steps to add your device to the Smart Home app and pair with other devices: SALUS SmartHome Go to SALUS Smart Home app Once your thermostat is added to the app you will see above screen...
- Page 9 Connect equipment Name this equipment SQ610 230V Thermostat Finish After that thermostat will show main screen. Congratulations! You succesfully configured SQ610 Quantum Thermostat.
- Page 10 Installation in OFFLINE mode Pairing with Wiring Centre / Control Box (Install the Wiring Centre / Control Box according to the instructions included with product) 5 sec 5 sec Open the ZigBee network Using buttons select the Control buttons to select Select system type: UNDERFLOOR, Box number (press PAIR button on the Control the zone number and press...
- Page 11 Pairing with TRV radiator head (Install the TRV according to the instructions included with product) 5 sec 5 sec. Open the ZigBee network 10 sec You can pair up to 6 TRV’ s with Now hold antenna button for 10 Select system type: 1 Thermostat.
- Page 12 Wired device Please note: Thermostat SQ610 Quantum can work without Universal Gateway or CO10RF Coordinator as a standalone device. Wiring diagram for volt-free connection (e.g. boiler control): COM NO BOILER CONNECTIO N AC 230V Wiring diagram for 230VAC connections: COM NO MAX 3(1) AC 230V...
- Page 13 Wiring diagram for control box connection: Legend: Pump Valve actuator Heating mat Boiler KL08 Boiler connection * - Boiler’ s contacts 1-8 Zones Power for ON/OFF thermostat (according to the boiler’ s instructions) AC 230V Please note: Self-acting SQ610 Quantum Thermostat without application support can be easily added to the Smart Home app anytime.
- Page 14 SQ610 Full menu structure DISABLE MO-FR+SA-SU Schedule settings MO-SU SINGLE DAYS TIME/DATE HOLIDAY MODE THERMOSTAT CALIBRATION SHOW/HIDE DISPLAY HUMIDITY User settings SHOW/HIDE DISPLAY FLOOR STANDBY TEMP SETPOINT HEAT/COOL RESET USER SETTINGS TEMPERATURE SCALE DISPLAY TEMPERATURE RESOLUTION HEAT CONTROL ALGORITHM COOL CONTROL ALGORITHM S1/S2 INPUT MINIMUM SETPOINT MAXIMUM SETPOINT...
- Page 15 S1/S2 input of SQ610RF. Additionally, by connecting a NO type of ON/OFF voltage- free contact, you can use this input as a OneTouch rules trigger (programmed in the Salus Smart Home app) or as a Heat/Cool changeover.
- Page 16 Der SQ610 Quantum ist ein ZigBee-Temperaturregler zur Funk Steuerung von Geräten der iT600-Serie, z.B. Die Klemmleiste KL08RF, den TRV10RFM (Thermostatkopf ) oder den RX10RF Kesselsystem-Empfänger Um den SQ610 über das Internet und die mobile SALUS Smart Home-App (ONLINE-Modus) zu regelen, muss er zusammen mit dem Internet-Gateway UGE600 (separat erhältlich) installiert werden. Ausgehend von der Anwendungsebene ist es möglich SQ610 mit anderen Systemelementen zu verbinden, z.B.
-
Page 17: Bitte Beachten
Der Anfang: Schaltplan (S1, S2 Eingang): Wählen Sie den richtige Montageort AC 230V 230V~,50Hz SQ610 Montage: zur Montage des Thermostats können Sie mitgeliefertes Zubehör (Befestigungsschrauben) Symbolik: verwenden. Entfernen Sie die Platte von der Rückseite, S – potentialfreie Kontakte um sie an der Wand zu montieren. Danach einfach T –... - Page 18 LCD Symbol Beschreibung Menü/Einstellung Beschreibung + Uhrzeit Standby-Modus-Symbol AM/PM Aktuelle Temperatur / Sollwerttemperatur Temperatur Einheit Urlaubsmodus Heiz-anforderung (Symbol ist animiert bei Heizan Temporärer Override-modus foderung) Einstellungssymbol Kühl-anforderung (Symbol ist animiert bei Externe / Boden-Temperatursensor-Anzeige Kühlan foderung) Programmnummer Funkverbindungs Indikator Programm-Modus-Symbol Internetverbindungs Indikator Tagesanzeige/ Einstell-Informationen Anwesenheitssensor (Hotel Schlüsselkarte)
- Page 19 Tasten Beschreibung Tasten Beschreibung Taste Funktion 1) Menütaste /Zurücktaste 2) In der Hauptanzeige: Für 3 Sek gedrückt halten um den Betriebsmodus zu ändern (Programm / Manuell / kurzfristiger Override). 3) Im der Einstellungsanzeige: Für 3 Sek gedrückt halten um zurückzukehren ohne die Änderun- gen zu speichern.
- Page 20 KOMPATIBILTY MIT ANDEREN SALUS CONTROLS GERÄTEN ONLINE MODUS OFFLINE MODUS Universelles Gateway ist NICHT Universelles Gateway ist VERBUNDEN MIT DEM INTERNET VERBUNDEN Sie können Ihre Geräte lokal ohne die INTERNET Sie können alle Ihre SmartHome App verwenden. Gateway Geräte in der Smart Home App...
- Page 21 Sie können Ihren Thermostat mit Universellen Gateway oder CO10RF- Koordinator konfigurieren. Das heißt, fügen Sie es dem Salus Smart Home System hinzu. NEIN - STANDALONE. Thermostat arbeitet als Standalone-Gerät für Pumpe, Kessel, Empfänger usw. Das heißt, Sie können den Thermostat direkt an ausgewählte Geräte ohne Netzwerksystem anschließen.
- Page 22 Führen Sie nach der Sprachauswahl die folgenden Schritte aus, um Ihr Gerät zur Smart Home-App hinzuzufügen und mit anderen Geräten zu koppeln: SALUS SmartHome Zur SALUS Smart Home App Sobald Ihr Thermostat der App hinzugefügt wurde, sehen Sie den obrigen Bildschirm auf der...
- Page 23 Geräte verbinden Benennen Się dieses Gerät SQ610 230V Thermostat Fertig Danach wird der Hauptbildschirm angezeigt. Glückwunsch! Sie haben den SQ610RF Quantum Thermostat erfolgreich konfiguriert.
- Page 24 Installation im OFFLINE Modus Koppeln mit Klemmleiste / Steuerbox (Installieren Sie die Klemmleiste / Control Box gemäß den im Lieferumfang enthaltenen Anweisungen): 5 sek. ODER 5 sek. Öffnen Sie das ZigBee-Netzwerk oder Verwenden sie die Tasten um die Verwenden Sie oder Wählen Sie Den Systemtyp: Nummer der Klemmleiste auszuwählen (drücken...
- Page 25 Kopplung mit TRV-Heizkörperkopf (Installieren Sie den TRV gemäß den im Lieferumfang enthaltenen Anweisungen): 5 sek. ODER 5 sek. 3 Öffnen Sie das ZigBee-Netzwerk 10 sec Halten Sie nun die Antennentaste für Sie können bis zu 6 TRVs mit Systemtyp auswählen: 1 Thermostat verbinden.
- Page 26 Kabelgebundenes Gerät Bitte beachten Sie: Der Thermostat SQ610 Quantum kann ohne Universellem Gateway oder CO10RF Coordinator als eigenständiges Gerät arbeiten. Schaltplan für Potentialfreien Anschluss (z.B. Kesselsteuerung): COM NO Kesselanschluss* BOILER CONNECTIO N AC 230V Schaltplan für 230VAC-Anschlüsse: COM NO MAX 3(1) AC 230V...
- Page 27 Schaltplan für Klemmleiste: Legende: Pumpe Stellantrieb Heizmatte Kessel KL08 Kesselanschluss * - Kesselkontakte 1-8 Zonen 1-8 Zones Power für ON/OFF Thermostat (gemäß den Klemmen des Kessels) AC 230V Bitte beachten Sie: Freie SQ610 Quantum Thermostat ohne APP Anwendung können jederzeit zur Smart Home App sehr einfach hinzugefügt werden.
- Page 28 SQ610 Vollständige Menüstruktur MO-FR+SA-SO Programmeinstellung MO-SO EINZELNE TAGE ZEIT/DATUM URLAUBSMODUS THERMOSTAT-KALIBRIERUNG FEUCHTIGKEIT ANZEIGEN/AUSBLENDEN Benutzereinstellungen SENSOR ANZEIGEN/AUSBLENDEN STANDBY TEMP-SOLLWERT HEAT/COOL ZURÜCKSETZEN VON BENUTZEREINSTELLUNGEN TEMPERATURSKALA ANZEIGE TEMPERATURAUFLÖSUNG HEIZUNGSTEUERUNGSALGORITHMUS KÜHLUNGSSTEUERUNG-ALGORITHMUS S1/S2 INPUT MINIMALER SOLL MAXIMALER SOLL Admin VENTILSCHUTZ Einstellungen INTERNES RELAIS (COM/NO) 5. MINIMALE AUSSCHALTZEIT OPTIMIERUNGSFUNKTION KOMORT BODENTEMP...
- Page 29 3. S1/S2 INPUT: Ein Bodensensor, ein externer Temperatursensor oder ein Anwesenheitssensor können an den S1/S2-Eingang von SQ610RF angeschlossen werden. Darüber hinaus können Sie diesen Eingang als OneTouch-Regelauslöser (programmiert in der Salus Smart Home App) oder als Heiz/Kühl-Wechsel verwenden, indem Sie einen NO-Kontakt von ON/OFF-potentialfreinen kontakt anschließen.
-
Page 30: Información De Seguridad
Smart Home, como por ejemplo el centro de conexiones KL 08RF, el cabezal de radiador TRV, etc... Para controlar el SQ 610 a través de Internet o mediante la aplicación móvil SALUS Smart Home (modo ONLINE), debe instalarse la puerta de enlace universal UGE 600 (se vende por separado). Desde la aplicación, es posible emparejar SQ 610 con otros elementos del sistema, Smart Home como el Enchufe SPE 600, o el sensor de ventana / puerta SW 600. -
Page 31: Antes De Empezar
Antes de empezar: Esquema de cableado AC 230V Seleccione la ubicación correcta del termostato 230V~,50Hz SQ610 Montaje: para montar el termostato puede usar los accesorios incluidos (tornillos de montaje). Realice el cableado necesario, coloque la placa base del termostato sobre la caja y después de Explicación de los símbolos: esto, simplemente coloque el termostato sobre S –... - Page 32 Descripción de los iconos LCD 1. Menú / Descripción de la configuración + Reloj 10. Icono de apagado 2. AM / PM 11. Temperatura actual / temperatura de consigna 3. Unidad de temperatura 12. Modo vacaciones 4. Indicador de calefacción (el icono se anima cuando 13.
- Page 33 Descripción de los botones Descripción de los botones Botón Función 1) Botón menú / botón retorno. 2) Estando en la PANTALLA PRINCIPAL: Presione y mantenga presionado durante 3 segundos para cambiar el modo de funcionamiento del termostato (modo de programación / modo permanente / modo de anulación temporal).
- Page 34 COMPATIBILIDAD CON OTROS DISPOSITIVOS DE CONTROL DE SALUS El termostato SQ 610 puede funcionar en modo ONLINE u OFFLINE. En el primer paso, debe decidir en qué modo funcionará su termostato. MODO ONLINE MODO OFFLINE La puerta de enlace UGE 600 La puerta de enlace UGE 600 está...
- Page 35 Primera secuencia de encendido Atención: Para una fácil instalación, asegúrese de haber agregado otros dispositivos a su red ZigBee, como la caja de conexiones para suelo radiante (KL 08RF) o los actuadores radiofrecuencia de radiador (TRV), etc. software version Para encender el termostato, debe ...
- Page 36 Smart Home y emparejarlo con otros dispositivos: CONECTAR CONECTAR CON LA RED CON LA RED SALUS SmartHome Vaya a la aplicación SALUS Smart Home IR A SMART HOME APP Una vez que haya agregado su termostato a la aplicación, verá la siguiente pantalla LCD.
- Page 37 Connectar el equipo Nombre del equipo Termostato SQ 610 Terminado Después de eso, el termostato mostrará la pantalla principal. ¡Felicidades! Ha configurado correctamente el termostato SQ 610 Quantum.
- Page 38 Instalación en modo OFFLINE Emparejamiento con el centro de conexiones (Instale el centro de conexiones de acuerdo con las instrucciones incluidas con el producto) 5 s. Conectado Conectado a la red a la red 5 s. Poner coordinador en modo emparejamiento TIPO SISTEMA SELECCIONE SELECCIONE EL...
- Page 39 Emparejamiento con el actuador radiofrecuencia para radiador TRV (Instale el TRV de acuerdo con las instrucciones incluidas en el producto) 5 s. Conectado Conectado a la red a la red 5 s. Poner coordinador en modo emparejamiento TIPO SISTEMA TRV PULSE RADIADORES ANTENA 10 s.
- Page 40 Dispositivo cableado Atención: Tenga en cuenta que el termostato SQ610 Quantum puede funcionar de forma autónoma, como un dispositivo independiente, sin necesidad de una puerta de enlace o un coordinador. Esquema de cableado para conexión sin tensión (por ejemplo, control de caldera): Conexión de caldera COM NO BOILER CONNECTIO N...
- Page 41 Esquema de cableado para la conexión de la caja de conexiones: Leyenda: Bomba Actuador Resistencia de calentamiento Caldera KL08 1-8 Zonas 1-8 Zones Power AC 230V Atención: El termostato SQ 610 Quantum se puede agregar fácilmente a la aplicación Smart Home en cualquier momento.
- Page 42 SQ 610 Estructura completa del menú INHABILITAR CONFIGURACIONES LU-VI+SA-DO LU-DO DE HORARIO DÍAS SENCILLOS HORA / FECHA MODO VACACIONES CALIBRACIÓN DEL TERMOSTATO AJUSTES DE MOSTRAR / OCULTAR VALOR DE HUMEDAD USUARIO MOSTRAR / OCULTAR VALOR DE SUELO AJUSTE DE TEMPERATURA ANTIHIELO FRÍO / CALOR RESTABLECER LA CONFIGURACIÓN DEL USUARIO UNIDAD DE TEMPERATURA...
- Page 43 S1 / S2 de SQ 610RF. Además, al conectar un contacto libre de tensión ON / OFF, puede usar esta entrada como un activador de reglas OneTouch (programado en la aplicación Salus Smart Home) o como un cambio de frío / calor.
-
Page 44: Conformidade Do Produto
Smart Home, como o centro de conexão KL 08RF, o cabeçal do radiador TRV, etc. Para controlar o SQ 610 via Internet ou através do aplicativo móvel SALUS Smart Home (modo ONLINE), a porta de enlace universal UGE 600 (vendido separadamente) deve ser instalada. A partir do aplicativo, é possível emparelhar o SQ 610 com outros elementos do sistema, o Smart Home, como o plug SPE 600, ou o sensor de janela / porta SW 600. -
Page 45: Antes De Começar
Antes de começar: Esquema de cablagem AC 230V Selecione a locallização correta do termostato 230V~,50Hz SQ610 Montagem: para montar o termostato, você pode usar os acessórios incluídos (parafusos de montagem). Faça a fiação necessária, coloque a placa de base do termostato na caixa e depois Explicação dos símbolos: disso, basta colocar o termostato na placa. - Page 46 Descrição dos icones LCD 1. Menú / Descrição da configuração + Relógio 10. Icone de desligado 2. AM / PM 11. Temperatura atual / temperatura de set-point 3. Unidade de temperatura 12. Modo férias 4. Indicador de aquecimento (o ícone fica animado 13.
- Page 47 Descrição dos botões Descrição dos botões Botão Função 1) Botão menú / botão retorno. 2) Ao estar no ecrã parcial ECRÃ PRINCIPAL: Carregue e mantenha pressionado durante 3 segundos para mudar o modo de funcionamento do termostato (modo de programação / modo permanente / modo de anulação temporária).
- Page 48 COMPATIBILIDADE COM OUTROS DISPOSITIVOS DE CONTROLO DE SALUS O termostato SQ 610 pode operar no modo ONLINE ou OFFLINE. Na primeira etapa, você deve decidir como o termostato funcionará. MODO ONLINE MODO OFFLINE A porta de enlace UGE 600 A porta de enlace UGE 600 está...
- Page 49 Primeira sequencia de ligação Atenção: Para facilitar a instalação, adicione outros dispositivos à sua rede ZigBee, como a caixa de junção de piso radiante (KL 08RF) ou os atuadores do radiador de radiofrequência (TRV), etc.. software versAO Para ligar o termostato, você ...
- Page 50 Smart Home e emparelhe-o com outros dispositivos: CONECTAR CONECTAR A REDE A REDE SALUS SmartHome Vaya a la aplicación SALUS Smart Home IR A SMART HOME APP Depois de adicionar o termostato ao aplicativo, você verá a seguinte tela LCD.
- Page 51 Ligar a equipe Nome da equipe Termostato SQ 610 Terminé Depois disso, o termostato exibirá o ecrã principal. Parabéns! Você configurou com sucesso o termostato SQ 610 Quantum.
- Page 52 Instalação em modo OFFLINE Emparelhamento com o centro de conexões (Instale o centro de conexões de acordo com as instruções incluídas no produto) 5 s. CONECTAR CONECTAR A REDE A REDE 5 s. Por coordenador no modo emparelhamento TIPO SISTEMA SELECIONE SELECIONE O PISO RAD.
- Page 53 Emparelhamento com o atuador radiofrequencia para radiador TRV (Instale o TRV de acordo com as instruções incluídas no produto) 5 s. CONECTAR CONECTAR A REDE A REDE 5 s. Coloque o coordenador no modo de emparelhamento TIPO SISTEMA PRES. TRV RADIADORES ANTENA 10 s.
- Page 54 Dispositivo cablado Atención: Observe que o termostato Quantum SQ 610 pode operar de forma autônoma, como um dispositivo independente, sem a necessidade de uma porta de enlace ou um coordenador. Diagrama de fiação para conexão sem tensão (por exemplo, controle de caldeira): Conexão da caldeira COM NO BOILER CONNECTIO N...
- Page 55 Diagrama de fiação para conexão da caixa de conexão: Lenda: Bomb Atuador Resistência de aquecimento Caldeira KL08 1-8 Áreas 1-8 Zones Power de atuação AC 230V Atenção: O termostato SQ 610 Quantum pode ser facilmente adicionado ao aplicativo Smart Home a qualquer momento.
- Page 56 SQ 610 Estructura completa do menú DESABILITAR CONFIGURAÇÕES SE-SE+SA-DO SE-DO DE HORÁRIO DIAS SIMPLES HORA / DATA MODO FÉRIAS CALIBRACÃO DO TERMOSTATO AJUSTES DE MOSTRAR / OCULTAR VALOR DE HUMIDADE UTENTE MOSTRAR / OCULTAR VALOR DE PISO AJUSTE DE TEMPERATURA ANTIGELO FRIO / CALOR RESTABELECER A CONFIGURAÇÃO DO UTENTE UNIDADE DE TEMPERATURA...
- Page 57 à entrada S1 / S2 do SQ 610RF. Além disso, ao conectar um contato ON / OFF sem tensão, você pode usar esta entrada como um acionador de regra OneTouch (programado no aplicativo Salus Smart Home) ou como uma troca quente / fria.
- Page 58 English Deutsch QUANTUM SQ610 QUANTUM SQ610 Spannungsversorgung AC 230 V Power Supply AC 230 V Temperaturbereich 5-40°C Temperature range 5-40°C Temp. Anzeigegenauigkeit 0.5°C oder 0.1°C Display temperature accuracy 0.5°C or 0.1°C Regel Algorithmus ITLC Control algorithm ITLC SPAN SPAN (±0.25°C / ±0.5°C) (±0.25°C / ±0.5°C)
- Page 59 Español Português SQ 610 QUANTUM SQ 610 QUANTUM Alimentação AC 230 V Alimentación AC 230 V Faixa 5-40 °C Rango 5-40 °C Precisão 0.5 °C ou 0.1 °C Precisión 0.5 °C o 0.1 °C ITLC Algoritmo de controlo Algoritmo de control ITLC SPAN SPAN...
- Page 60 S60 1SD United Kingdom Universal Quantum Universal Connect it with Pair with Connect it with Gateway and setup your achieve perfect Gateway control own SALUS Smart Home temperature everywhere, wirelessly pumps, valves, system not only beside the radiator boilers, lighting etc...
Need help?
Do you have a question about the Quantum SQ610 and is the answer not in the manual?
Questions and answers