Table of Contents
Advertisement
Available languages
Available languages
Quick Links
Advertisement
Table of Contents

Related Manuals for Warmtech PR1501


Summary of Contents for Warmtech PR1501
- Page 1 PR1501 PR2001 1500W 2000W 220-240V~ 50/60Hz PANNEAU RAYONNANT TRADUCTION DES INSTRUCTIONS D’ORIGINE WARMTESTRAALRADIATOR VERTALING VAN DE ORIGINELE INSTRUCTIES RADIANT PANEL HEATER ORIGINAL INSTRUCTIONS S20 M05 Y2016...
- Page 2 Montage du sèche-serviette handdoek rail montage Installation of towel rail Humidificateur – Luchtbevochtiger - Humidifier...
- Page 3 PANNEAU RAYONNANT Nous vous remercions d'avoir choisi notre produit. Veuillez lire attentivement ce mode d'emploi avant d'utiliser l'appareil. · Ne couvrez pas l’appareil quand il fonctionne pour éviter les risques de surchauffe. Risque de lésion corporelle ou de dégâts matériel. CE Conformément aux normes Européennes...
-
Page 4: Apparence Du Produit
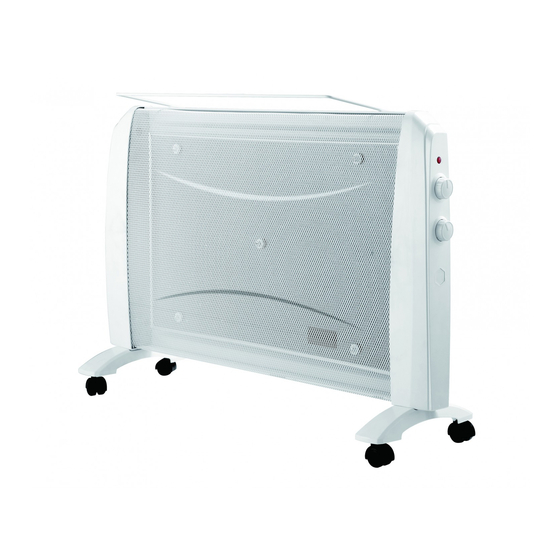
APPARENCE DU PRODUIT POWER LIGHT TÉMOIN D'ALIMENTATION POWER SETTING SWITCH INTERRUPTEUR MARCHE/ARRÊT THERMOSTAT THERMOSTAT HEATING PLATE PLAQUE DE CHAUFFAGE SIDE PANEL PANNEAU LATÉRAL GRILLE SUPPORTING LEG JAMBE DE SUPPORT TRUCKLE ROULETTE... - Page 5 CARACTERISTIQUES TECHNIQUES PRINCIPALES Fréquence Puissance Modèle Tension nominale nominale nominale PR1501 220-240V~ 50/60Hz 1500W PR2001 220-240V~ 50/60Hz 2000W III. PRECAUTIONS POUR UNE UTILISATION SURE Veuillez lire attentivement le mode d'emploi du produit avant de faire fonctionner l'appareil de chauffage. Brancher la fiche dans la prise de courant (caractéristiques de la prise et du câble d'alimentation : AC 220-240V~, 50/60Hz, ≥10A).
- Page 6 11) Afin d'éviter une surcharge de courant, ne partagez pas l'utilisation d'une prise de courant avec d'autres appareils. 12) L'appareil de chauffage ne doit pas être situé directement en dessous d'une prise de courant fixe. 13) Si le câble d'alimentation est endommagé, il doit être remplacé par le fabricant, son agent de maintenance ou des personnes de qualification similaire afin d'éviter un danger potentiel.
-
Page 7: Installation
IV. INSTALLATION (Le produit peut être monté de deux façons : au sol et au mur). 1. Installation autonome : Sortir d'abord l'appareil de chauffage de l'emballage et le placer à l'envers sur une surface douce. Ensuite, prendre quatre vis des accessoires (deux vis pour chaque roulette, placer le chanfrein de la console de roulette parallèlement au chanfrein du radiateur;... - Page 8 Enclencher l'appareil de chauffage sur un des réglages de puissance suivants. A) PR1501 : pousser l'interrupteur une fois (I) pour 750W pousser l'interrupteur deux fois (II) pour 1500W B) PR2001 :...
-
Page 9: Schema Electrique
aiguilles d'une montre diminue la température de consigne. Ne jamais recouvrir jamais l'appareil de chauffage lorsqu'il est en service. Il y a risque d'incendie en cas de recouvrement de l'appareil de chauffage. Lorsque vous avez fini d'utiliser l'appareil de chauffage, coupez l'interrupteur et mettez le bouton de commande du thermostat en position "basse"... -
Page 10: Maintenance
MAINTENANCE Mettre tout d’abord l’appareil hors tension et retirer la fiche secteur de la prise ! Nettoyer le boîtier avec un chiffon humide, un aspirateur ou une brosse. Ne pas utiliser de détergents abrasifs ou corrosifs ! Pour nettoyer l’appareil, ne jamais utiliser de produits inflammables tels que de l’essence ou de l’alcool. - Page 11 ENTREPOSAGE Nettoyez soigneusement toute la machine et ses accessoires. Entreposez-la hors de la portée des enfants, dans une position stable et sûre, dans un lieu sec et tempéré, évitez les températures trop hautes ou trop basses. Protégez-la du rayonnement direct du soleil. Tenez-la, si possible, dans le noir. Ne l’enfermez pas dans des sacs en plastique car de l’humidité...
- Page 12 WARMTESTRAALRADIATOR Dank u voor de keuze van ons product. Lees deze instructies zorgvuldig door vooraleer in gebruik te nemen! Bedek niet het toestel wanneer het loopt oververhittende risico's te vermijden. Waarschuwing/gevaar! CE Conform de Europese toepasselijke standaarden op het gebied van veiligheid. Gelieve deze handleiding te bewaren, zelfs na het installeren van het apparaat.
- Page 13 I. PRODUCTUITZICHT POWER LIGHT AAN/UIT-LICHTJE POWER SETTING SWITCH AAN/UIT-SCHAKELAAR THERMOSTAT THERMOSTAAT HEATING PLATE VERWARMINGSPLAAT SIDE PANEL ZIJPANEEL SUPPORTING LEG STEUNPOOT TRUCKLE ROLWIELTJE...
-
Page 14: Technische Gegevens
II. TECHNISCHE GEGEVENS Nominale Nominaal Model Nominale spanning frequentie vermogen PR1501 220-240V~ 50/60Hz 1500W PR2001 220-240V~ 50/60Hz 2000W III. VOORZORGSPUNTEN VOOR EEN VEILIG GEBRUIK 1) Gelieve de producthandleiding zorgvuldig te lezen vooraleer het verwarmingstoestel in gebruik te nemen. Steek de stekker in een wandstopcontact (de vereisten voor stopcontact en voedingssnoer: AC 220-240V~, 50/60Hz, ≥10A). - Page 15 12) Het verwarmingstoestel mag niet worden geïnstalleerd onder een vast wandstopcontact. 13) Als het voedingssnoer beschadigd is, moet dit worden vervangen door de fabrikant of zijn hersteldienst of een vergelijkbare ervaren persoon om eventuele gevaren te voorkomen. 14) Gebruik het product nooit met automatische inschakelprogrammaklok, timer of ander installatietypes.
- Page 16 2.Montage tegen de wand: Gebruik eerst een elektrische boormachine om twee gaten in de wand te boren. Voor de diameter en diepte voor de boorgaten kunt u hier de afstand tussen de vier gaten aantreffen. More than 1 M Meer dan 1 M More than 0.5 M Meer dan 0,5 M More than 0.4 M...
- Page 17 Schakel het verwarmingstoestel naar één van de volgende regelstanden. A) PR1501: Duw de schakelaar naar stand één (I) voor 750W Duw de schakelaar naar stand two (II) voor 1500W B) PR2001: Duw de schakelaar naar stand één (I) voor 1000W...
- Page 18 VI. BEDRADINGSSCHEMA tip-over switch kantelschakelaar thermostat control thermostaatregeling switch schakelaar power light aan-lampje electrical heating plate Elektrische verwarmingsplaat...
- Page 19 ONDERHOUD • Eerst het apparaat uitschakelen en de stekker uit het stopcontact trekken! • De behuizing met een vochtige doek, stofzuiger of stofborstel reinigen. • Geen schurende of caustische reinigingsmiddelen gebruiken! • Gebruik nooit licht ontvlambare schoonmaakproducten zoals benzine of spiritus om het apparaat te reinigen.
- Page 20 KLANTENSERVICE EN GEBRUIKSADVIEZEN Onze klantenservice beantwoordt uw vragen over reparatie en onderhoud van uw product en over vervangingsonderdelen. Explosietekeningen en informatie over vervangingsonderdelen vindt u ook op :www.eco-repa.com Het WARM TECH-team voor gebruiksadviezen helpt u graag bij vragen over onze producten en toebehoren : sav@eco-repa.com OPSLAG Reinig zorgvuldig de gehele machine en het toebehoren.
-
Page 21: Garantie
GARANTIE Lees de bijgevoegde garantievoorwaarde door voor de termijnen en voorwaarde van garantie. MILIEU Als uw machine na verloop van tijd aan vervanging toe is, geef hem dan niet met het huisvuil mee, maar zorg voor een milieuvriendelijke verwerking WARM TECH 81, rue de gozée 6110 Montigny-le-Tilleul Belgique... - Page 22 RADIANT PANEL HEATER Thank you for using our products. Please read this instruction manual carefully before operation! Make sure that the air inlet and outlet openings are not blocked. To avoid any risk of fire, do not cover the heater (ex. With clothes) Warning / Danger! In accordance with essential applicable...
- Page 23 Ⅰ Ⅰ Ⅰ Ⅰ . PRODUCT APPARENCE Ⅱ Ⅱ Ⅱ Ⅱ . MAIN TECHNICAL DATE Model Rated Voltage Rated Frequency Rated Power PR1501 220-240V~ 50/60Hz 1500W PR2001 220-240V~ 50/60Hz 2000W Ⅲ Ⅲ Ⅲ Ⅲ .PRECAUTION ITEMS FOR SAFE USE 1) Please read the product manual carefully before using the heater.
- Page 24 7) Never use the heater outdoors. 8) Do not use this heater in the immediate surroundings of a bath, a shower or a swimming pool 9) Do not use the appliance in area where gasoline, paint and flammable liquid are used to stored. 10) Never cover anything on the heater during use.
- Page 25 Ⅳ Ⅳ Ⅳ Ⅳ . HOW TO INSTALL (The product has tow installation methods:Desk-top and wall mount) 1.Free standing installation: First, take the heater out the package and place it upside down on soft surface. Second, take four screws from the accessories(two screw for each castor, parallel the bevel of castor bracket to the bevel of the heater, if installed reversely, the screw cannot be revolved in.)and aim them at the taps to tighten them.
-
Page 26: Operation
2) Switch the heater to one of the following power settings. A) PR1501 : Push switch one (I) for 750W Push switch two (II) for 1500W B) PR2001 : Push switch one (I) for 1000W Push switch two (II) for 2000W 3) The power switch lights up when activated. - Page 27 Ⅵ Ⅵ Ⅵ Ⅵ .CIRCUIT DIAGRAM...
-
Page 28: Service Department
SERVICE DEPARTMENT _ Damaged switches must be replaced by our after-sales service department. _ If replacing the power cord is necessary, it should be done by the manufacturer or his agent to avoid a hazard. · All repairs must be referred to authorised personnel! ·... - Page 29 GUARANTEE Refer to the enclosed guarantee conditions for the terms and conditions of guarantee. ENVIRONMENT Should your machine need replacement after extended use, do not put it in the domestic waste but dispose of it in an environmentally safe way. WARM TECH 81, rue de gozée 6110 Montigny-le-Tilleul...
- Page 31 PR1501 SN : 2016.06:001~500 29.04.11629 Date d’arrivée – Aankomstdatum - Arrival date – Ankunftsdatum: 01/08/2016 Année de production - Productiejaar - Production year - Fertigungsjahr : 2016 PR2001 SN : 2016.06:001~500 29.04.11629 Date d’arrivée – Aankomstdatum - Arrival date – Ankunftsdatum: 01/08/2016...
- Page 32 81, rue de Gozée 6110 Montigny-le-Tilleul Belgique Tél : 0032 71 29 70 70 Fax : 0032 71 29 70 86 S.A.V sav@eco-repa.com Service Parts separated 32 / 71 / 29 . 70 . 83 32 / 71 / 29 . 70 . 86 Fabriqué...
Need help?
Do you have a question about the PR1501 and is the answer not in the manual?
Questions and answers